Stellar Repair for Outlook
- 1. About Stellar Repair for Outlook
- 2. About the Guide
 3. Getting Started
 4. Working with the Software
- 4.1. Select and Repair File
- 4.2. Preview Repaired File
- 4.3. Find, View and Save a Single Message
 4.4. Save Repaired File
- 4.5. Save All Contacts as CSV
- 4.6. Save Log Report
- 4.7. Save and Load Scan Information
- 4.8. How to Apply Advance Filter
- 4.9. Importing PST file in MS Outlook
- 4.10. Changing the Software Language
- 5. Frequently Asked Questions (FAQs)
- 6. About Stellar

4.4.5. Save as Other Formats
Stellar Repair for Outlook saves the repaired file in MSG, EML, RTF, PDF, HTML or MBOX formats. With the Naming Convention option, the mail items can be saved with specific names such as Subject of the e-mail, Date of the e-mail, and Sender of the e-mail.
Note: Before you begin saving the repaired files, ensure that you close Microsoft Outlook.
Steps to save the repaired file:
-
Run Stellar Repair for Outlook.
-
See Select and Repair File, to know how to select and repair the corrupt file.
-
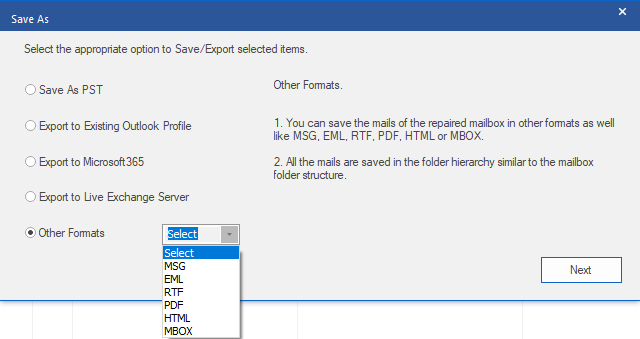
Click Save Repaired File from the Home ribbon to open the Save As window.
-
From the Save As window, select the Other Formats option. Drop-down list box enables.

-
Select any one of the formats (MSG, EML, RTF, PDF, HTML or MBOX) from the item list and click Next.
-
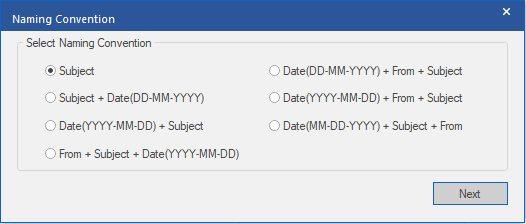
Naming Convention window appears, select anyone from the following options:
-
Subject - The repaired file will be saved with the name as the respective email message's subject.
-
Subject + Date(DD-MM-YYYY) - The repaired file will get saved with the name as the respective email message's subject, and date.
-
Date(YYYY-MM-DD) + Subject - The repaired file will get saved with the name as the respective email message's date and subject.
-
From + Subject + Date(YYYY-MM-DD) - The repaired file will get saved with the name as the respective email message's sender, subject, and date.
-
Date(DD-MM-YYYY) + From + Subject - The repaired file will get saved with the name as the respective email message's date, sender, and subject.
-
Date(YYYY-MM-DD) + From + Subject - The repaired file will get saved with the name as the respective email message's date, sender and, subject.
-
Date(MM-DD-YYYY) + Subject + From - The repaired file will get saved with the name as the respective email message's date, subject, and sender.
-

-
Click Next.
-
Select Destination screen appears. Click Browse to save the repaired file at the specified destination.

Note:
-
The "Recover Deleted Items" checkbox is selected by default. Uncheck it if you do not require recovery of deleted items.
-
Click Apply Advance Filter if you want to apply the filter on the repaired files.
-
Click OK. A window appears and shows the status of Saving in progress.
-
After successful saving completion, the Saving Complete dialog box appears with the message, "Selected messages saved successfully".

11. Click the 'Open containing folder' link to view the saved messages.