Stellar Repair for Exchange
- 1. About Stellar Repair for Exchange
- 2. About the Guide
 3. Getting Started
 4. Working with the Software
- 4.1. Select and Scan EDB Files
- 4.2. Preview Scanned Files
- 4.3. Save and Load Scan Info
 4.4. Save Scanned Files
- 4.5. Search and Save Scanned Files
- 4.6. Recover Deleted Emails
- 4.7. View Log Report
- 4.8. Apply Filter
- 4.9. Importing PST file in MS Outlook
- 4.10. Performing Dial Tone Recovery
- 4.11. Folder limits recommended by Microsoft
- 4.12. Changing the Software Language
- 5. Frequently Asked Questions (FAQ)
- 6. About Stellar

4.4.1. Export Mailbox to Live Exchange Server
Stellar Repair for Exchange allows you to export your repaired mailboxes to the mailbox of a mounted database on a Live Exchange Server. If your Exchange database is not mounted on the Live Exchange Server then perform a Dial Tone Recovery process to mount the database.
See Dial Tone Recovery, to know how to perform the Dial Tone Recovery process.
Note: If the Administrator account exists in the corrupt database, the client has the Dial Tone Recovery option available.
To know how to export data to a Live Exchange Server refer to the topics as follows:
Note: All the mailboxes on the Destination Exchange Server to which you want to export the data must have Admin rights.
To Export Multiple Mailboxes to Exchange Server:
1. Select the mailboxes or mailbox items that you want to export from the navigation tree.
Note: The Admin account must be configured in the same domain as the Exchange Server. All Users having their mailboxes on the Destination Exchange Server must be assigned Admin rights, for their data to be exported.
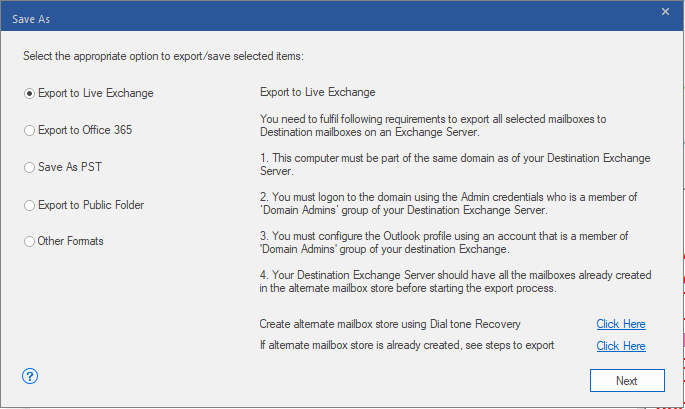
2. Click Save button from the Home ribbon. A Save As dialog box opens.
3. Select Export to Live Exchange from the list of options on the Save As dialog box.

4. Click Next to proceed.
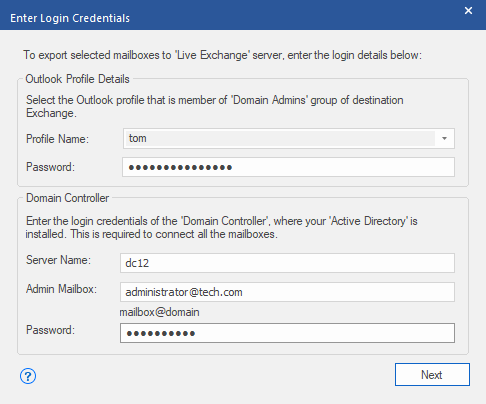
5. A Enter Login Credentials dialog box appears that consist of two sections as shown below:

-
Outlook Profile Details: Enter the details of the user's Outlook profile with administrator rights to export data to the destination mailbox of the Exchange Server.
-
Profile Name: Select the configured Outlook Profile from the drop down list.
-
Password: Enter the password of the Outlook Profile.
-
Domain Controller: To connect all the mailboxes, enter details of the 'Domain Controller' where your 'Active Directory' is installed.
-
Server Name: Enter the Server name.
-
Admin Mailbox: Enter the administrator email id for the Exchange Server.
-
Password: Enter the password of the administrator login id of the Exchange Server. Click Next to continue.
Note:
-
The Server Name you are giving as an input in Domain Controller section in Enter Login Credential dialog box should be similar to that of the system on domain.
-
You must log on to the domain using the Admin credentials of a user who is a member of the ‘Domain Admins’ group of your Destination Exchange Server.
-
Full-Mailbox permissions are mandatory for the user to whom the data is being exported.
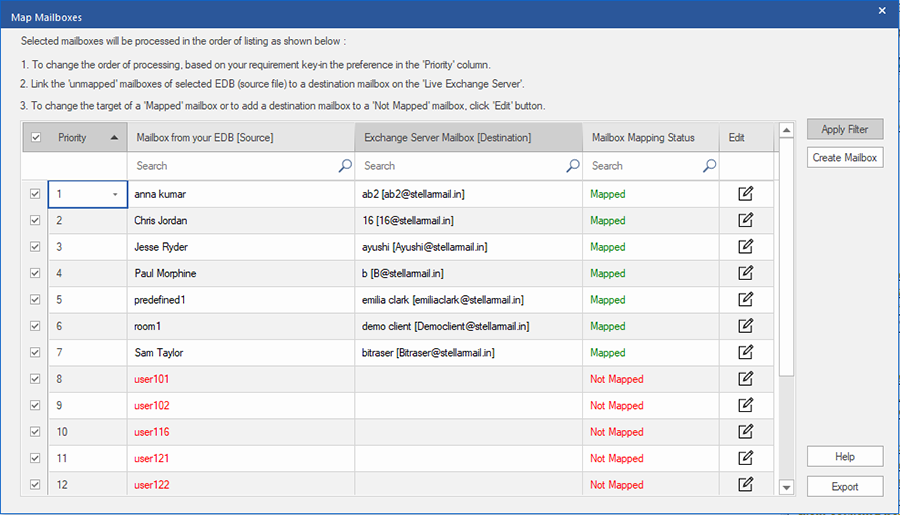
6. Map Mailboxes screen appears displaying mapped and unmapped mailboxes. By default, all repaired mailboxes are listed in alphabetical order. This screen can be used for functions such as setting priority to export the mailbox data, map source mailboxes to desired destination mailboxes, applying a filter for exporting the data, etc. See the Mapping of Mailboxes for Live Exchange Server section to know the detailed information about the Map Mailboxes screen.

Note: If the software doesn't finds a destination mailbox on Live Exchange Server to export the data from the source EDB file, then you have to manually create a new user mailbox on the destination server and export the data from the source EDB file to the new mailbox. See the How to Create Mailbox section to know the detailed information.
7. After mapping of the mailboxes on Map Mailboxes screen using information given on Mapping of Mailboxes for Live Exchange Server section, click Export from Map Mailboxes screen to continue.
Note: If any source mailbox from scanned EDB is not mapped with the destination mailbox, a dialog box as shown below appears to confirm your action for the unmapped mailboxes. On this dialog box, click Map Mailboxes to go back to previous screen to map the unmapped mailboxes. If you do not want to save the unmapped mailboxes, click on Skip Mapping, this will only save the mapped mailboxes.

Note: When you click Export, a Confirm Mailbox Export dialog box appears informing you that the export process, once started, cannot be aborted. Click Yes to proceed with the export process. Click No to cancel.

Tip: Stellar Repair for Exchange can save and process up to four mailboxes at the same time. The number of mailboxes that Stellar Repair for Exchange process at a time depends on the available system memory (RAM) of your computer. It is recommended that you have more than 4GB of Available System Memory on your machine before initiating the save process.
8. Save dialog box appears that consists of seven columns as follows:

-
Mailbox Name Column: Mailbox Name is often the username of the recipient in the destination server. This column provides a list of mailboxes from the scanned EDB file that you have sorted from previous screen for export.
-
Destination Mailbox Column: This column provides the email address of the destination mailbox where you exporting the data.
-
Status Column: Status column provides information about the mailbox whether the save process is Completed, Processing, Pending, Aborted, or Removed.
-
Recovering Folder Column: This column provides the name of the folder for the mailbox which is being saved.
-
Total Items Processed Column: This column provides the total number of items processed from the source mailbox to the destination mailbox.
-
Percentage Column: This column provides the information about the progress of the saving process in percentage.
- Action Button Column: This column provides a Remove button that allows you to remove individual mailbox from the list of the mailboxes to be saved.
Stellar Repair for Exchange can process up to four mailboxes at the same time. You can ether remove the mailbox that is in Pending status or stop the saving process using the steps as follows:
- To remove the mailbox that is in Pending status, click Remove button given in front of the mailbox. When you remove one or more mailbox for saving, a Process complete dialog box appears after the completion of the saving process, click Resume if you want to resume the saving of the mailboxes that you were removed or Close to complete the saving process without saving the removed mailboxes.

9. A Saving Complete dialog box opens, displaying a message “Process completed successfully” and displays the number of saved mailboxes, aborted mailboxes, removed mailboxes and failed mailboxes.

10. Click OK to continue.
Note: For best performance while using Live Exchange Server, Microsoft recommends to have up to 1,000,000 mail items in a folder at a time. Therefore, Stellar Repair for Exchange saves up to 900,000 mail items to each folder in the mailbox of the Live Exchange Server. After this limit, the software splits the folder into another folder with the same name followed by " date-time_earlier" , where "date-time" is the date and time up to which the mailbox data gets saved in that folder. To know more about the Mailbox Folder Limits, refer to Mailbox Folder Limits Recommended by Microsoft.
To Export Single Mailbox to Exchange Server:
- Right Click on the mailbox or mailbox item in the navigation tree that you want to export and select Export to Exchange Server.
Note: In order to export data by right clicking on the mailbox, the local system should be on the same domain of the user of Exchange Server on which you are exporting the data.

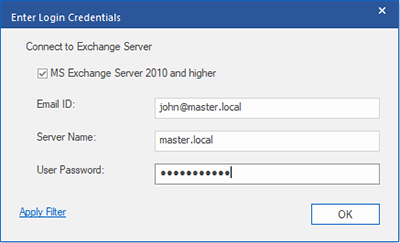
- Enter Login Credentials dialog box opens, enter the Email Id, Server Name and User Password.

Note: By default, the MS Exchange Server 2010 and higher check-box is unchecked. If you are using Exchange Server 2010 or a higher version, check the MS Exchange Server 2010 and higher check-box.
-
If you want to filter the scanned results before exporting, click on the Apply Filter.
-
Click OK.