Stellar Data Recovery
- 1. About Stellar Data Recovery
- 2. About the Guide
 3. Getting Started
 4. Working with the Software
- 4.1. Recovering Data from Existing Volume
- 4.2. Recovering Data from CD/DVD
- 4.3. Recovering a Lost Partition
- 4.4. Recovering Data from Crashed Computer
 4.5. Working with Disk Images
- 4.6. Previewing the Scan Result
- 4.7. Saving the Recovered Files
 4.8. Performing a Deep Scan
- 4.9. Save and Load Scan Information
 4.10. Changing Preferences
- 5. Supported File Types
- 6. Frequently Asked Questions (FAQs)
- 7. About Stellar

4.8.2. Why disable System Integrity Protection (SIP)?
Stellar Data Recovery provides recovery of data from mac models with an M1 chip. If you have an M1 chip system then for performing a deep scan you are required to disable System Integrity Protection (SIP). SIP is a security feature introduced in Mac Operating System to restrict the access of third-party applications to system disk and partition. This feature prevents any modification in protected system files and folders on your Mac. Thus, disabling SIP helps the software to access the data and perform the recovery process.
Note: While performing a deep scan of any volume, Stellar Data Recovery software is required to disable System Integrity Protection (SIP). This process only needs to be set when starting a deep scanning process for the first time.
Steps to disable System Integrity Protection (SIP):
1. Run Stellar Data Recovery.
2. From Select What to Recover screen, select the desired type of data i.e. Documents, Emails, Videos, Audio or Photos you want to recover. The Recover Everything option is turned ON by default. You can also customize your scan by selecting your preferred type.
.png)
3. Click Next.
4. From the Recover From screen, select the volume from which you want to recover the data.

5. Select Deep Scan directly from here, if you want to perform a comprehensive scan of the selected volume. Then click on Scan.
Note: If you don't want to select Deep Scan from Recover From screen, then skip Step 6 and directly click on Scan button for quick volume scanning.
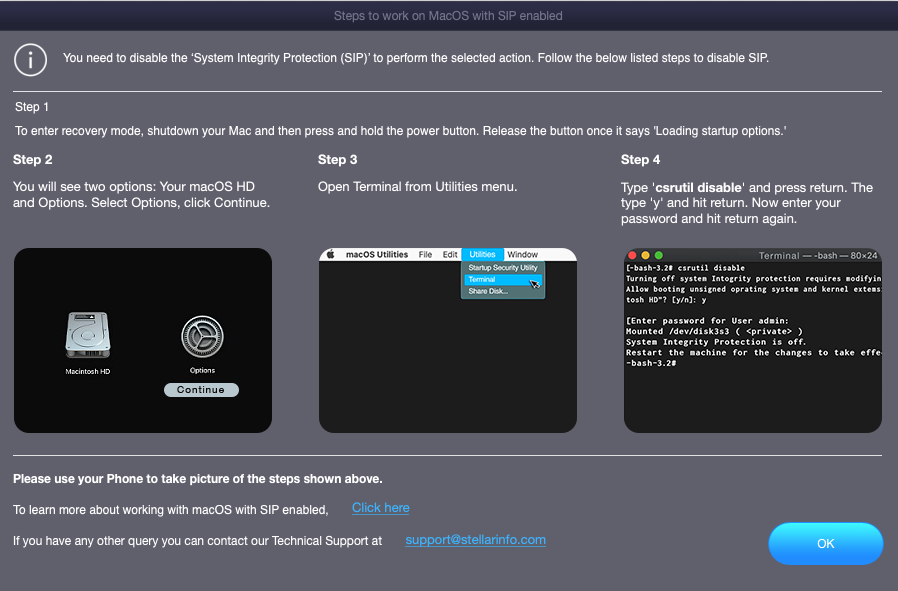
6. Steps to work on MacOS with SIP enabled window is displayed showing the steps for how to disable System Integrity Protection (SIP).
Note: For further instructions on how to disable (SIP), follow the steps mentioned from Step 13.

7. Click Stop button, if you need to abort the scanning process before it is completed.

8. After the scan process is completed, details of the files and folder found are displayed in a dialog box as shown below:

9. Click OK to finish the process.
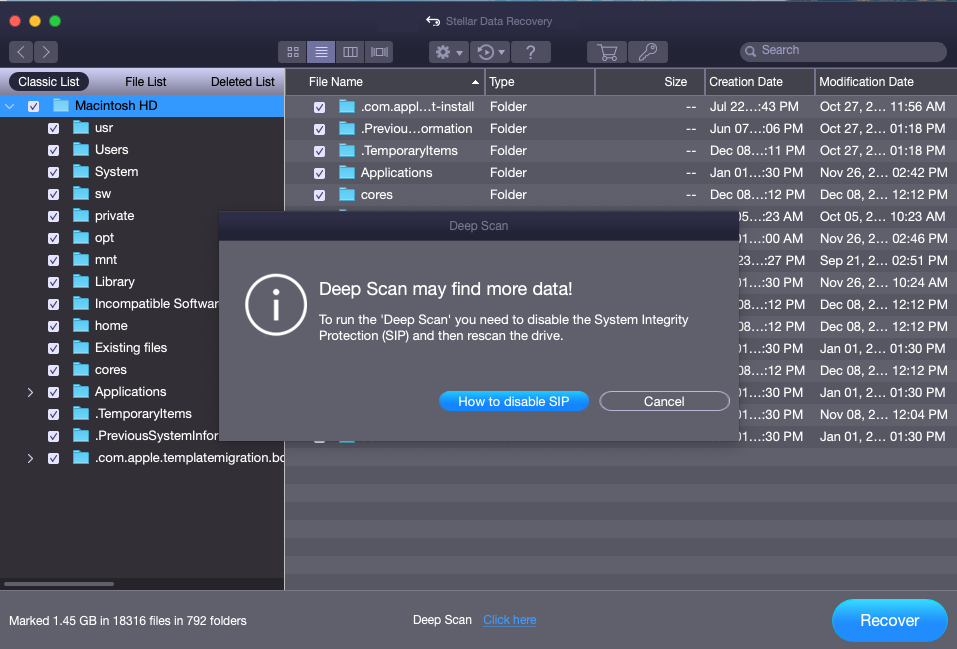
10. If you have done a quick scan from Recover From screen and your expected data is not recovered then click on Click here link from preview window to perform deep scanning. Deep Scan dialog box is displayed prompting to disable System Integrity Protection (SIP) and then perform a deep scan.

11. Click on How to disable SIP button.
12. Steps to work on MacOS with SIP enabled window is displayed showing the steps for how to disable System Integrity Protection (SIP).

13. To enter recovery mode, shut down your Mac and then press and hold the power button. Release the button once it shows, 'Loading startup options'.
14. You will see two options: Your macOS HD and Options. Select Options, click Continue.
15. From Utilities menu, open Terminal.
16. Type 'csrutil disable' and press return. The type 'y' and hit return. Now enter your password and hit return again.
17. Restart your system and continue recovering data.