Stellar Repair for Outlook
- 1. About Stellar Repair for Outlook
- 2. About the Guide
 3. Getting Started
 4. Working with the Software
- 4.1. Select and Repair File
- 4.2. Preview Repaired File
- 4.3. Find, View and Save a Single Message
- 4.4. Save as PST, MSG, EML, RTF, HTML and PDF format
- 4.5. Save Log Report
- 4.6. Save and Load Scan Information
- 4.7. How to Apply Advance Filter
- 4.8. Importing PST file in MS Outlook
- 4.9. Changing the Software Language
- 5. Frequently Asked Questions (FAQs)
- 6. About Stellar

4.1. Select and Repair File
Stellar Repair for Outlook provides a feature to identify and list all available Outlook profiles automatically. If you know the location of the PST/OST file, then you can directly specify the location and start repairing e-mails of that file. If you do not know the location, then you can search the required PST/OST file by using the find functionality of Stellar Repair for Outlook.
It is advised to disable your antivirus software before scanning because, in some instances, there is a possibility that the mailbox you are attempting to repair contains virus-infected attachments. Thus, your vigilant antivirus software will take immediate action to protect your system by flagging and moving the potential threat to quarantine, due to which you will not be able to retrieve those files entirely, as shown while scanning.
Steps to select and repair file:
1. Run Stellar Repair for Outlook.
2. The List Configured Profiles dialog box displays when the software launches.

3. Click the List Profiles button to list all the available Outlook profiles automatically.
Note: Only once you need to list configured Outlook profiles.
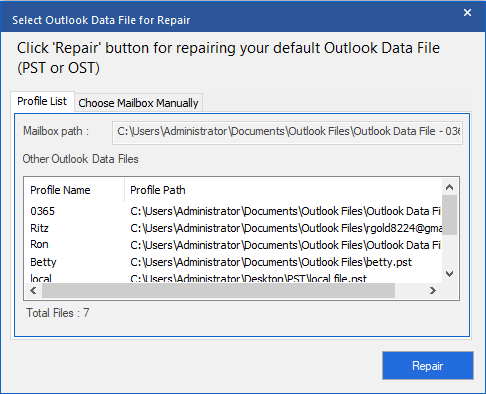
4. After listing the Outlook profiles, the Select Outlook Data File for Repair window appears, showing the number of listed profiles.
Note: Alternatively, you can also open the Select Outlook Data File for Repair window from the File menu or Home ribbon.

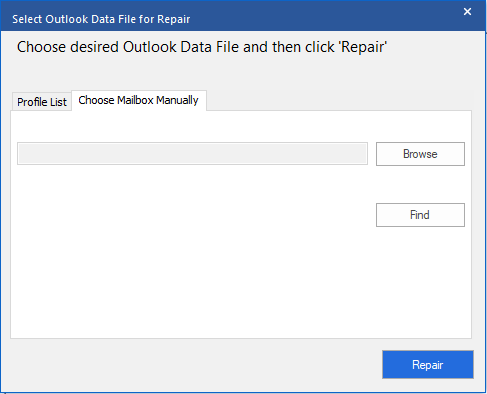
5. You can select PST or OST files using two tabs: Profile List and Choose Mailbox Manually.
- Profile List: Use this tab to repair listed outlook profiles.
(a) From the list, select the required outlook profile.
(b) Click Repair to start the repair process.
(c) Upon completion of the process, the Repair Complete dialog box appears with the message, "Selected file has been repaired".
Note: To save the repaired file, click Save Repaired File button from the Home ribbon.

(d) Click OK to complete the process.
- Choose Mailbox Manually: Use this tab when the file location is known.

You can select PST or OST files using two options: Browse and Find.
(i) Browse: Use the Browse button if you are aware PST or OST file location.
a) Click on the Browse button, locate the PST or OST file and then click Open.
b) Click Repair to start the repairing process.
c) Upon completion of the process, the Repair Complete dialog box appears with the message, "Selected file has been repaired".
Note: To save the repaired file, click the Save Repaired File button from the Home ribbon.

d) Click OK.
(ii) Find : Use the Find button to search PST and OST files on your system's drives, folders, and subfolders.
a) Click Find, Find Outlook Mailbox window appears.
b) Select the drive from the drop-down list. However, you can only select one drive at a time.
c) Click the Find button to start the search process.
d) If you wish to stop the search process, click Stop.
e) After the search finishes, the Find Complete dialog box appears, displaying the number of files found. Click OK.
f) The list of files found in the selected drive is displayed in the Results section. Select the file you want to repair, only one file can be selected at a time.
Note: If you want to clear the search result, click Clear List.
g) Click the Repair button to start the repair process.
h) Upon completion of the process, the Repair Complete dialog box appears with the message, "Selected file has been repaired".
Note: To save the repaired file, click the Save Repaired File button from the Home ribbon.

i) Click OK.
After completing the repair process, the software displays a preview of the repaired files. See Preview Repaired File, for more details.