Stellar Repair for Outlook
- 1. About Stellar Repair for Outlook
- 2. About the Guide
 3. Getting Started
 4. Working with the Software
- 4.1. Select and Repair File
- 4.2. Preview Repaired File
- 4.3. Find, View and Save a Single Message
 4.4. Save Repaired File
- 4.5. Save All Contacts as CSV
- 4.6. Relink Attachment Folder
- 4.7. Save Log Report
- 4.8. Save and Load Scan Information
- 4.9. How to Apply Advance Filter
- 4.10. Importing PST file in MS Outlook
- 4.11. Changing the Software Language
- 5. Frequently Asked Questions (FAQs)
- 6. About Stellar

4.4.4. Export to Live Exchange Server
Stellar Repair for Outlook provides a feature to connect exchange server through Admin or User credentials and export the repaired mailbox to a live MS Exchange Server.
Steps to export the repaired mailbox to live MS Exchange Server:
-
Run Stellar Repair for Outlook.
-
See Select and Repair File, to know how to select and repair the corrupt file.
-
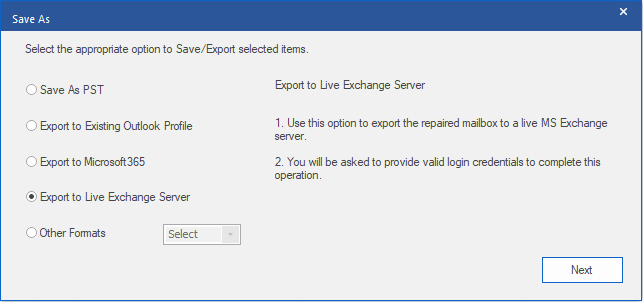
Click Save Repaired File from Home ribbon to open Save As window.

-
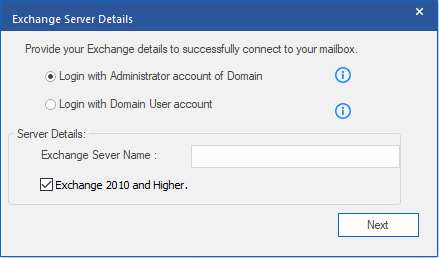
Select Export to Live Exchange Server option from Save As window and click NEXT. Exchange Server Details window appears.

- There are two options:
(a) Login with Administrator account of Domain: Use this option when you have administrator credential details.
(i) Choose Login with Administrator account of Domain radio button.
(ii) Enter Exchange Server Name in the text field.
Note: Exchange 2010 and Higher check box is by default selected, unselect it if not required.
(iii) Click Next.
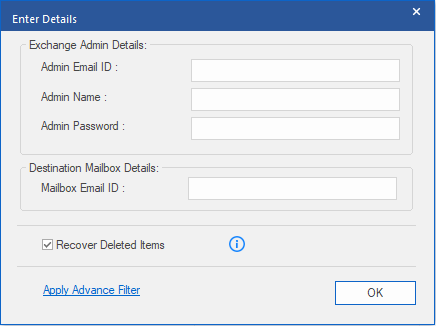
(iv) Enter Details dialog box appears.

(v) Under Exchange Admin Details section enter Admin Email ID, Admin Name, and Admin Password.
(vi) Under Destination Mailbox Details section enter Mailbox Email ID.
Note: Recover Deleted Items check box is by default selected, unselect it if not required.
Note: Refer to section Apply Advance Filter, to know how to apply filter.
(vii) Click OK to connect to your mailbox.
(b) Login with Domain User Account: Use this option when you have user account credential details to connect live exchange server.
(i) Choose Login with Domain User Account radio button.
(ii) Enter Exchange Server Name in the text field.
Note: Exchange 2010 and Higher check box is by default selected, unselect it if not required. This software will not support Exchange server below 2010.
(iii) Click Next.
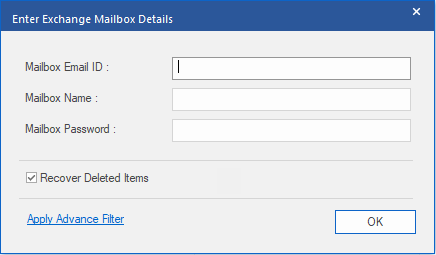
(iv) Enter Exchange Mailbox Details dialog box appears.

(v) Enter Mailbox Email ID, Mailbox Name, and Mailbox Password.
Note:
-
Recover Deleted Items check box is by default selected, unselect it if not required.
-
Refer to section Apply Advance Filter, to know how to apply filter.
(vi) Click OK to connect to your exchange server mailbox.
(vii) Saving process starts, if you want to stop the process click Stop button.
(viii) After successful saving process, saving complete dialog box appears with message, "Selected message saved successfully".
(ix) Click OK to complete the process.