Stellar Converter for Microsoft 365

4.2. Preview Mailbox items
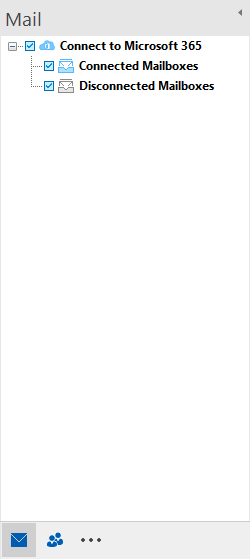
Once Stellar Converter for Microsoft 365 loads the mailboxes, you will find a navigation tree on the left side showing the mailboxes with folders and sub-folders. There are two types of mailbox categories:
-
Connected Mailboxes: The data of the mailboxes that are accessed after scanning are shown in this mailbox category.
-
Disconnected Mailboxes: In case of multiple mailboxes, the mailboxes that Stellar Converter for Microsoft 365 was not able to access after scanning are shown in this mailbox category. This happens when the mailboxes do not have administrator rights or mailboxes have been disabled. To provide the access to these mailboxes, necessary permissions needs to be provided by the administrator using Microsoft 365 server. After providing the required permissions, right click on Disconnected Mailboxes and click Refresh All. The mailbox will now move to the Connected Mailboxes category.

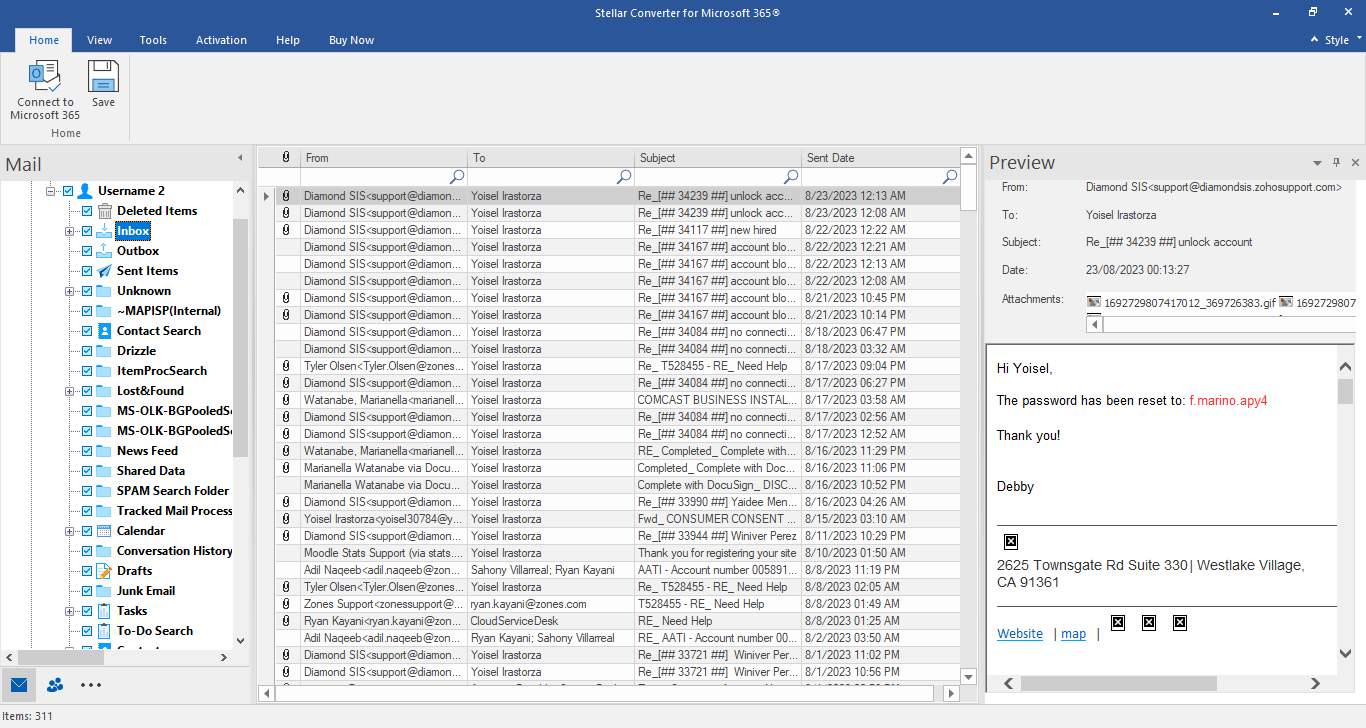
Select the mailbox from the Connected Mailboxes category to view the data in the file. Preview of the mailbox data is available in a three pane structure containing: Left pane, Middle pane and Right pane, which are explained below with details:

-
The left pane provides the navigation tree, displaying the files with its mailboxes, folders and sub-folders. Select the desired mailbox/folder/sub-folder from this pane.
-
The middle pane provides a list of mailbox items, in a tabular format, of the selected mailbox/folder/sub-folder. The pane contains the following columns:
-
Attachments: Shows an attachment icon if the particular mail item contains an attachment.
-
From: Shows the e-mail address of the sender.
-
To: Shows the e-mail address of the receiver.
-
Subject: Shows the e-mail subject.
-
Sent Date: Shows the date and time when the e-mail was sent.
-
Tip: You can change the order of the above given columns as per your requirement. Click and hold on the column name and drag the column to the desired location to change it.
-
The right pane provides the preview of the mail item that you select from the middle pane. It shows the following information:
-
From: Shows the e-mail address of the sender.
-
To: Shows the e-mail address of the receiver.
-
Subject: Shows the subject of the e-mail.
-
Date: Shows the date and time when the e-mail was sent.
-
Attachments: Shows the attachments of the selected mailbox item.
-
Body: Shows the preview of body of the selected mail item.
-
Additional Options:
-
Quick search: The software provides quick search options for Mails and Media files. In the middle pane below the table headings, type the keywords in the search bar of a particular column. The columns that support quick search are From, To, Subject, and Sent Date.

-
Sorting columns: You can sort the mails and media items using the table headers in the middle pane. Click on the column heading to sort the column in ascending order. Click on the same heading again to change the sorting order from ascending to descending and vice versa.

-
Preview mail options:

The preview pane provides the following preview options:
-
Floating/Docking Preview Pane: The preview pane opens in Docking view as default. To change the view to Floating, click on
 and select Floating from the drop down menu. To change the view back to Docking, click and hold the floating window from its title bar. The screen provides dock hints that indicate a valid drop location when you are dragging the float window. When the preview pane is about to be docked, a dock preview will be displayed to show where the preview pane will be placed.
 -
Pin/Unpin Preview Pane: Click on
 to pin and
  to unpin the preview pane. Alternatively, click on
  select Auto Hide to pin/unpin the pane. When unpinned, the preview pane automatically hides on the right side of the work area. Hover the mouse on Preview button to view the preview pane.
 -
Close/Hide the Preview Pane: To close the preview pane, click on close
 located at right hand top corner of the pane. Alternatively, click on
  and select Hide from the drop down menu.
 3. Getting Started