Stellar Eraser for Mobile

4.1. General Settings
Before starting the Erasure process, it is important to understand and configure various settings of Stellar Eraser for Mobile. Click the Settings icon on the top right corner of the screen. Use this window to change the various general and default settings of the software. This window has the following tabs:
The General Settings tab allows you to configure erasure warning settings, grid settings and select the default erasure method.

The following fields can be edited from this section:
-
Erasure Warning Settings:
-
Enable Erasure Warning Dialog: Check this field to enable the warning message before the initiation of the erasure process.
-
-
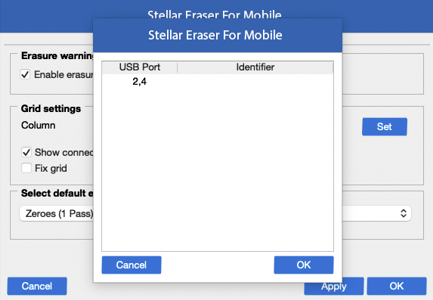
Grid Settings: This option allows you to set the layout of the grid which is shown when we connect the devices.
-
Column: Allows you to predefine the number of columns in a grid.
-
Port Identifier: Allows you to predefine name of each port to identify the port easily. Click on Set. The popup window shows a list of USB ports. Type the name against each port in the Identifier column and click OK to save or Cancel to exit without saving:
-

-
Show connected devices at the top of the grid: Checking this field allows you to display the connected devices at the starting of the grid.
-
Fix Grid: Checking this field allows you to fix the grid columns i.e., they cannot be moved.
Once the settings have been modified, click the Apply button to save the changes. OK applies all the changes to the software and closes the Settings menu, Cancel closes the Settings menu without saving the changes.
The Erasure setting tab has the following two sub-tabs:
- iOS Settings:

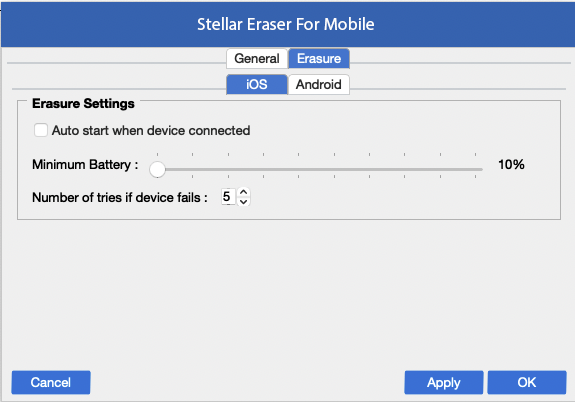
The iOS settings tab displays the erasure settings. The following fields can be edited from this section:
-
Erasure Settings:
-
Auto start when device connected checkbox: Select this checkbox to start the erasing process automatically when you connect a device.
-
Minimum Battery: You can define the minimum battery percentage using the slider. This represents the minimum battery required to erase the device's data. For example: If you set the slider to 20 % it means that at least 20% battery should be there in your device for the Erase process to take place.
-
Number of tries if the device fails: Allows you to define the maximum amount of retries/attempts for the erasure process to start if in case the device is disconnected/removed in the middle of the erasure process.
-
Once the settings have been modified, click Apply button to save the changes. OK applies all the changes to the software and closes the Settings menu, Cancel closes the Settings menu without saving the changes.
- Android Settings:

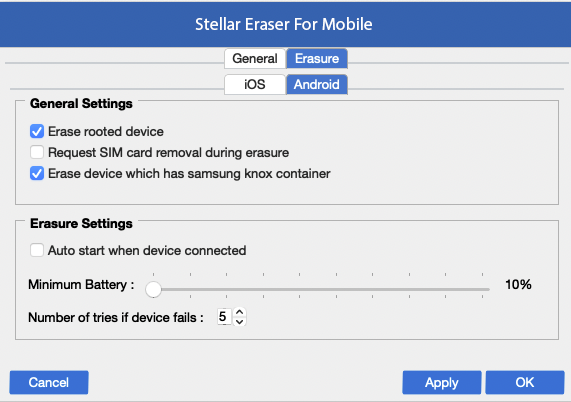
The Android settings tab displays general and erasure settings. The following fields can be edited from this section:
-
General Settings:
-
Erase rooted device: Checking this option allows you to erase an Android device even if it is rooted.
-
Request SIM card removal during erasure: Checking this option will show a message to remove the SIM card from the device before the erasure process starts.
-
Erase device which has Samsung Knox container: Checking this option allows you to erase an Android device that has a Samsung Knox container.
-
-
Erasure Settings:
-
Auto start when device connected checkbox: Select this checkbox to start the erasing process automatically when you connect a device.
-
Minimum Battery: You can define the minimum battery percentage using the slider. This represents the minimum battery required to erase the device's data. For example: If you set the slider to 20% it means that at least 20% battery should be there in your device for the Erase process to take place.
-
Number of tries if the device fails: Allows you to define the maximum amount of retries/attempts for the erasure process to start if in case the device is disconnected/removed in the middle of the erasure process.
Once the settings have been modified, click Apply button to save the changes. OK applies all the changes to the software and closes the Settings menu, Cancel closes the Settings menu without saving the changes.
 3. Getting Started