How to Fix Windows Resource Protection Could Not Start the Repair Service Error
-
Written By Mansi Verma

-
Approved By Tanushree Chatterjee
-
 Updated on 5 Jun, 2024
 -
 Min Reading 5 Min
 -
Share


Summary: The ‘Windows Resource Protection could not start the repair service’ error prevents you from running an SFC scan. The error might occur due to a disabled or malfunctioning Windows TrustedInstaller. You can fix this issue by running Windows Modules Installer (TrustedInstaller) through Service Console or Command Prompt. Other proven workarounds are also discussed in this blog.
System files are necessary for your Windows to operate and run properly. If these system files go corrupted, missing, or damaged, your PC may run into errors. Such errors are usually fixed by running the SFC (System File Checker) scan. But what if you face issues while running this scan?
‘Windows Resource Protection could not start the repair service’ is an error that occurs while you try to run the ‘SFC/Scannow’ command. The error is majorly caused by a malfunctioning or disabled TrustedInstaller.
Why is SFC throwing the ‘Windows Resource Protection Could Not Start the Repair Service’ Error?
System File Checker (SFC) is a Windows built-in tool that helps replace damaged system file versions with the correct ones, thereby fixing many problems. For the System File Checker to work properly, TrustedInstaller needs to be functional.
TrustedInstaller is required to install, modify, and remove Windows updates and other system components. It controls Windows Resource Protection (WRP), which protects against unauthorized modifications, including changes to the system files, registry values, etc.
When the TrustedInstaller malfunctions or remain disabled, the services dependent on it, like SFC and WRP, fail to run and you may get the above error while running the SFC scan.
In this blog, we have shared some quick & easy methods to help you troubleshoot the ‘Windows Resource Protection could not start the repair service’ error.
How to Fix Windows Resource Protection Could Not Start the Repair Service Error?
Let’s start fixing the error with the number one recommended method!
#1 Run Windows Modules Installer (TrustedInstaller) Through the Service Console
Windows TrustedInstaller (Modules Installer) allows installing, removing, or modifying the Windows OS components and updates. If it doesn’t work ideally or malfunctions, you may receive the “Windows Resource Protection Could Not Start the Repair Service” error. You can try to restart it with the following steps and see if the issue gets fixed:
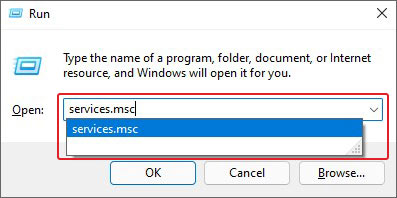
- Open the Run dialog box (press Windows + R), and type services. msc and click OK to access the Service console.
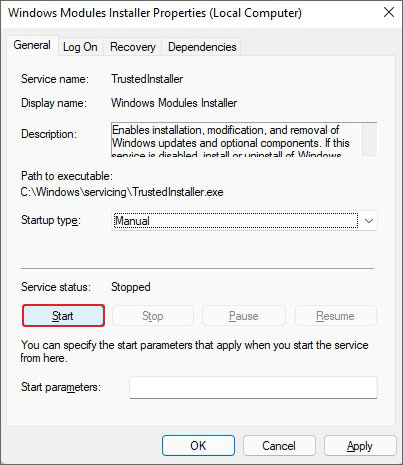
- Now, search Windows Modules Installer, right-click on it, and choose to open its Properties.

- Under the General tab, select Manual from the Startup type drop-down list.

- Now, click Start > Apply under Service status to save the changes.
- Finally, close the Service console and see if you can run the system file checker without error.
#2 Start TrustedInstaller Using the Command Prompt
If restarting the TrustedInstaller from Service Console didn’t work in your favor, you can do it using the command prompt. Follow the steps below:
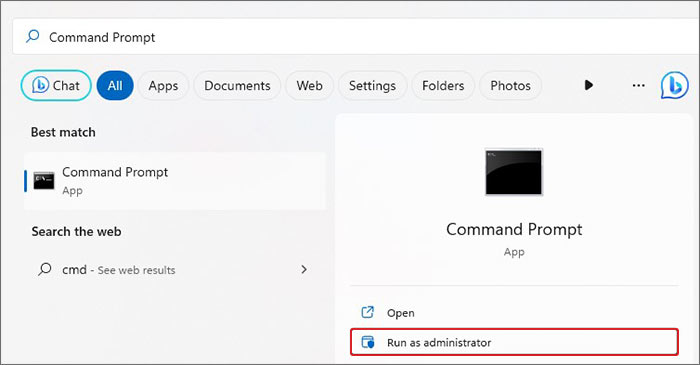
- Press Windows + S to access Windows Search.
- Type CMD and select the Run as administrator option.
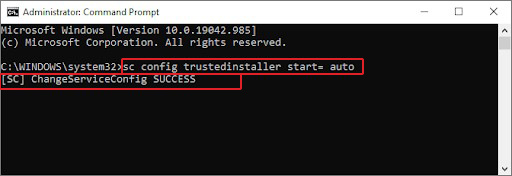
- In the elevated CMD window, type sc config trustedinstaller start= auto command and hit Enter. This command will set the Windows Modules Installer service startup type to Automatic.
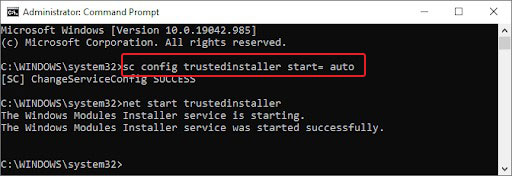
- Once done, you’ll see a ChangeServiceConfig SUCCESS message on the screen.
- Now, type the net start trustedinstaller command and press Enter.
- Once the process is completed, run the SFC command to check if the problem is resolved.
#3 Enable Safe Boot
You may also encounter this system error due to a service or application conflicting with the System File Checker utility. You can enable the Safe Boot and see if you can run SFC:
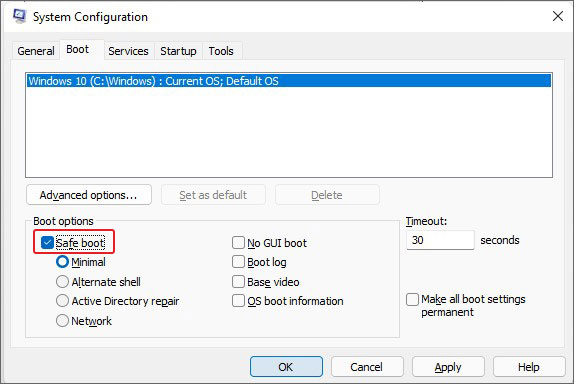
- Access Windows Search (Windows + S) or Run (Windows + R) dialog box and type msconfig to open System Configuration.
- Go to the Boot tab, click Safe boot, and then choose the Minimal option. Finally, click OK.
Restart your system and run an SFC scan to see if the problem is fixed.
#4 Run DISM Command
In some cases, users have been able to fix the error by running the DISM command before the SFC scan. DISM (Deployment Image Servicing and Management) is a Windows built-in tool to service and prepare corrupted or broken Windows images, including the images used in Windows RE and Windows Setup. Follow the given steps:
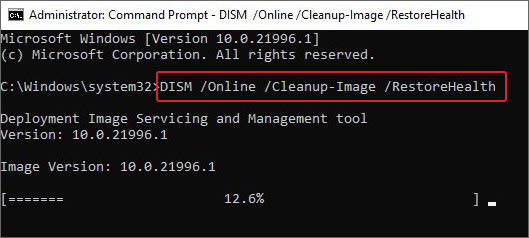
- Open Command Prompt (CMD) and run it as administrator.
- In the elevated cmd window, you type DISM /Online /Cleanup-Image /RestoreHealth and hit Enter.
Wait for the scan to complete. Once done, see the results. If there are any instructions to follow, do so. If not, you can run SFC/Scannow command and see if the error is fixed.
#5 Add a TrustedInstaller Expandable String Value to the Registry Editor
This could be your last resort to fix the error. But be careful as meddling with the Registry Editor is not recommended very often, except for errors such as, Code 19, Restart to Repair Drive errors, or fixing Broken Registry Items.
Additionally, incorrect modifications can wreck your system and put your data at risk. Therefore, ensure that you have a backup of your system data. Once sure, you can add a TrustedInstaller Expandable String Value to the Registry Editor with the following steps:
A. Find TrustedInstaller ID and Sub-Folder in File Explorer
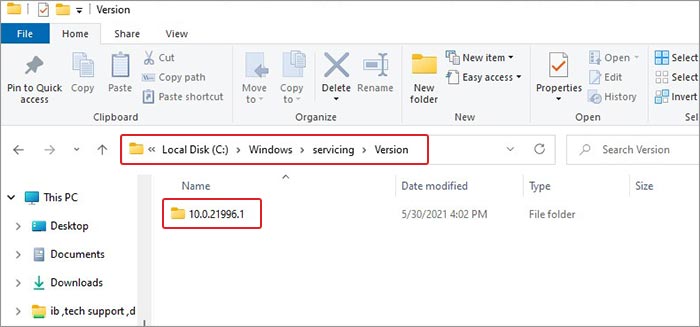
- Open File Explorer with Windows + E and navigate to C:\Windows\Servicing\Version path.
- You’ll see a folder named 10.0.219XX.X. This is your TrustedInstaller ID. Copy the folder name to your clipboard.
- Now, navigate to the C:\Windows\WinSxS path.
- Afterward, locate the following, depending on your CPU.
x86_microsoft-windows-servicingstack_31bf3856ad364e35_{TrustedInstaller ID} (32bit Windows)
amd64_microsoft-windows-servicingstack_31bf3856ad364e35_{TrustedInstaller ID} (64bit Windows)
- In the above-discussed sub-folder name, TrustedInstaller ID is the name noted previously.
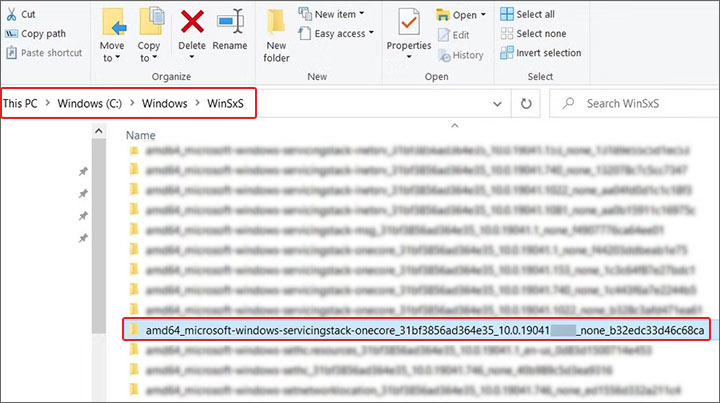
- Copy the folder name and path to the clipboard or notepad.
B. Create Expandable String Value in Registry Editor
Now that you have the required details, add a new expandable string value in the registry editor.
- Open the Run dialog box, type regedit, and hit Enter.
- Now, copy-paste the following address and hit Enter.
HKEY_LOCAL_MACHINE\SOFTWARE\Microsoft\Windows\CurrentVersion\Component Based Servicing\Version.
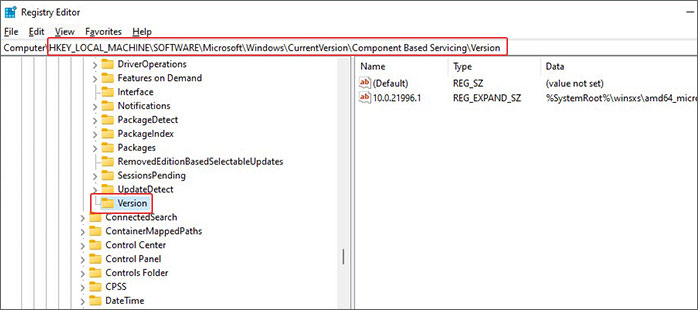
- Now, right-click on the Version, and select New > Expandable String Value.
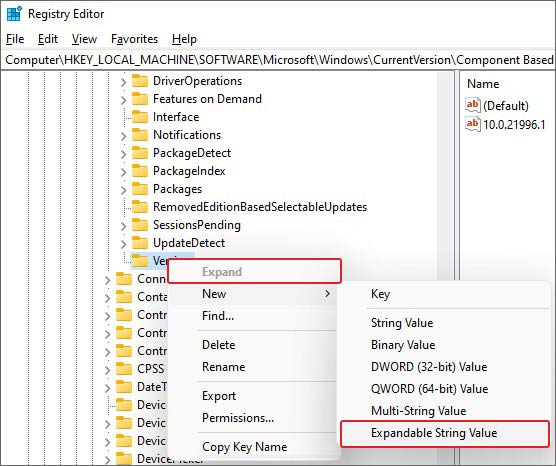
- Rename the value using TrustedINstaller ID. Next, double-click on the newly created value and enter the folder path as given below:
%SystemRoot%\winsxs\amd64_microsoft-windows-servicingstack_31bf3856ad364e35_10.0.19041.1XXX_none_7e3d47227c694b34
- Ensure that you use %SystemRoot% and trim C:\Windows from the folder path.

- Click OK to save the changes and close the editor window.
- Now, reboot your system and see if the issue is resolved.
All these methods have been helpful for users stuck with this error. You can try the solutions and see which works best for you. However, remember that there may be a risk of losing data while modifying Registry entries. Always backup your system data or keep a Windows data recovery software handy to recover deleted or lost data.
People Also Ask
TrustedInstaller.exe is a Windows Modules Installer service that constantly checks for available Windows updates and installs, removed, and modifies them and other system components. You can locate it in C: Windows\servicing.
You can force repair your system using the Windows built-in Startup Repair utility. Follow the given steps:
- Boot your design using the Windows installation media.
- When you see the Install Windows screen, click Next > Repair your computer > Troubleshoot.
- Afterward, select Advanced options > Startup Repair.
- Once the process is done, reboot your system.
Corrupted, missing, or damaged system files are common reasons for blue screen errors. You can boot your PC in Safe Mode and run SFC/scannow command through Command Prompt. SFC (System File Checker) replaces the wrong versions of the files with the correct ones, thus fixing the error.
Yes. You can use a powerful data recovery software, such as Stellar Data Recovery to recover data. This DIY software efficiently recovers data from formatted, corrupted, or error-affected Windows PCs and storage drives.
Was this article helpful?
 YES2
YES2
 NO
NO
About The Author
Mansi is a seasoned tech enthusiast, holding over a decade of experience in writing blogs, articles, guides, press releases, and tips for different industries, including Data Recovery, IoT, Artificial Intelligence, and Robotics.


I am happy because the dism.exe command works again on my laptop after using the above steps. sfc does not, yet. But continuing to try solutions.
Thanks!
You’re most welcome, and we are happy that we could resolve your issue.
Hi there,
This article presumes that the user can at least get i to safe mode, but to make it genuinely jseful for someone, talking about how to solve this issue from the troubleshooting command prompt would be even better, as a lot more things don’t work when in that minimal environment.
Hi Bruce,
Thank you for your feedback! We appreciate your input, and we’ll make sure to incorporate your suggestions into the content. Adding the steps for troubleshooting from the command prompt will certainly enhance the usefulness of the article. We strive to provide comprehensive and helpful information, so your input is valuable in improving the content. Thank you for taking the time to share your thoughts with us.