Irritated with videos not playing on Windows? Most media players on Windows 10/11 can play videos smoothly. In fact, tools like VLC Player, and Windows Media Player (WMP) are the staple tools Windows users utilize to watch videos on their PCs seamlessly. However, sometimes, videos won’t play on Windows 10/11. The unexpected issues can cause problems with video playback such as stuttering, glitches, black screen, and mismatched audio-video sync, etc. Such errors can ruin the entire video experience for any Windows user.
Nonetheless, the good news is that these video errors are pretty easy to fix using a few quick solutions. But before moving on to the fixes, let’s understand why the problem occurs.
Why won’t videos play on a Windows 10 laptop?
There can be several reasons for videos not playing on a laptop or PC. Some of the most common causes of Windows 10/11 video playback issues include:
- Absence of the right video codec.
- The media player is not updated.
- The storage drive or media has been corrupted.
- Wrong camera settings while shooting can lead to jerky or blurry video.
- Outdated video drivers don’t let the videos play properly causing issues like slow-motion video playback.
- Video file is corrupted due to virus attack, read/write errors, or bad sectors in the drive.
- File format incompatibility can also make your video unplayable in a media player on Windows 10/11.
Besides, if the videos are not playing in Chrome or another browser on a computer, it could be an Internet, outdated browser, or server issue. If you’re facing any of the above issues or any random error codes when playing videos on Windows 10/11, we’re sure you can find a working solution in the next section.
Tips to perfect video playback on Windows
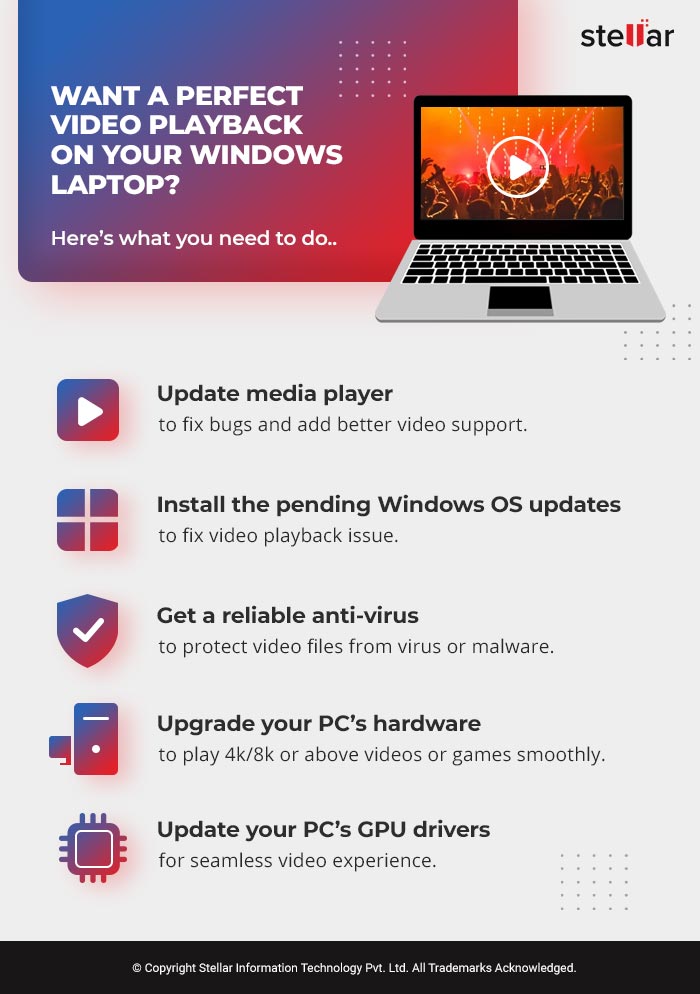
Methods to fix videos not playing on Windows 10/11
Here are some of the easiest solutions to the issue. We recommend going through them one by one and restarting your computer after performing each fix to analyze if it’s working as expected or not.
1. Restart your video player
This is the most basic thing you should do. Try exiting your video player and restart it. To ensure it is properly closed, go to the Task Manager on your computer and find the process named “wmplayer.exe” or something similar. Select it by clicking on it once and then hit the ‘End Task’ button at the bottom of the Task Manager. Once the player has completely shut down, restart it from the Start Menu and try playing the video again. If this doesn’t work, exit WMP and restart the computer. Then check.
2. Uninstall and reinstall the Display Adapter
Although a Windows update is meant to fix hidden system bugs and improve your usage experience, sometimes you may experience a ‘Windows 10 videos not playing’ error after you’ve performed an update of your OS. You can fix the issue by uninstalling and reinstalling the display adapter. Here are the steps you need to follow:
- Open Device Manager by right-clicking on your Windows 10 Start button at the bottom-left corner of the screen. From the list of devices that open up, expand the Display adapters option.
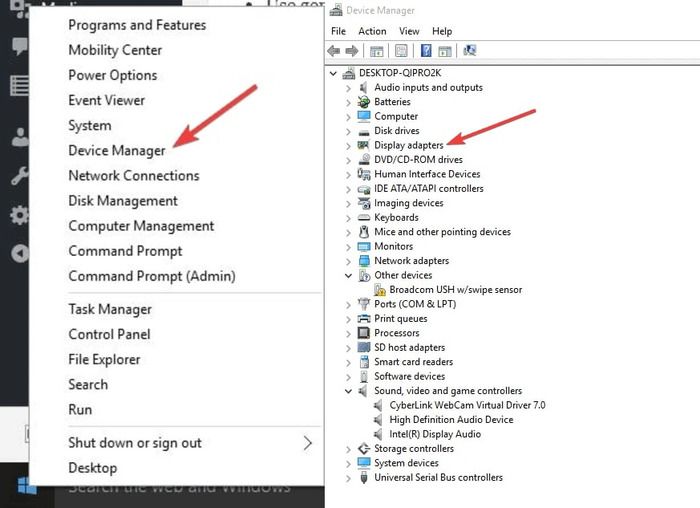 Figure: Uninstall the display driver from “Device Manager” on your Windows PC
- Now right-click on your display driver and choose the Uninstall option. Make sure that the option to ‘remove driver package’ is unchecked.
- Next, go to the main menu and click on Action > Scan for hardware changes. This will automatically reinstall the driver.
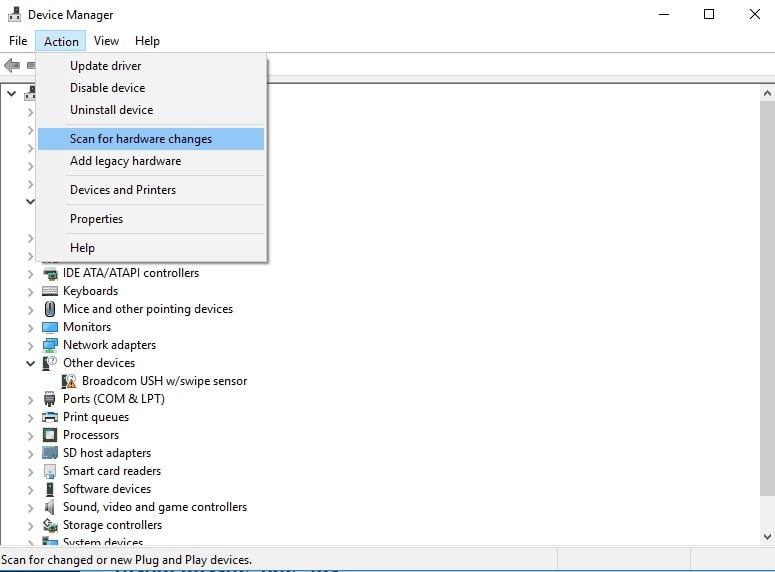 Figure: Scan from hardware changes option in the Action tab
- Finally, restart the computer to check if the error is fixed.
3. Run “Video Playback” Troubleshooter
The built-in Windows troubleshooter is quite a handy tool for fixing most problems on your Windows PC. For “Windows 10 video playback issues” too, you can use the “video playback” troubleshooter. Follow these steps:
- Open the Control Panel on your computer and type “Troubleshoot” in the search box of the Control Panel window. This will list down a few options from which you need to select “Troubleshooting.”
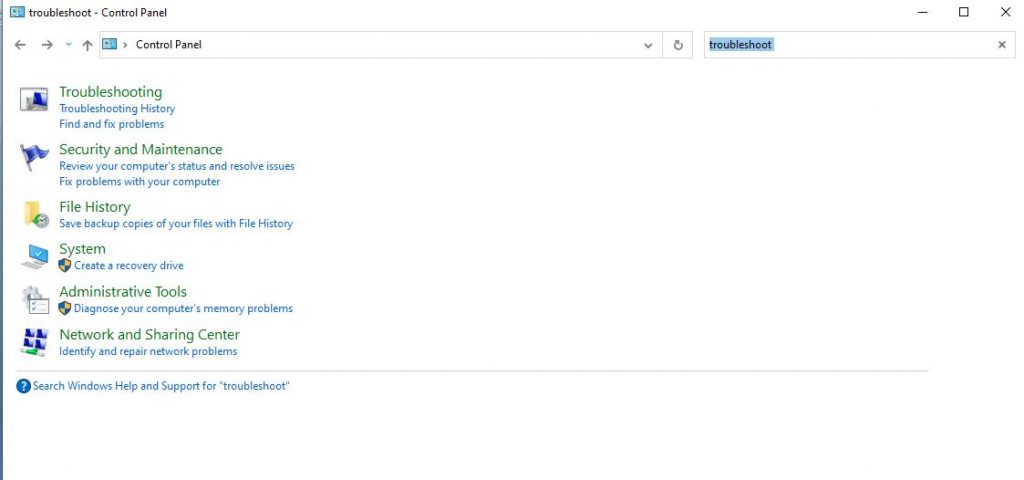 Figure: Troubleshooting option in the Control panel
- In the Troubleshoot computer problems screen that opens, go to the options listed in the left-hand sidebar and click on View All.
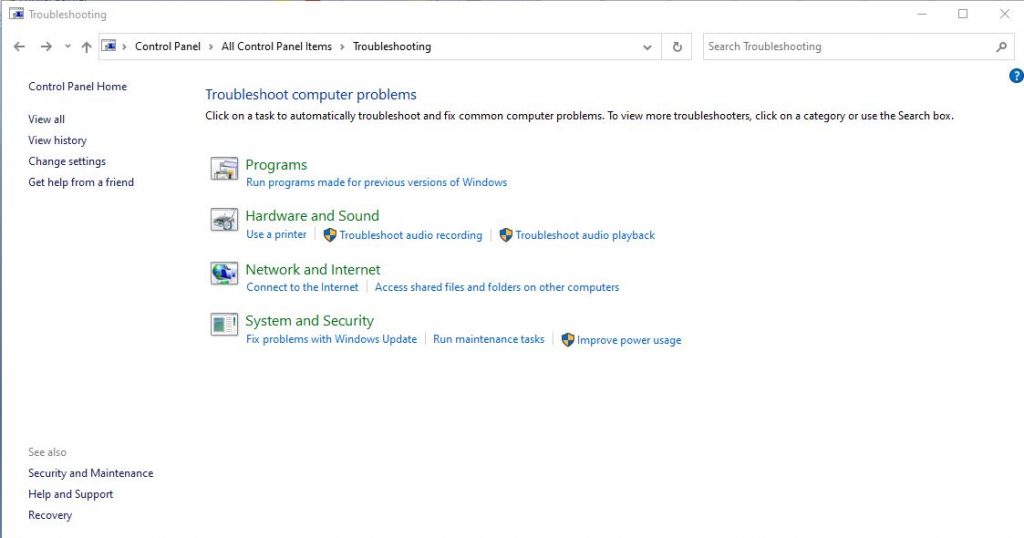 Figure: View all options on the left sidebar in the Troubleshooting window
- Now you’ll see a list of all the troubleshooting problems that are pre-installed on your system. Find ‘video playback’ and use it to fix the issue.
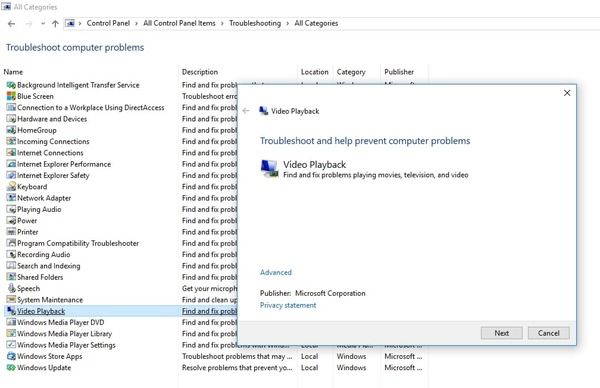 Figure: Video Playback option in the troubleshoot computer problems list
- Restart your computer once the troubleshooter finishes working and see if the error is resolved. If not, proceed to the next fix.
4. Change power options
Though this could sound unrelated to the issue, changing your computer’s power options from ‘High performance’ to ‘Balanced’ can help solve the video playback issue. Here’s what to do:
- Open the Windows ‘Run’ dialog and type ‘powercfg.cpl’. Click ‘OK’ or hit Enter.
- From the Power Options window, choose the ‘Balanced’ radio button and close the window.
- Restart your computer and check if the problem persists.
Even after trying the above-mentioned fixes, if you’re dealing with the “videos not playing on Windows 10” error, you should know that most probably, you’re dealing with a damaged or corrupted video. To remove the error, you need to fix the video using a reliable video repair tool.
5. Fix corrupted video with a repair software
Stellar Repair for Video is an advanced application that lets users fix corrupted and glitchy videos within a few clicks. This software supports most storage media, including SD cards, HDD, SSD, etc., and can repair any format of video, including MKV, MOV, MP4, etc. It’s compatible with Windows 10 as well as Windows 11 and is quite user-friendly and affordable.
You can use the software, in case a corrupt video file is not playing in PowerPoint, Windows Media Player, VLC Media Player, or other programs on Windows 10/11.
Here are the steps for installing and using this tool:
- Go to the download page for Stellar Repair for Video and click on the “Free Download” button. This will save the installer for the demo version of the software (the demo version lets you preview repaired files up to 20% of the total video size).
- After the file has been downloaded, double-click the .exe file to install the software on your machine.
- Now launch Stellar Repair for Video and follow these steps to repair your corrupted video files:
- From the software’s interface, click on the box that says Add File to add the video file that needs repair. You can also add multiple files here.
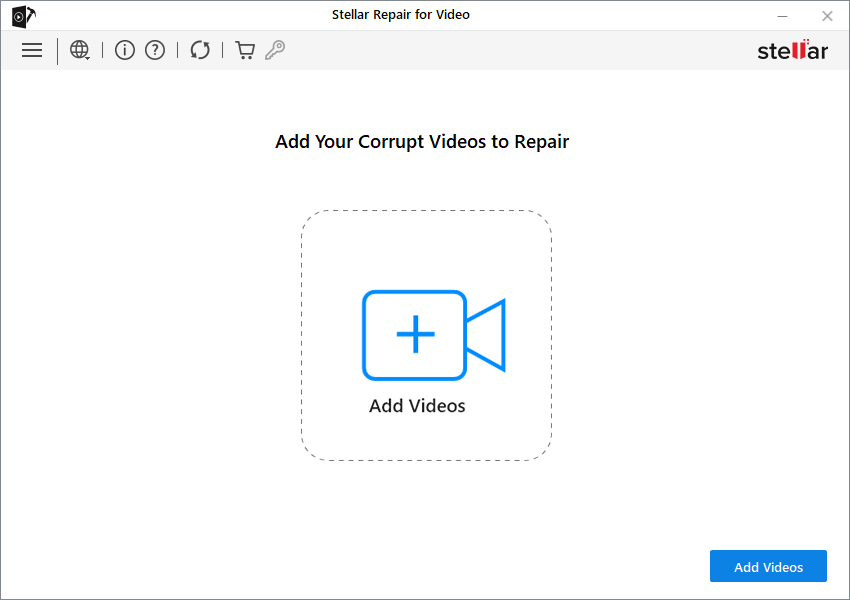 Figure: Use the “Add File” option to import damaged videos into software
- After adding the files to the tool, click on the Repair button to start the repair process.
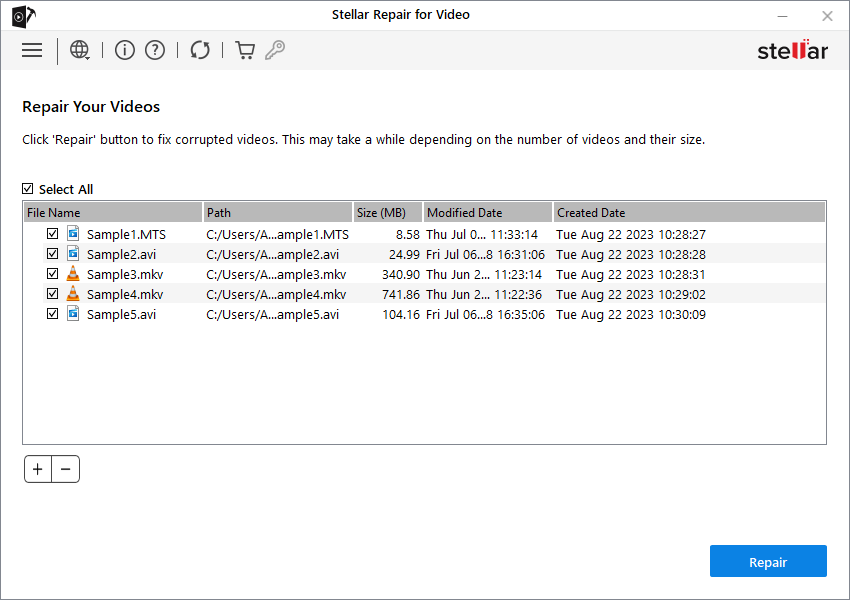 Figure: Repair button in the software
- When the repairing process has begun, a progress bar will show repair progress.
- After the video files are repaired, you can preview them before saving them to your computer.
 Figure: Preview option before saving videos to the computer
 Once the video is repaired, try loading it into WMP or another player. We’re sure you won’t face the ’videos not playing on Windows 10/11’ error anymore.
You can use the free version of Stellar Repair for Video to evaluate its repair capability, by clicking on the download button below.
6. Update Windows Drivers
Videos will not play on Windows 10 computers if the graphics drivers are outdated. Hence, to fix videos not playing issues, update the graphics drivers from Device Manager on your PC. Here are the steps:
- Press the Windows+R keys to open the ‘Run’ dialog box.
- Type ‘devmgmt.msc’. Click OK.
- In the Device Manager windows, double-click on Display Adapter.
- Select the video graphic card from the drop-down and right-click on it.
- Select the Update Driver Software option.
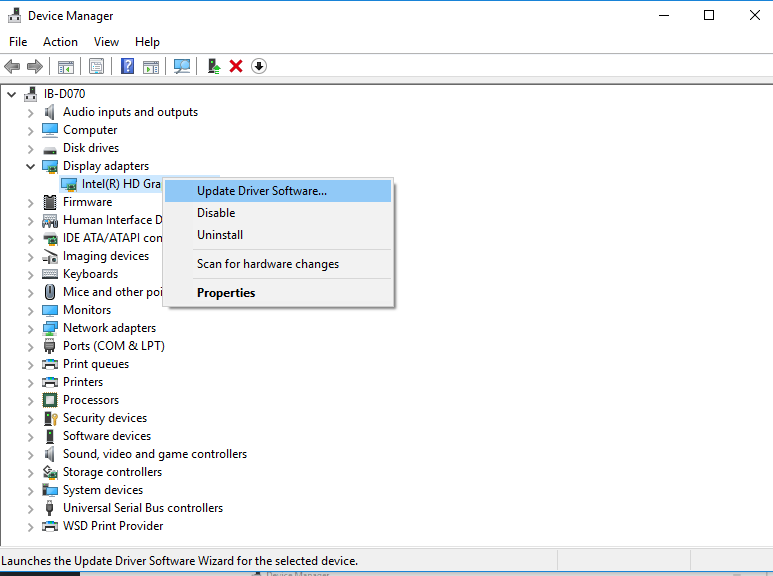 Figure: Update Driver Software from Device Manager
- Click on ‘Search automatically for updated driver software’.
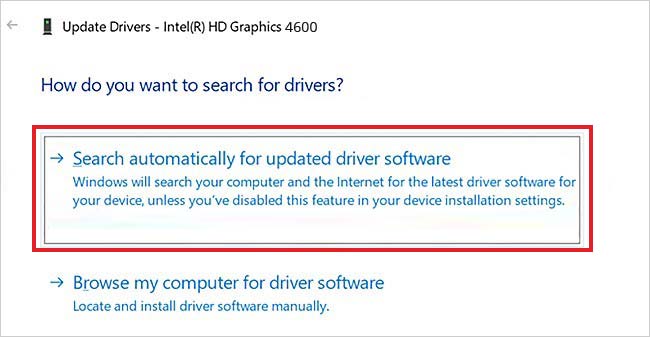 Figure: ‘Search for drivers’ windows
- After the update process finishes, restart your PC. Next, check if the video plays smoothly in Windows 10.
7. Check and update Windows
Video playback issues can also occur if your computer is not updated. Check if there are any pending Windows updates. Follow the below steps to update Windows 10/11 computer:
- Open Settings on PC.
- Click on Update & Security.
- Select Windows Update and click on the Check for updates button.
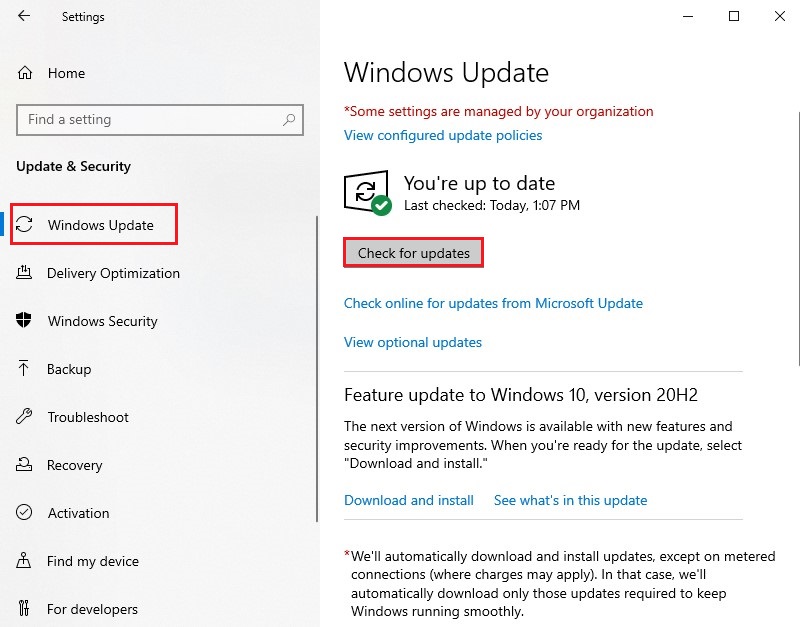 Figure: Check for updates in Windows 10
- All the pending updates will start to install. As the update process finishes, play the video to check if the problem is resolved.
8. Compress your video
Are you trying to watch 4k/ 8k quality videos on Windows 10/11? If yes, then this could be the reason for the video not playing on a Windows laptop.
Often Windows media players fail to play high-quality or resolution videos smoothly. Videos may stutter or show errors. However, you can fix the issue by compressing the video file.
To compress a high-quality video either decrease its size, resolution, bitrate, or crop some unnecessary sections.
There are free online video compressing programs like FreeConvert and Veed. You can also try open-source VLC Media Player or iMovie to compress videos without losing quality.
Wrapping Up
Users can experience errors when playing videos on Windows Media Player, VLC Player, or others on Windows 10/11. Usually, you can resolve minor videos not playing on Windows issues through manual fixes. But sometimes, the problem could be with the video files. In a case where a video file itself is corrupt, it won’t play on Windows. Repairing corrupt videos with a reliable tool like Stellar Repair for Video is the only ideal solution. However, to be assured, take the free trial of the repair software, which shows the repaired video.
Was this article helpful?