Time Machine is one of the most important utilities on macOS, once set up, it will take periodic backups of your files automatically. However, it’s not always smooth sailing. Take Time Machine Error 19, for instance.
Forums are replete with users citing Time Machine Error 19, which returns the message, “The backup disk image “xyz.sparsebundle” could not be accessed (error 19).” It usually pops up when you’re trying to access or create a Time Machine backup.
The error indicates an issue with the permissions for a specific file, which further prevents Time Machine from successfully reading and backing it up. The problem may arise on both local external drives and network drives, often after a macOS update.
This blog will guide you through resolving this error and restoring your Time Machine’s functionality.
Why does “The Backup Disk Image Could Not Be Accessed (Error 19)” Occur?
Error 19 on macOS prevents you from accessing your backed up data. Here are some probable reasons behind this:
- The backup file might be corrupted, preventing you from accessing it.
- Incorrect permission on your backup disk or folder due to which Time Machine may be missing the necessary ‘access key’ to use it.
- Connection issues while using a network drive.
- Another program could be interfering by locking the backup file or messing with the Time Machine’s operations.
- Physical damage to the backup disk drive.
How to Fix “The Backup Disk Image Could Not Be Accessed (Error 19)”?
Below, we will mention several workable solutions to effectively resolve the Time Machine error 19. Try them out one by one to get the ideal solution.
Solution 1: Reconfigure the Backup Disk to Fix Time Machine Error 19
If you’re using an external hard drive for your Time Machine backups, it might be disconnected, preventing your Mac from accessing it.
Simply remove the backup disk from Time Machine and set it up again. Here’s how to reconfigure it:
For macOS Ventura and Later
Step 1: Click on the Apple menu and select System Preferences.
Step 2: Go to Time Machine and select the backup disk or folder you are unable to access.
Step 3: Hit the (-) button to remove it.
Step 4: Click Forget Destination.
Step 5: Restart System Preferences.
Step 6: Launch Time Machine.
Step 7: Click Add Backup Disk and follow the prompts to add your backup drive.
For macOS Monterey or Earlier
Step 1: Click on the Apple menu and select System Preferences.
Step 2: Go to Time Machine and click Add or Remove Backup Disk.
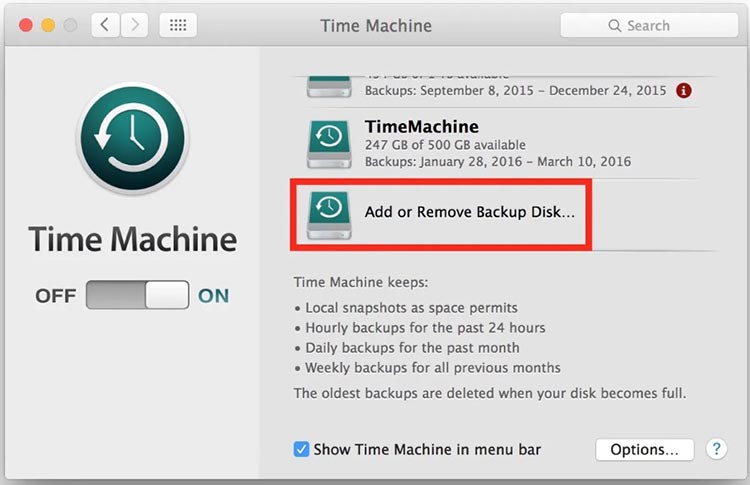
Step 3: Select the backup or folder you are unable to access and click Remove Disk.
Step 4: Click Stop Using This Disk to confirm.
Step 5: Restart System Preferences and launch Time Machine.
Step 6: Click Add or Remove Backup Disk and follow the prompts to add your backup drive.
Solution 2: Review Permission to to Fix Time Machine Error 19
Having trouble connecting to a Time Machine backup disk? It’s often due to insufficient permissions for the backup database folder.
To review this, go to the Time Machine disk via Finder and proceed to the Backups.backupdb folder within Time Machine Backup.
A red stop sign on this folder indicates a lack of access, so fixing this is straightforward:
Step 1: Launch the Terminal app on your Mac.
Step 2: Type in: cd /Volumes/YourTimeMachineDiskName (make sure to replace ‘YourTimeMachineDiskName’ with the actual name of your Time Machine disk). It will direct you to the specific Time Machine disk that’s causing connection issues.
Step 3: Input: sudo chgrp admin Backups.backupdb. It changes the group permissions, granting the admin group on your Mac access to the Time Machine backup folder.
Step 4: Enter your Mac’s passcode twice to confirm the changes.
Once you’ve adjusted the permissions, revisit Time Machine to see if you can access your back up again.
Solution 3: Verify Backups on Time Machine
When facing the error “The backup disk image “xyz.sparsebundle” could not be accessed (error 19),” it’s recommended to verify your Time Machine backup for probable issues.
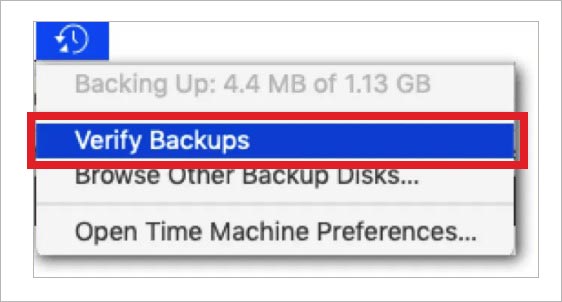
Here’s how to verify backups on a network drive:
Step 1: Click the Time Machine icon in the menu bar.
Step 2: Hold the Option button and select Verify Backups from the menu.
Here’s how to verify backups on a local drive:
Step 1: Press Command + Space to search for and launch Terminal.
Step 2: Execute the following command: tmutil compare –s
Once the verification process is complete, it will alert you to any issues with your Time Machine backups.
Solution 4: Uninstall Anti-Virus Software on Your Mac
Many users have found success with fixing Time Machine error 19 by uninstalling the third-party anti-virus software on their Macs.
Such programs often interfere Time Machine’s fuctioning by flagging legitimate files as threats or may even corrupt your backup files while attempting to remove detected malware.
If your Mac is running any anti-malware program, VPN, or security application, it’s recommended that you uninstall them prior to attempting a Time Machine backup and rely on macOS’s built-in security features.
Solution 5: Restore to Previous Backup
To resolve the macOS error 19, consider restoring to an earlier system snapshot. Start by disconnecting your backup disk, then, restore your system using a snapshot taken before the latest backup and finally, reconnect the backup disk.
Keep in mind that this will revert your system to a previous state. So if you have any new data since the last backup, back it up separately before you begin. Here’s the rundown:
Step 1: Connect the Time Machine backup drive to your Mac.
Step 2: Remove this drive from Time Machine’s settings.
Step 3: Reboot your Mac by holding Command + R to enter Recovery Mode.
Step 4: In the macOS Utilities menu, opt for Restore From Time Machine Backup.
Step 5: Select the backup you want to revert to by its source and date.
Step 6: Choose where you want to restore this backup and wait for the process to complete.
Bonus Solution: Restore Backup Files Without Time Machine
If the above solutions fail to resolve the issue, it’s likely the backup drive is damaged or corrupted beyond repair. In such cases, it’s recommended to use a reliable data recovery software for Mac to retrieve your lost data.
Stellar Data Recovery for Mac is a DIY tool for recovering lost files, including documents, photos, videos, emails, and audio files. The software is compatible with all Macs powered by T2, M1, M2, and M3 chips running macOS Sierra 10.12 up to the latest macOS Sonoma 14.
Key features of Stellar Data Recovery for Mac:
- Recovers data from SSDs, fusion drives, Time Machine backups, Thunderbolt 3 drives and other USB storage media.
- Restores data from high storage capacity (>18 TB) storage drives.
- Recover data from formatted APFS/HFS+/NTFS/ExFAT volume.
- Recovers data from crashed or non-booting Macs.
- Offers additional smart features, like drive health monitoring, cloning, and device optimization.
To restore lost files with Stellar Data Recovery Professional for Mac:
Step 1: Download, install, and launch Stellar Data Recovery Professional for Mac on your PC.
Step 2: Choose the type of files you want to recover.
Step 3: Select the volume to scan for lost files.
Step 4: Run the Scan to detect files for recovery.
Step 5: Select the files you want to restore and hit the Recover button.
Bottom Line
Time Machine backups store our most important data, and losing access to them due to any issue is always a problem. In this guide, we have outlined 8 workable solutions that should be able to help you fix “The backup disk image could not be accessed (error 19),” on your Mac.
Was this article helpful?