When it comes to using a Mac, you may occasionally run into the “Erase process has failed” error when trying to erase Mac HD. This error can be frustrating and prevent you from completing the task you intended to do. In this guide, we will tell you why the ‘Erase process has failed’ error and how to fix the issue.
What Causes the ‘Erase Process Has Failed’ Issue on Your Mac
There are several reasons why you may encounter the “Erase process has failed” error. Some of them are:
- Hardware Issues. If your Mac’s hard drive is damaged or failing, you may encounter this error when trying to erase a disk or partition.
- Software Conflicts. Another reason for the “Erase process has failed” error could be due to conflicts with the software running on your Mac. The reason is that apps may be outdated, incompatible with your Mac, or even contain malware infections.
- User Errors. Sometimes, the “Erase process has failed” error can occur due to user errors. For example, if you accidentally interrupted the erasing process or disconnected the external hard drive while erasing, this error may appear.
- FileVault. If you have enabled FileVault on your Mac, this can sometimes cause the “Erase process has failed” error as it encrypts data on Mac’s HD. That is why you may encounter this error if trying to erase a partition encrypted with FileVault.
How to Fix the ‘Erase Process Has Failed’ Issue on Your Mac
Several solutions can help you resolve this issue and get back to using your Mac as intended. Let’s talk about them in more detail.
Solution I: Check for Physical Damage
If there are any physical crashes on your Mac may cause the issue you are experiencing. In this case, take your Mac to an authorized Apple service and have it repaired.
Solution II: Check for Hardware Issues
You can use the built-in Mac utility Apple Diagnostics to verify if there are any hardware issues.
Here are the comprehensive instructions on how to run Apple Diagnostics:
- Disconnect External Devices. Before running Apple Diagnostics, disconnect any external devices connected to your Mac, such as printers, cameras, or external hard drives. It ensures that the diagnostic test is focused solely on your Mac’s internal hardware.
- Restart your Mac. When all external devices are disconnected, restart your Mac.
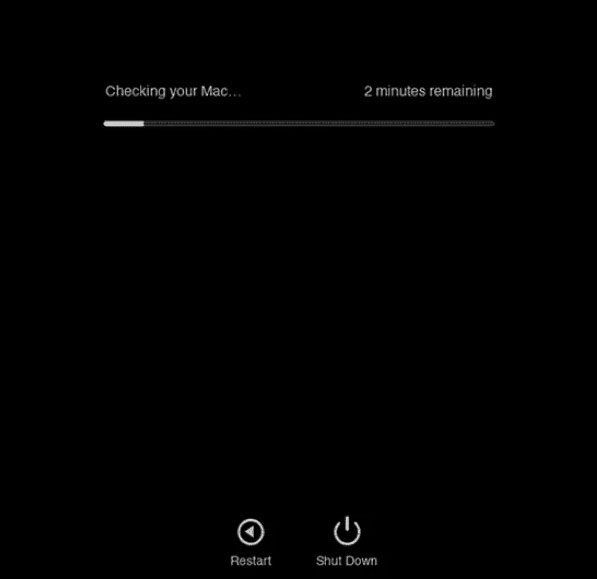
- Launch Apple Diagnostics. As your Mac is restarting, hold down the D key until the Apple Diagnostics screen appears. The screen will display a progress bar as the diagnostic test is run.
 Apple Diagnostics
- Follow the On-Screen Instructions. Once Apple Diagnostics has launched, it will run a series of tests to check for hardware issues. Follow the on-screen instructions to complete the diagnostic process. The tests may take some time to complete, so be patient.
- View the Diagnostic Results. Once the diagnostic test is complete, you will see a list of the diagnostic results.
- Contact Apple Support. If you are unsure how to interpret the diagnostic results or need further assistance, you can contact Apple Support for help.
Solution III: Check for Mac Updates
Keeping your Mac updated with the latest software is essential to ensure it runs smoothly, securely, and error-free.
Here is how to update your Mac to the latest version:
- Go to System Settings.
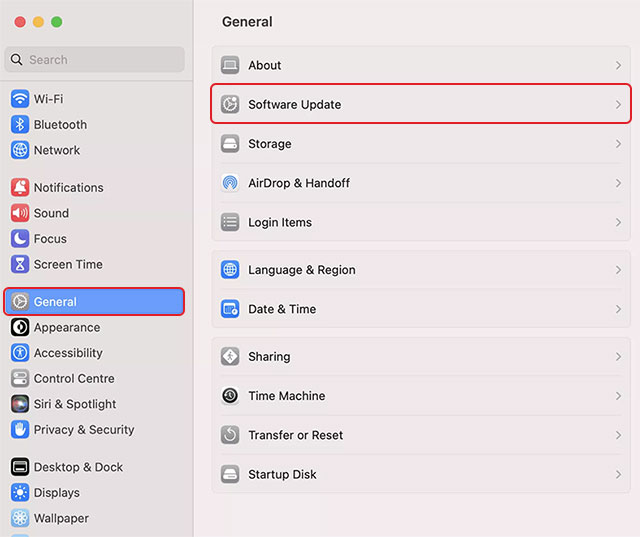
- Click on General > Software Update. Your Mac will automatically check and display available updates in a list.
 System Settings > General > Software Update
- If any updates are available, click the Update Now button to install them.
- Restart your Mac.
Solution IV: Run First Aid
Running First Aid in Disk Utility is a useful troubleshooting tool that can help fix various issues on your Mac, including disk errors, volume structures, and file permissions.
Here is how to run First Aid:
- Enter Recovery Mode.
- Open Disk Utility. When in Recovery Mode, select Disk Utility from the available options and click Continue.
- Select the disk you want to repair from the list on the left side of the window.
- Run First Aid. After selecting the disk, start the First Aid process to detect and repair any disk errors.
Solution V: Uninstall Conflicting Software
Detecting conflicting software on a Mac can be challenging, as it can often be difficult to identify which software is causing the problem. However, you can take a few steps to narrow down the list of potential culprits.
- Check for recently installed software: If you have recently installed any new software on your Mac, try uninstalling it to see if the ‘Erase Process Has Failed’ issue persists.
- Check for software that may interfere with disk operations: Some applications, like antiviruses or disk encryption apps, may disrupt disk operations and cause the ‘Erase Process Has Failed’ issue. Try temporarily disabling any software that may interfere and see if the issue is resolved.
- Check for software that modifies the boot process: Some software may modify the boot process, which can cause conflicts when trying to erase a disk or partition. Check the software running when the Mac starts up and disable unneeded or those you don’t recognize.
By taking these steps, you can narrow down the list of potential software causing the ‘Erase Process Has Failed’ issue on your Mac. Once you have identified the conflicting software, you can try uninstalling it or disabling it to see if the issue is resolved.
Solution VI: Erase the Disk
Erasing a disk on a Mac is a simple process that can be completed using the built-in Disk Utility app.
Here are the extended instructions on how to erase a disk on a Mac:
1. Backup Important Data
Before erasing a disk, it’s essential to back up any important data you want to keep. This ensures that you don’t lose any data accidentally during the erasing process. You can use a cloud-based service like iCloud or Dropbox, an external hard drive, or Time Machine to back up your data.
2. Open Disk Utility from Recovery Mode
To open Disk Utility:
- Enter the Recovery Mode
- In the macOS Utilities window, select Disk Utility.
- Erase the Disk:
- Select the disk from the left-side menu.
- Click on Erase.
- In an opened dialog box, select the APFS format and give a name to disk.
- Confirm the erasing.
- Restore your Mac from Time Machine Back Up.
When everything is done, you will need to restore your Mac from the Time Machine backup. Additionally, install Stellar Data Recovery Professional to get your files back.
Solution VII: Disable FileVault
FileVault is a built-in feature on Macs that encrypts data of your Mac’s startup disk.
Follow these steps to disable FileVault:
- Backup Important Data. Before disabling FileVault, it’s crucial to back up any important data you want to keep. This ensures that you don’t lose any data accidentally during the disabling process. You may use Time Machine or specific software like Stellar Data Recovery Professional to make sure you will be able to get your files back.
- Click on the Apple menu in the top-left corner of your screen.
- Select System Settings.
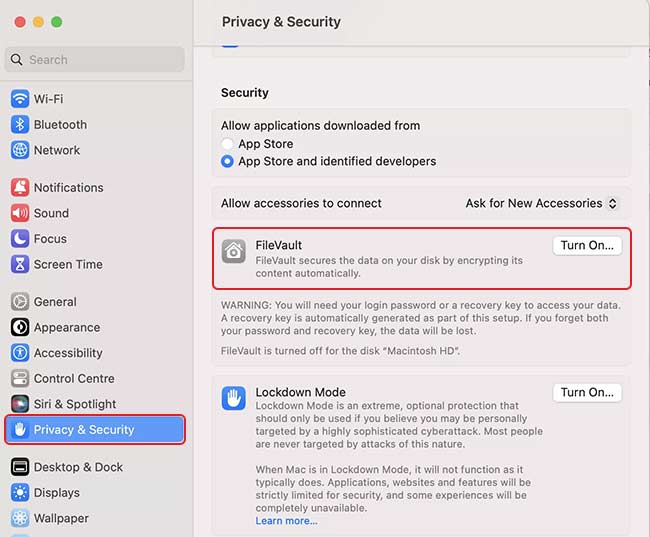
- Click on Privacy&Security.
- Scroll down to the FileVault tab.
 System Settings > Privacy&Security > FileVault
- Click on the Turn Off FileVault button.
- Restart your Mac
Wrapping Up
By following the solutions provided in this guide, you should be able to successfully fix the ‘Erase Process Has Failed’ issue on your Mac. We have provided a range of solutions to this problem that you can use. If you have lost your files when using any solutions, consider using Stellar Data Recovery Professional software. This tool enables you to recover various data types on your Mac effortlessly.
Read more:
Was this article helpful?