While trying to enable Secure Boot on my Windows PC, I received an error message stating, “Secure Boot Can Be Enabled When System in User Mode.” What does it mean and how can I fix it?
Secure Boot is an essential feature for modern-day PCs to ensure that only trusted software is loaded during boot up. However, users often face errors while enabling Secure Boot on their systems, such as the “Secure Boot Can Be Enabled When System in User Mode” issue.
This blog will discuss the reasons behind this error and provide effective methods to fix it.
What Causes Secure Boot can be Enabled When System in User Mode Problem?
- User Mode is Not Enabled: The primary reason behind this error is that the system is not running in User Mode. Secure Boot can only be enabled when the system is running in User Mode.
- Unsupported Firmware: Another reason could be that your system’s firmware does not support Secure Boot. In such cases, you need to update your firmware to the latest version.
- Corrupted Boot Configuration Data (BCD): Corrupted BCD can also cause this error. BCD is responsible for loading the operating system, and if it’s corrupted, you may face issues while enabling Secure Boot.
Top Methods to Fix Secure Boot Can Be Enabled When System in User Mode
Method 1: Check Secure Boot State
- First, press the Windows key and R to open the RUN box.
- Now, type “msinfo32” and press Enter to open the System Information window.
- Look for the “Secure Boot State” entry. It should say “On.”
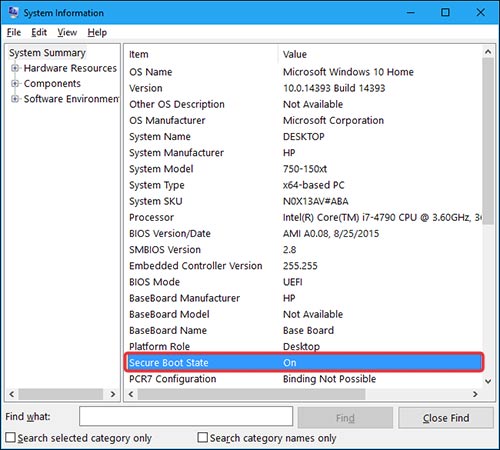
- If it says “Unsupported” or is turned off, you need to pursue the steps below to enable Secure Boot.
Method 2: Re-enable Secure Boot in BIOS
- Restart your computer while holding the Shift key to access the Advanced Startup screen.
- Click on “Troubleshoot,” then “Advanced Options,” and finally, “UEFI Firmware Settings.”
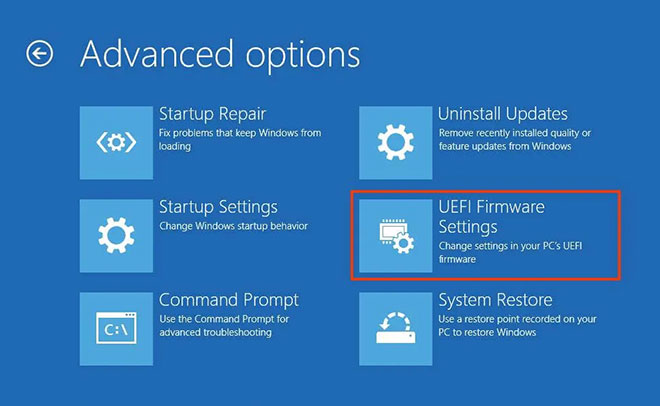
- Click on “Restart” to access the Startup Menu, then press the key for “Boot Setup.”
- Look for the “Secure Boot” option in the Boot Options or Security tab.
- If it is disabled, select it and press Enter to enable it.
- Navigate to the “Exit” tab and select “Save Changes and Exit.”
- Confirm with “Yes” and wait for your PC to restart.
- Check the “Secure Boot State” in System Information to see if it now says “On.”
Method 3: Convert MBR to GPT
- Press the Win + R to open the Run command window.
- In the Run command, type diskmgmt.msc and click Enter. It will open the Disk Management window.
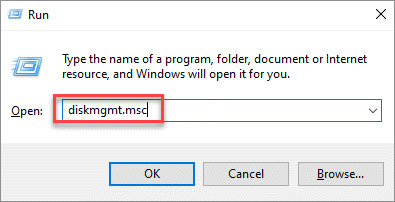
- Right-click on your disk on the left and select “Properties.”
- Switch to the “Volumes” tab and check the “Partition style.”
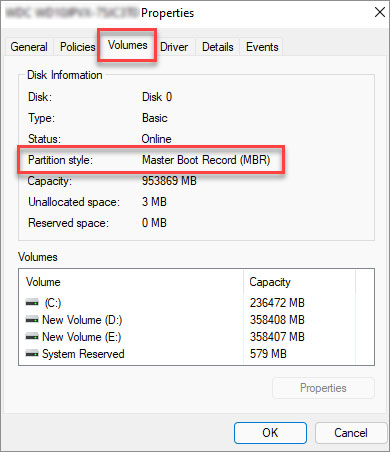
- If it says “MBR,” open the Command Prompt as an administrator.
- Type “mbr2gpt.exe /convert /allowfullos” and press Enter.
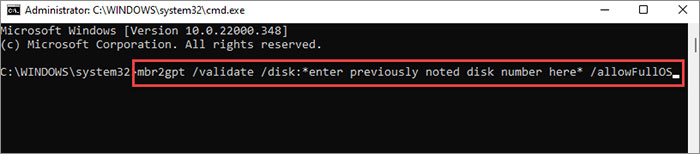
- Wait for the validation and conversion process to complete.
- Check the partition style in Disk Management again to see if it now says “GUID Partition Table (GPT).”
Method 4: Disable CSM and re-install Windows
- Go into your BIOS settings and look for the “Compatibility Support Module (CSM)” option.
- Disable CSM and save your changes.
- Create a Windows 11 installation media and boot from it.
- Follow the prompts for installing Windows 11 on your computer.
- Check the “Secure Boot State” in System Information to see if it now says “On.”
It is crucial to note that disabling CSM and reinstalling Windows can lead to data loss due to its process, which includes formatting the hard drives and deleting all stored data. You can recover the lost data using a trusted data recovery tool if you forgot to take adequate data backup before data loss.
One such software is Stellar Data Recovery Professional. The tool recovers data from diverse types of storage devices, including hard drives, memory cards, solid-state drives, and USB drives.
Stellar Data Recovery Professional tool utilizes state-of-the-art scanning algorithms to retrieve lost data. It even recovers data from corrupted or formatted drives as well. Here are some core features:
- Recovers media files from external and internal hard drives and SSD.
- Recovery is available for 4K media drives, USB drives, SD cards & more.
- Supports recovery from HD DVD, CD/DVD, and Blu-Ray discs.
- Retrieves data from FAT, NTFS, and exFAT formatted drives.
Method 5: Enable User Mode
User Mode is a system mode in Windows that allows users to run applications and perform tasks without requiring administrator-level permissions. Here are the steps to enable User Mode in Windows:
- Press the Windows key + R to open the Run dialog box.
- Type “gpedit.msc” and press Enter to open the Group Policy Editor.
- In the left pane of the Group Policy Editor, navigate to “Computer Configuration” > “Administrative Templates” > “System.”
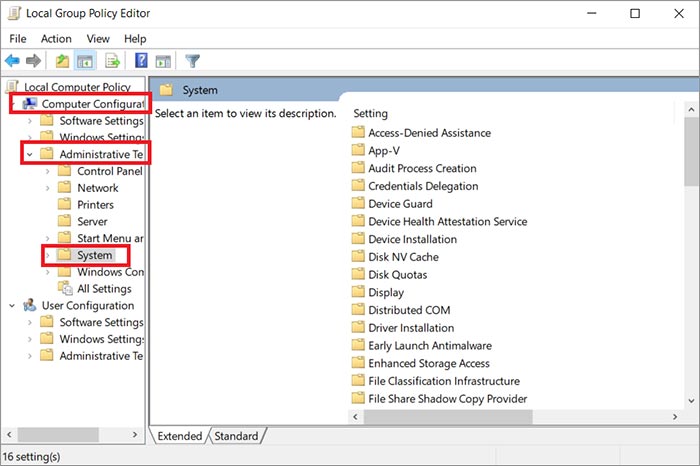
- In the right pane, locate and double-click on the “User Account Control: Switch to the secure desktop when prompting for elevation” policy.
- Select the “Enabled” option.
- Click “Apply” and “OK” to save the changes.
- Close the Group Policy Editor.
After completing these steps, Windows will enable User Mode, and you can perform tasks that do not require administrator-level permissions.
Conclusion
Enabling Secure Boot is crucial for maintaining the security of your system. However, if you face the “Secure Boot Can Be Enabled When System in User Mode” issue, you can use the above methods to fix it.
Ensure that your system is running in User Mode, update your firmware to the latest version, and repair any corrupted BCD files to enable Secure Boot successfully.
FAQs
What is Secure Boot?
Secure Boot is a built-in feature with most modern PCs and laptops. When enabled, Secure Boot ensures that only trusted software is loaded during the bootup process, providing an added layer of security to the system.
What is the difference between Quick Scan and Deep Scan?
Quick Scan assists you in scanning the chosen drive faster. This mode is useful in all data loss or deletion cases.
On the other hand, Deep Scan does a thorough, file signature-based search to maximize the recovery possibilities.
Was this article helpful?