All of us are familiar with Blue Screen of Death issues and how they can make the OS crash. These have long been a part of Windows and signal severe problems like machine check exception.
Before taking action, you must first figure out the root source of the BSOD issues. The problem is that the stop code that comes with the error doesn’t give much information about it.
So, what does BSOD machine_check_exception error mean, and how can you solve it? Let’s proceed to the next part and discuss this specific problem in greater detail.
What are the causes of the machine_check_exception error code?
A Machine Check Exception (MCE) typically represents a hardware issue with your machine. You can boil down an MCE error to a few fundamental causes:
- Defects in the system hardware
- Problems and stress brought on by overclocking
- Memory problems
- Corrupted or outdated drivers
Because they deal with hardware and nearly everything else, machine check errors can originate from anywhere.
How to fix Machine Check Exception Error Message
1. Update drivers
System driver updates are among the most popular Machine Check Exception error solutions. On Windows 10/11 computers, outdated drivers are becoming less common as Microsoft manages driver upgrades automatically.
That does not, however, imply that outdated drivers cannot or will not occur. In the Update & Security subsection of the Settings panel, Windows 10/11 provides a list of the drivers it updates. Here’s how to check for driver updates:
- To access the Settings panel, press Windows Key + I, choose Update & Security or Windows update, then Update history. You can check if Windows updated any drivers here.
- Enter device manager in the search box on the Start menu now, then click on the best match.
- As you scroll down the list of devices, look for any error symbols. If there isn’t anything, it’s unlikely that your driver status is the problem.
- If any error symbols are found, right-click on the device and select Properties. In the device status, the box device manager will provide you with a description of the issue.
- By right-clicking the device, you can also choose Update to make Windows look for a better version of the driver across the web.
2. Disconnect incompatible devices
Disconnecting the non-critical peripherals should be your first line of defense when dealing with the stop code machine check exception problem. Many of these gadgets are known to interfere with the OS’s operation and result in several faults.
Start by unplugging accessories that are not essential, such as the printer, speakers, and other similar devices. Once finished, restart the computer to see if you have fixed the machine_check_exception error.
3. Disabling overclocking
The machine components are typically under a lot of stress when overclocked. If done properly, you can increase the performance of your system hardware. There are innumerable instructions for overclocking nearly every piece of hardware, and online forums are brimming with user overclocking stories.
Even if you stay within the reasonable bounds of the declared hardware restrictions, overclocking still puts more load on your hardware. The Stop code machine_check_exception may be resolved by resetting any overclocking. You likely need to access the system BIOS or UEFI menu. Following are the steps:
- Turn off your computer.
- Boot your computer into BIOS by pressing the BIOS/UEFI menu access key (usually F2, but other common keys include F1, F10, DEL, and ESC).
- BIOS and UEFI settings differ based on the manufacturer, but menu titles are frequently the same. You’re trying to find an overclocking choice. The Advanced, Performance, Frequency, or Voltage menus are where you can find overclocking settings.
- Locate the menu, then reset the overclocking settings.
Try resetting your entire BIOS if clearing your BIOS/UEFI overlock settings doesn’t fix the issue. There is a choice to reset the BIOS settings somewhere in the BIOS menu completely. Choose the option after locating it.
If your PC has problems due to bad memory, a memory diagnostic program can help you identify and fix the problem in the best-case scenario.
- To open the Search menu, press Windows + S. In the text box at the top, type Windows Memory Diagnostic. Then click the appropriate search result.
- Next, select Restart now and check for problems (recommended) from two options.
Before using the memory diagnostic tool, save any open work to prevent data loss. Check to see if you resolved the Machine Check Exception Windows 10 error after you restarted the system.
5. Run CHKDSK
Run Windows Check Disk from the Command Prompt to get this built-in Windows tool. CHKDSK checks your system files and corrects any problems it finds.
- Enter command prompt in the search bar on your Start menu, then right-click the top result and choose Run as administrator.
- Next, enter the command chkdsk /r and press Enter. The command will check your system for faults and address with any problems.
6. Run SFC scan
Run the System File Check after that. Another system utility in Windows that scans for missing and damaged data is SFC. Unlike CHKDSK, which analyses your entire drive for faults, SFC selectively checks for Windows system files.
However, it is important to double-check that everything is fully operational before executing the SFC command.
- Enter command prompt in the search bar on your Start menu, then right-click the top result and choose Run as administrator.
- Type SFC /scannow into the command prompt window and hit Enter.
- Windows system files are checked for integrity using the system file checker software and may need to be repaired.
- Restart the computer after the procedure is finished.
7. Run DISM scan
Deployment Image Servicing and Management is called DISM, a built-in Windows tool with various capabilities. In this instance, the DISM Restorehealth command ensures that no files are left unchecked. Work your way through the next steps.
- Enter Command Prompt in the Start menu search box, then right-click and choose Run as administrator.
- Enter the command DISM /online /cleanup-image /restorehealth and press Enter.
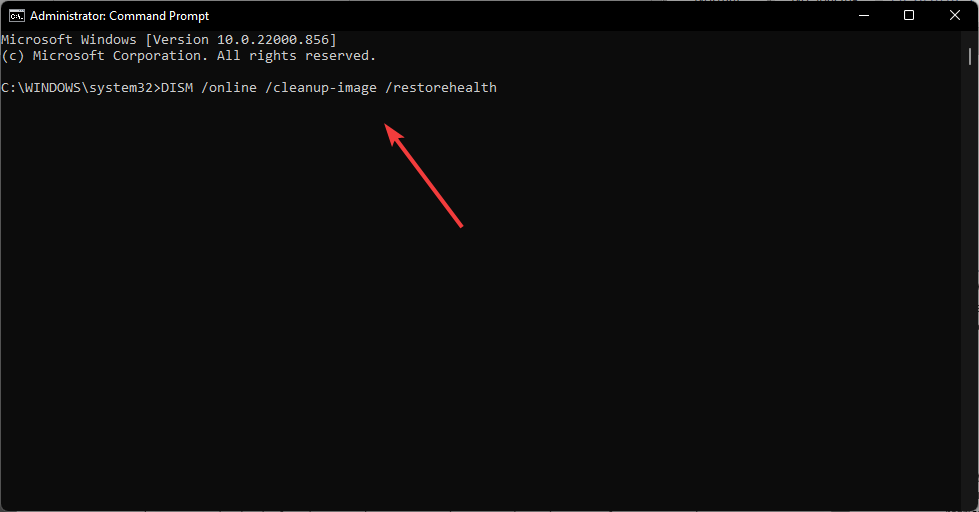
- Depending on the state of your system, the process could take up to 20 minutes. Wait for the procedure to finish, even if it sometimes it seems to be stalled.
8. Restart Windows
Use Windows 10’s Reset feature to reset your system files if all else fails. Windows 10 Reset replaces your system files with a brand-new set of files, which should ideally resolve any lingering Machine Check Exception error-related difficulties while preserving most of your crucial files.
- Go to Settings, select Update and Security or Windows Update, and then Advanced.
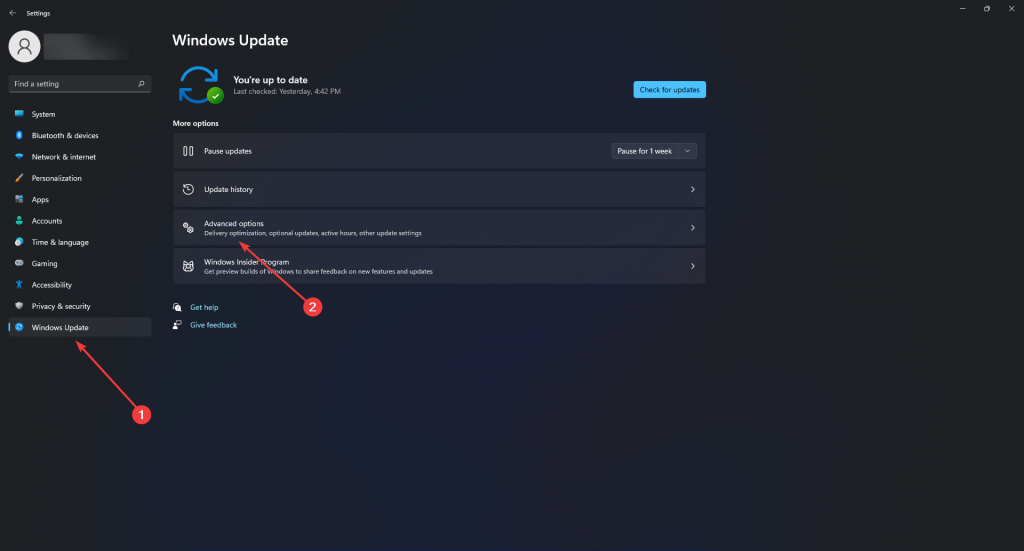
- Select Recovery, then click Get started under Reset this PC. As soon as you press the button, your system restarts, so be sure to back up any important files first.
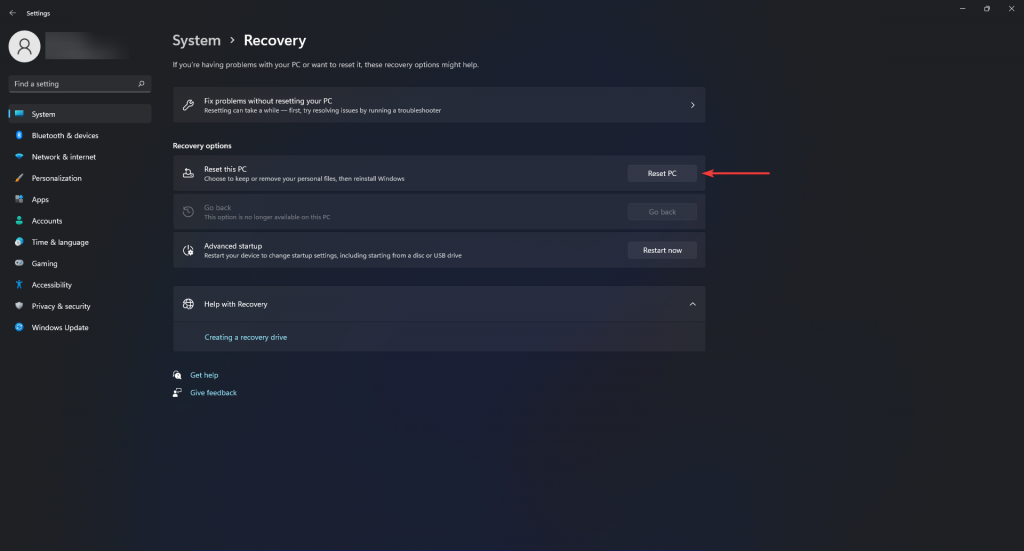
- After a system restart, you can choose between keeping your current files and deleting everything.
The system will completely erase the data on the chosen hard drive partition during a clean installation of Windows 10/11. It would help if you used specialized data recovery software in these situations to retrieve lost data.
Such data recovery tools use potent scanning algorithms to thoroughly scan, recover, and restore the deleted files from your hard drive. These recovery software are equipped with concise documentation, self-explanatory user interface, automated recovery process, and powerful recovery functionality.
What is a Stellar Data Recovery professional?
Stellar Data Recovery Professional for Windows is a potent solution for all your data recovery requirements. Data can be successfully recovered with the software in various loss scenarios, including deletion, drive formatting, disk corruption, lost or deleted partitions, drive failures, crashed systems, and even a complete Windows 10/11 reset.
Here’s how to get your files back:
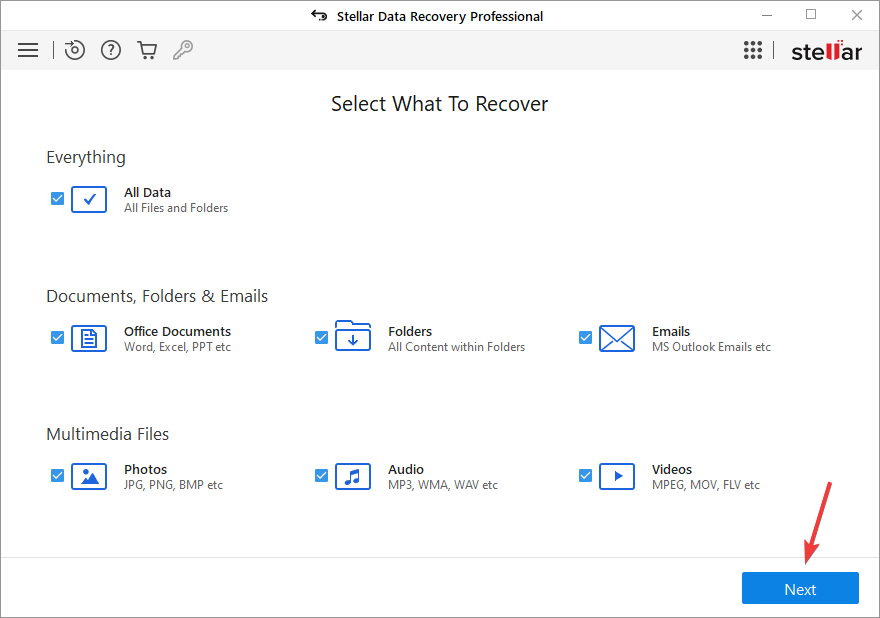
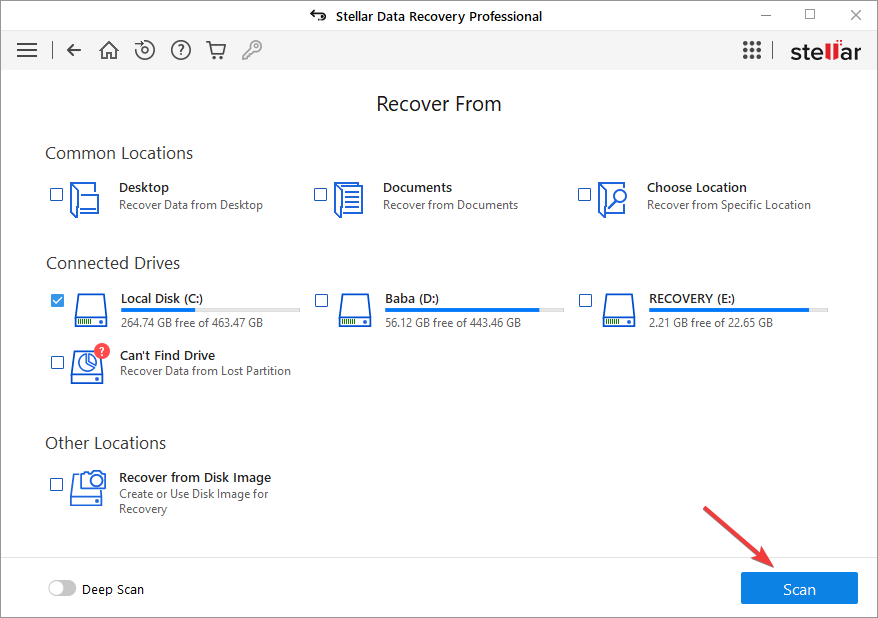
- Select the folder location or drive volume and click Scan.
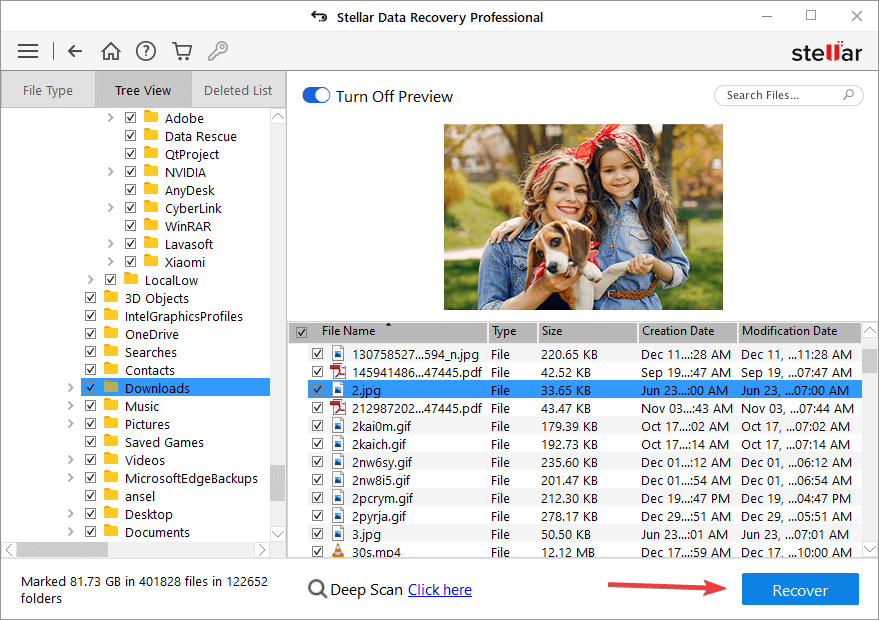
- Select files after the scan and click Recover to save recovered data.
No more blue screens
The approaches above can assist you in identifying the cause of the problem, even though the causes of this kind of breakdown can be highly varied. You can also recover your files using Stellar Data Recovery Professional even if your computer won’t boot up because of the error.
If you cannot resolve the problem, your best action is to have a professional come out and look at the machine. Technicians have cutting-edge tools and software that will instantly diagnose the issue and enable the specialist to resolve it efficiently.
FAQ
Why do I need a Stellar Data Recovery software professional after Windows reset?
Restarting your windows will reinstall all your windows files and wipe the computer of all data and information. Of course, taking a backup before the restarting process can be very useful, but recovering files from the backup can take time or even not return your files completely. But Stellar guarantees data consistency and will retain the files that you have lost.
Will the application let me view my files before restoring them?
While scanning the storage media, the software shows an improved glimpse of the lost and deleted files, including documents, audio, video, ZIP and RAR files, etc. Additionally, a full-screen sample of the video files is available. The software elegantly categorizes the scanned data in Tree View, File Type, and Deleted List formats for simple data sorting and verification before saving.
What if I can’t boot my PC?
Stellar Data Recovery Professional creates bootable media to recover data from a Windows PC that freezes or crashes due to hardware- or software-related failures, such as BSOD, boot sector corruption, Windows system file damage, disk errors, etc., which you can use to recover files without fully booting up the PC.
Was this article helpful?