How to Recover Saved & Unsaved Word, Excel, PowerPoint Files on Mac?
-
Written By Santosh Kumar Gupta

-
Approved By Tanushree Chatterjee
-
 Updated on 16 Feb, 2024
 -
 Min Reading 7 Min
 -
Share


Summary:
Losing an unsaved Word, Excel, or PowerPoint file due to the crashing of the Office app or abrupt shutdown of your Mac is entirely possible. That’s not all; you might even lose your saved ‘Office for Mac’ file due to accidental file deletion, drive corruption, volume formatting, etc.
Don’t worry! In this blog, we’ll share different methods to recover saved and unsaved Office for Mac files.
Table of Contents
Suppose you’re working on a high-priority multi-sheet Excel workbook (say tracking sales record) and simultaneously preparing Word templates and PowerPoint presentations to give it a visual kick. Suddenly, out of nowhere, before saving all your files, you accidentally end up closing all the windows, or your Mac shuts down unexpectedly. You would think that your files are gone, but that’s not the case. Irrespective of how it happened, there’s a fair chance you can recover your unsaved files. Find out how:
1. Recover Unsaved ‘Office for Mac’ File
A. Using AutoRecover
AutoRecover is a built-in feature in Word, Excel, and PowerPoint for Mac that attempts to recover Office files automatically after a system or app crash. This feature saves a copy of the Office file in the background every 10 minutes. But, if you save your file manually while working on the Office file, the previous AutoRecover files are deleted.
The Office app automatically opens the recovery file for you to save the unsaved file in any mishap. But, if you close the file and click Don’t Save, the AutoRecover file is removed immediately.
Also, you can access the AutoRecovered files by using the given steps:
a) Click the Finder icon from Dock, and navigate to Go > Go to Folder from the Menu bar.
b) In the Go to Folder text box, type the following path as per the Office app:
Word: Users/<username>/Library/Containers/com.microsoft.Word/Data/Library/Preferences/AutoRecovery
Excel: /Users/<username>/Library/Containers/com.microsoft.Excel/Data/Library/Application Support/Microsoft
PowerPoint: /Users/<username>/Library/Containers/com.Microsoft.Powerpoint/Data/Library/Preferences/AutoRecovery
Here: you need to replace the <username> word for the actual Mac user name.
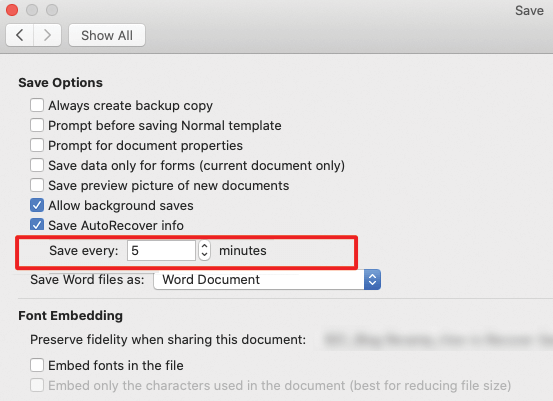
Please note that you can set AutoRecover frequency in Word or PowerPoint to an optimum value, say 5 minutes, to minimize data loss. Also, Excel doesn’t allow you to set AutoRecover interval, as it automatically optimizes the interval to increase your chances to recover excel file in Mac.
The steps to set AutoRecover frequency for Word or PowerPoint are as follows:
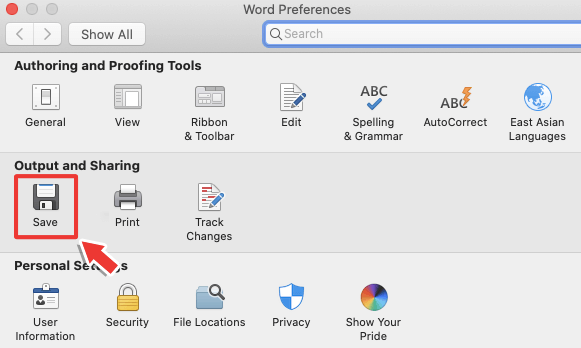
a) Click the Word or PowerPoint menu from the Menu bar, then choose Preferences.

b) Under Output & Sharing, click Save.
c) Ensure Allow background saves and Save auto-recovery info are selected.
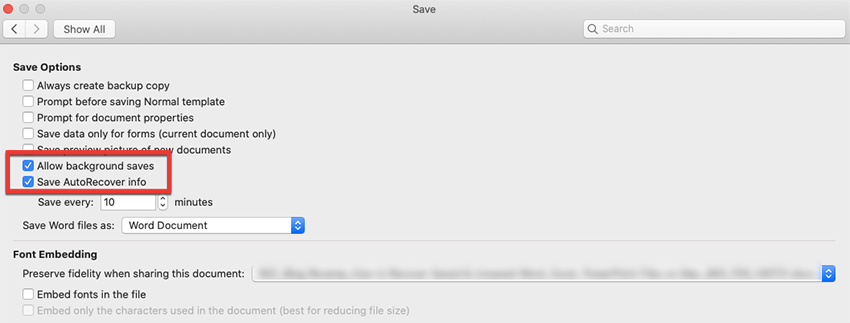
d) Set the “Save every: minutes” option to an optimum value, then close the Save window.
B. Using AutoSave
There is no substitute for pressing the Command + S hotkey or clicking the Save button frequently to save Office for Mac file during your work. But, the AutoSave feature is quite helpful to automate the manual save process. So, you don’t need to worry about saving the file on the go. The AutoSave feature is available in Word, Excel, and PowerPoint for Microsoft 365 for Mac. When the AutoSave feature is enabled, you rarely need the AutoRecover files to salvage your unsaved data.
C. Using Temporary Folder
While working on a PowerPoint presentation if your app or system crashes before you save it, you can access the PowerPoint recovery file on Mac using the temp folder.
Follow the steps mentioned below to locate the PowerPoint temp files:
a) Go to Applications > Utilities > Terminal.
b) In the Terminal window, type open $TMPDIR and hit Return.
c) Select the folder named ‘Temporaryitems’.
d) In ‘Temporaryitems’, find the required PowerPoint file and restore it. For example, the unsaved PowerPoint file will be named ‘PowerPointfile B$123.tmp’.
e) Open the file with ‘TextEdit’ because a .tmp file won’t open with PowerPoint.
2. Recover Text from Damaged ‘Word for Mac’ File
If your Word for Mac file is damaged, you can recover the text or repair the file. The steps are as follows:
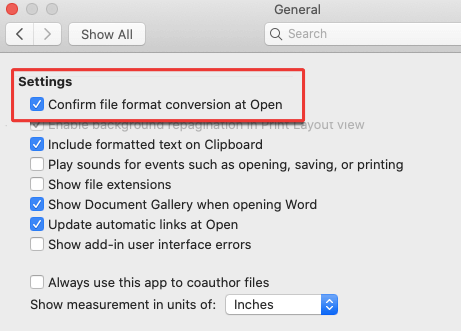
a) Click the Word menu from the Menu bar, then choose Preferences.
b) Under Authoring and Proofing Tools, click General.

c) Select the ‘Confirm file format conversion when opening’ checkbox, then close the window.
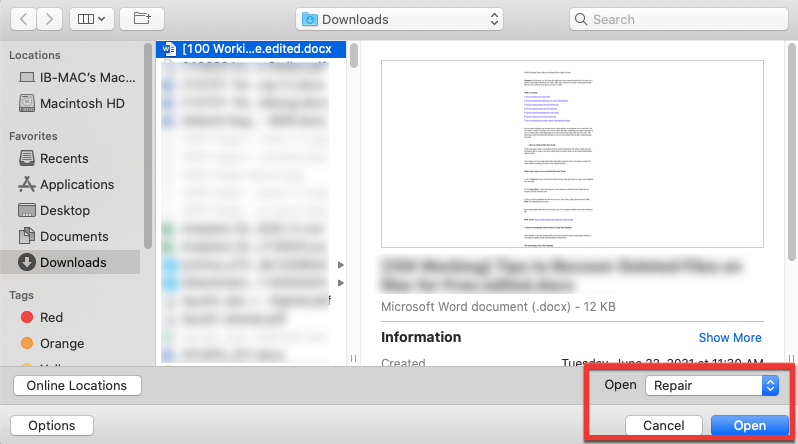
d) Navigate to File > Open.
e) In the bottom-right corner, click the Open menu, and select Recover Text or use Repair.
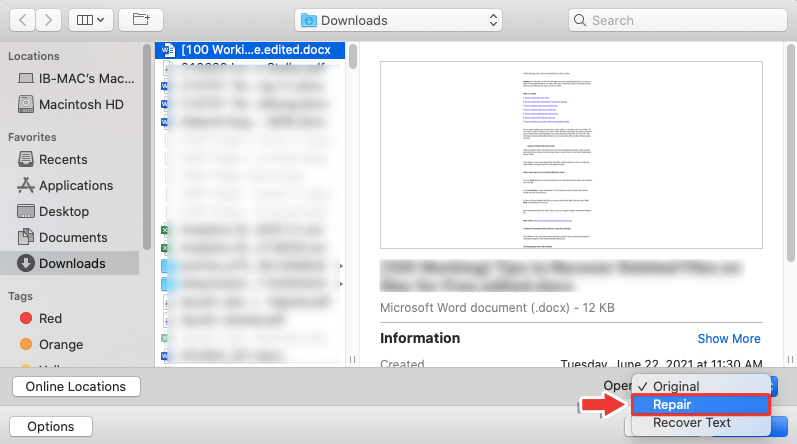
f) Click the Open button to open the recovered or repaired Word file.
3. Recover Deleted ‘Office for Mac’ File
A. Using Trash
Trash is a repository of deleted files that temporarily stores all your deleted items (say your Word, Excel, and PowerPoint files) unless you delete the files from Trash or empty Trash. So, for example, when you accidentally delete your ‘Office for Mac’ files (but not permanently), you can always check them in the Trash folder, and if found, you can restore them from there. The steps are as follows:
Step 1) Open Trash, then search the deleted files. Next, select all the required deleted files.
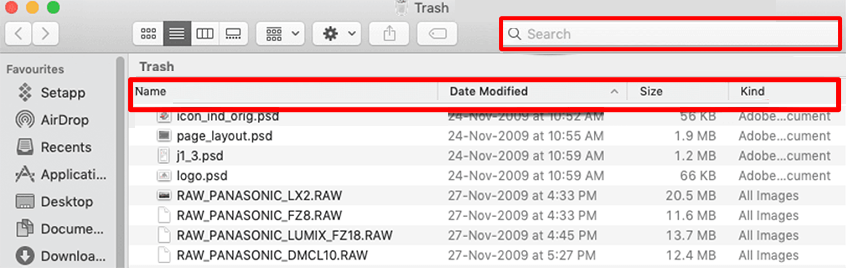
Step 2) Right-click the selection and choose ‘Put Back’. All the selected files restore from Trash to their original location.

Step 3) Alternatively, you can drag and drop the deleted files from Trash to the Desktop or anywhere in Finder.
But if you delete the files permanently using the permanent file deletion command or empty your Trash folder, you can’t use Trash to restore the deleted files.
Also Read – How to Recover Files Emptied from Trash
B. Using Time Machine
When you delete your Word, Excel, or PowerPoint files permanently from your Mac, restore them using their duplicate copy. Fortunately, macOS provides the Time Machine app with every Mac device that takes incremental backup of Macintosh HD to an external backup drive.
Suppose you’ve set up a Time Machine backup drive and selected the “Back Up Automatically” checkbox. Also, you’ve kept your Time Machine backup drive connected to your Mac, either via physical wire or wirelessly. Then, your Mac performs the incremental backup during its stipulated time—hourly, daily, and weekly.
Using the Time Machine backup drive, you can restore the deleted ‘Office for Mac’ files. The steps are as follows:
Step 1) Make sure your Time Machine backup drive is connected to your Mac.
Step 2) On the Menu Bar, go to Time Machine > Enter Time Machine.
Step 3) Find the deleted Office for Mac files by using Timeline or Up and Down arrows.
Step 4) Select all the deleted files, then click Restore. The selected files restore to their original location.

Time Machine backup drive is also helpful in restoring data when your macOS turns corrupt, Mac fails to boot, or all your Mac storage drive data is lost due to drive erasure.
C. Using Mac File Recovery Software
When you don’t use Time Machine to back up your Mac or the Time Machine backup is old, you need to leverage a free data recovery software for Mac to recover your deleted Office for Mac files. A data recovery software can help you recover deleted PowerPoint, Excel, or Word for Mac files quickly. The steps are as follows:
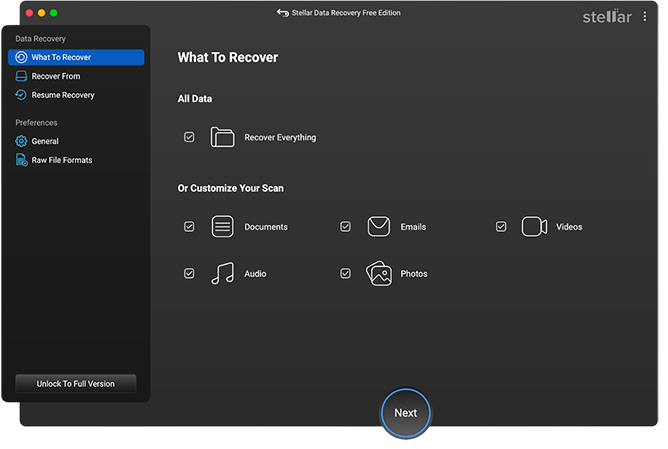
Step 1) Download and install Stellar Data Recovery Free Edition for Mac. Launch the software.

Step 2) Toggle on Document file type, then click Next. Next, specify the drive location from where you wish to recover deleted files, toggle on Deep Scan, then click Scan.
Step 3) Preview and recover up to 1 GB of the recoverable files to a distinct drive location to avoid overwriting. (Watch the below software tutorial)
Note: Stellar Data Recovery Free Edition for Mac allows free drive scanning, free scanned file previewing, and up to 1 GB of free file recovery. To recover more files, activate the software. Also, the software comes with a 30-day money-back guarantee.
The Office for Mac files must have been saved initially on the Mac storage drive to recover them through the software. If you accidentally delete files, erase a volume, or lose data while downgrading or upgrading macOS, launch the software to retrieve all the missing files.
Final Thoughts
It is a good practice to save all your files and back up your Mac periodically by using Time Machine to prevent any untoward data loss situation. Also, ensure the AutoRecover option is enabled in PowerPoint, Word, and Excel for Mac. For Word and PowerPoint for Mac, set the AutoRecover frequency to an optimum value (say 1 minute).
To recover unsaved Word document on Mac or other unsaved Office file, use the temporary or AutoRecovery folder. You can launch the Terminal command to retrieve the folder but apply your technical expertise to prevent any error. To recover lost Word Document on Mac or other deleted Office files, you can always check the Trash folder. In case of accidental Office file deletion, unintentional drive formatting, or corrupt storage device, leverage Stellar Data Recovery Free Edition for Mac to recover saved Office for Mac files. The software facilitates quick and easy recovery of the ‘Office for Mac’ files.
Was this article helpful?
 YES0
YES0
 NO
NO
About The Author
Santosh is a technical writer with 10-year experience in writing. He writes troubleshooting blogs, articles, and other web content on a variety of topics, including data recovery, data security, and data backup. His hobbies include solving puzzles, gardening & painting.


Thank You for Sharing this informative article! Very well-written
how can i recover my excel autosavefile..i accidently didnt saved. ?
Hello Rajeev,
Please use the demo version of Stellar Data Recovery Professional for Mac software to check the recovery possibility.
Stellar Mac Data Recovery Professional is a easy to use application for lost office files recovery. Around six months back I tried this software.
Thanks Greg for using Stellar Mac Data Recovery application.
Hi, I am new to Mac and something terrible happened to me in the morning. I was editing an excel file from an external drive but later deleted it accidentally from the drive. Can you tell where is trash located on external drive and how can I recover the file, the one I deleted?
Connect your external drive to your Mac and look into the Trash can for the deleted files. If you are unable to find the files, you can download Stellar Data Recovery Professional for Mac software to restore deleted data from external drive. You need to activate the software to save the deleted files.
Hi,
How can I recover a file that was csv format but I was working on sheet 2 which csv doesn’t support. When closed the main sheet was lost and the other remained. Please help.
Hi Tulika,
Did you follow the methods described in the blog above? If you lost your unsaved document then kindly apply the methods suggested above.
Yes, I did follow but couldn’t find anything.
Is there any chance to recover overwritten excel files on Mac?
Darren, It is difficult to recover overwritten excel file. However, I recommend you to run the Stellar Mac Data Recovery software and toggle Deep Scan to get better scan result.