WAV is an audio format developed by Microsoft and IBM for storing uncompressed audio data. The format was formerly known as WAVE (Waveform Audio File Format) and is now referred to as WAV because of its filename extension .wav or .wave.
This format is used to save high-quality audio, like sound effects and music tracks, as it preserves the quality of the original audio source. WAV files are used in recording studios, professional audio production, and for archiving purposes to maintain the original quality of the audio. You can open WAV files on different platforms like Windows Media Player, VLC, Winamp, iTunes, and QuickTime.
WAV files don't use any data compression, which is why they are large and take more storage space in your drive. Like other file formats, WAV files are also prone to accidental loss or deletion due to various reasons. Let’s look at one such scenario:
“I was recording a new song of an upcoming singer in WAV format. After two days of rigorous playbacks, I captured the perfect track and wrapped up the recording session.
Later, I started transferring the audio file from the SD card to my computer. Since it was a high-quality WAV format audio, it was taking a long time transferring. However, luck was not on my side, as a sudden power failure interrupted the transfer process. When I tried to re-open that WAV file, it was lost from the SD card.
I was shaken to the core as I had just one copy of that track which seemed lost now. I am still looking for ways to recover lost WAV files in case of no backup. Please help!”
Probable Reasons for Losing WAV Files
The above scenario is only one of many instances where a music producer lost the WAV audio file. But what leads to it?
There can be several reasons for losing WAV files, such as malfunction of the recording equipment and software, power outage during recording, or transferring the audio file. Often, you can lose your WAV file when you accidentally delete it while organizing or freeing up the space in the storage device or when there’s a hardware failure.
How to Recover Deleted WAV Files?
Before recovering WAV files,
- Stop using the hard drive or other storage media from where you deleted the audio files.
- Don't save any new audio files on the drive to avoid overwriting data.
Now, let’s look at different methods to recover WAV files from Mac and Windows PC.
WAV File Recovery for Mac
You may lose your WAV files stored on a Mac to accidental or intentional deletion, sudden power outage, or virus intrusion. In such a situation, stick to the methods mentioned below to recover deleted WAV files from Mac.
1. Recover WAV Files from Trash
Check deleted WAV files in the Trash folder of your Mac. This folder stores deleted audio files and other data for 30 days, after which it automatically gets deleted.
2. Use Time Machine Backup
If you are using Time Machine to back up your WAV files, you can easily recover lost or deleted WAV sound files. Here's how to retrieve deleted WAV files from Time Machine:
- Connect your Time Machine Backup drive to your Mac.
- Go to Apple menu > System Preferences > Time Machine.
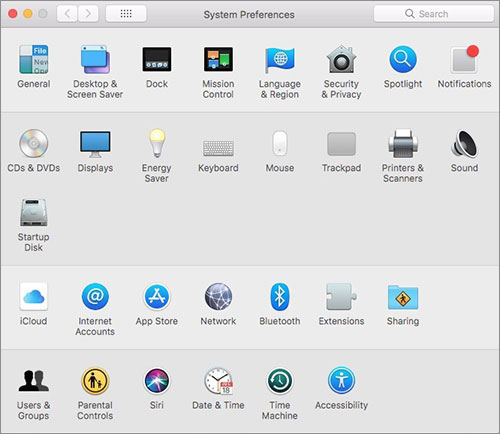
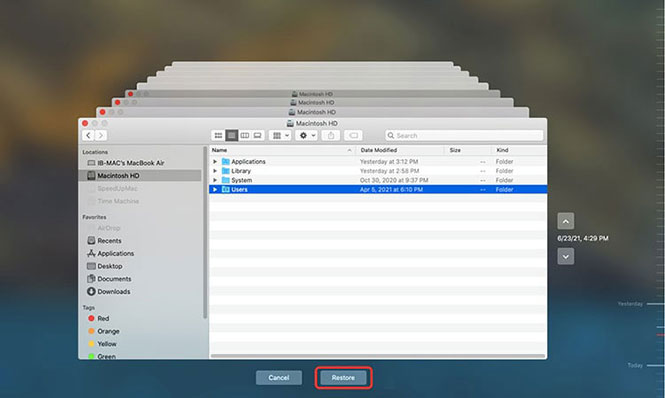
- Use the Up/down arrows to navigate the backups.
- Choose the date of your last backup and look for your deleted WAV files backup. Click Restore to recover that backup.
3. Recover Audio Files using Stellar Photo Recovery for Mac
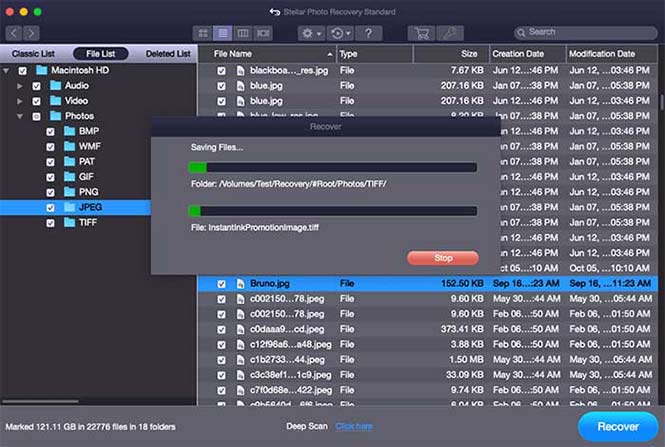
If you cannot recover the deleted WAV files using the Trash folder or Time Machine, use a professional WAV file recovery software like Stellar Photo Recovery for Mac. This audio file recovery software easily retrieves lost or deleted audio of any file format, including WAV, WMV, MP3, M4A, etc., from internal or external Mac storage drives.

Here's how to recover audio files using the Mac photo recovery tool.
- Download, install, and launch Stellar Photo Recovery for Mac.
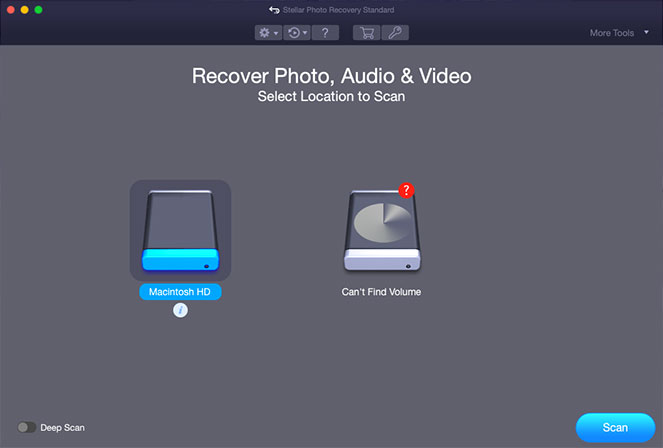
- On the home screen, select the drive from which you want to restore WAV files. Click Scan.
- Once the scan is completed, you see the list of recoverable files and preview them.
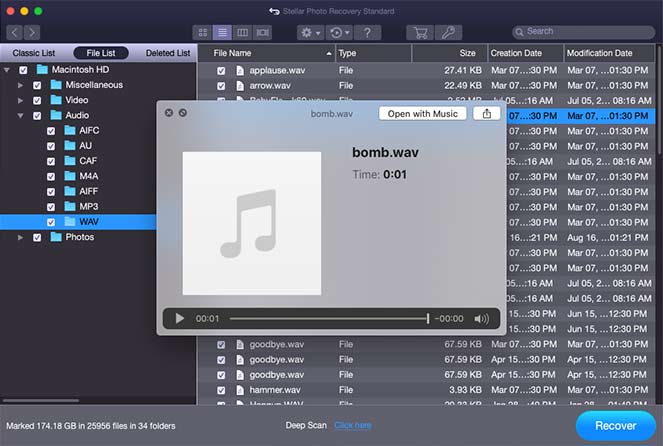
- Select the required WAV files and click Recover to save them at any desired location.
WAV File Recovery for Windows
If you lost or deleted WAV files from your Windows, follow the below steps to retrieve them.
1. Recover WAV Files from Recycle Bin
Normally, the deleted WAV files in the Windows PC go to the Recycle Bin and stay there for approx. 30 days unless removed automatically or manually.
2. Use Windows File History
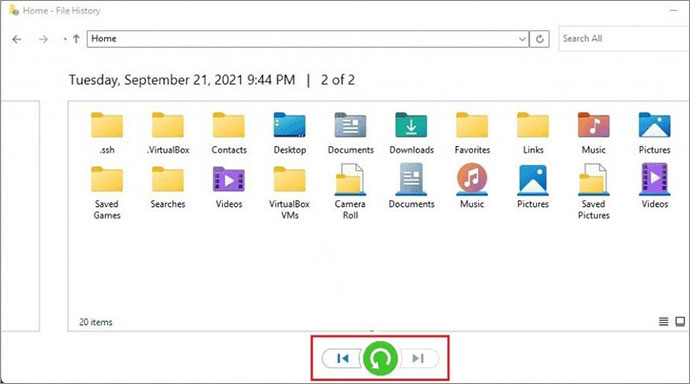
If you habitually take regular backups of your audio files using any of the built-in Windows utilities, retrieve WAV files from those backups. Here's how to recover WAV files using the Windows File History utility.
- Type Control Panel in the Windows search box and click Open to launch it. Go to File History.
- Click Restore Personal files, and choose the backup folder that may have your WAV files. Click Restore and save recovered audio files at the desired location.
3. Recover WAV Files using Audio File Recovery Software
The best and quickest way to restore deleted WAV files is by using reliable audio file recovery software like Stellar Photo Recovery. The WAV file recovery tool easily recover your lost or deleted WAV files in all data loss scenarios like accidental deletion, corruption, formatting, virus attack, etc.

Here's how to recover WAV files using Stellar Photo Recovery software:
- Download and install Stellar Photo Recovery software on your Windows PC.
- Launch the software and select the drive from which you lost your WAV files.

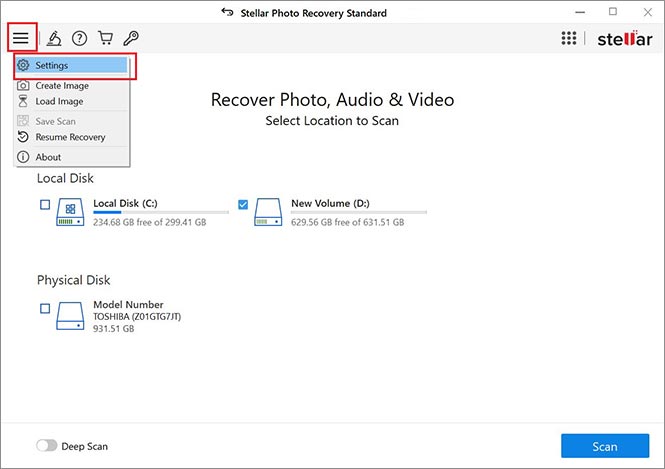
- Click on the hamburger icon at the top and click the Settings option.
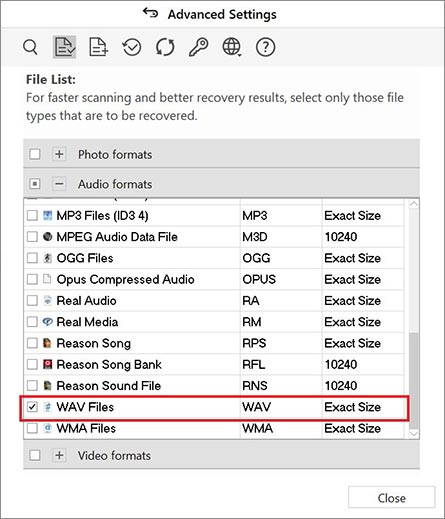
- Go to File List, then under Audio format, scroll down, tick the checkbox against WAV Files, and uncheck all other formats. Click Close.
- Next, click the Scan button on the Home screen to initiate the scanning.
- Once the scanning completes, you will see the list of recoverable files. To preview WAV recoverable files, navigate to File Type in the left pane, click the Audio option, and choose WAV.
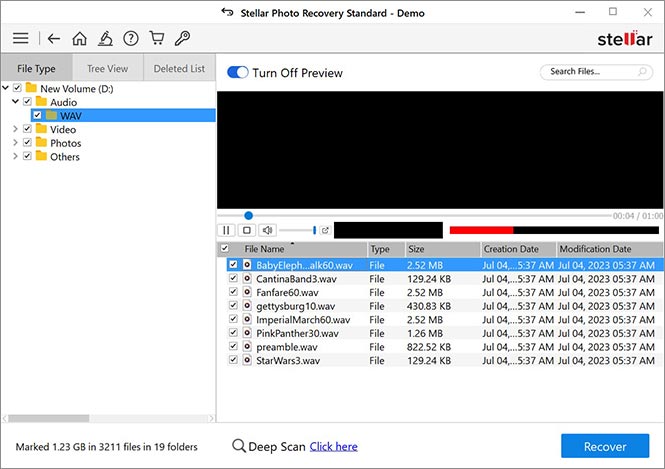
- Select the WAV files you want to restore, click Restore and save the files at any desired location
Tips to Prevent WAV Files from Getting Loss
- Double-check your audio files before deleting them.
- Take regular backups of your WAV files using a built feature Mac or Windows PC, external drive, or Cloud storage.
- Ensure to maintain multiple backups or your WAV files in 2-3 places.
- Use good antivirus software to ensure overall security from viruses or malware.
Conclusion
WAV file recovery on Mac/ Windows PC is challenging if you cannot find the deleted WAV files in the Trash or Recycle Bin folder or don't have the backup. However, in such a data loss situation, use a professional WAV audio file recovery software like Stellar Photo Recovery. This audio recovery tool retrieve WAV files lost due to data loss scenarios, sudden power outages, accidental deletion, virus attack, etc., from all storage devices.
Here’s a free trial you can download to evaluate the effectiveness of the software.


Are WAV files good for editing?
WAV files are lossless formats that are much larger and provide better sound quality. Due to these reasons, WAV files are ideal for recording and editing audio.
Why is my WAV file not playing?
If your WAV file is damaged due to incomplete transfer of audio from one source to another or virus intrusion, then it may not play.
WAV vs. MP3. Which Is Better?
WAV files provide a higher level of sound quality but are substantially larger, making them difficult to store and transfer. However, with MP3 files, you get low-quality audio that can be easily transferred and stored because of the compressed file sizes.
How do I play WAV files on my mobile phone?
Use the built-in media player and third-party media players apps like VLC and MX Player to play WAV files on Android smartphones. Likewise, on iPhone/iPad, use the built-in Music app or nPlayer, VLC, or Foobar2000 to play WAV audio files on iOS devices.
Was this article helpful?