Recover Deleted Photos From SD Card: 9 Proven Solutions
Summary: Photos stored on an SD card may get deleted or lost due to accidental deletion, damage, or corruption. Such a situation demands instant SD card recovery. Continue reading this article to understand all types of photo loss scenarios on SD memory cards and the working ways to recover the lost photos.
SD cards, or Secure Digital cards, are widely used in digital cameras and other handheld devices. They are also used in computers, smartphones, or other gadgets to help you access your files whenever you need them.
Since their introduction in 1999, SD cards have evolved significantly, now offering various capacities, speed classes, and bus interfaces. Despite their many advantages, such as simplicity, affordability, and portability, SD cards are not the most durable. They are prone to damage and corruption, with risks including accidental formatting and other errors.
If you're reading this, chances are you have encountered a loss of data, including your precious photos, on your SD card. However, the good news is that it's still possible to retrieve your cherished memories. This guide helps you explore different photo loss situations and explain the process of photo recovery from SD cards.
But let’s first understand the intricacies of data loss on SD cards.
What Happens to the Deleted Photos on the SD Card?
When data is lost from an SD memory card, most assume that deleted data is lost forever and can't be recovered. But the reality is different. What if we tell you that the lost data is still available on your SD memory card?
Yes, it’s true. When you format an SD card or delete the photos stored on it, you’re only deleting the pointers to the photos’ physical location on the card from the MFT (Master File Table) or FAT (File Allocation Table) index.
Here, the data is moved to another sector of the SD memory card. So if the data is still there, why is it not visible? It’s because the sector where the data now resides is not readable by your device. The system moves the deleted data to another location and marks the space available for new data.
The deleted data remains there until new files overwrite it. This is why it is advised that you immediately stop using the SD memory card in the event of data loss. Doing so prevents the deleted data from getting overwritten, and you are able to recover that data.
What Leads to Photo Loss on the SD Card?
There are various scenarios in which you may lose photos on an SD memory card. It can be anything from accidental deletion to memory card corruption. Below are some common SD memory card data loss scenarios that users face:
- Accidental deletion
- Damage or corruption
- Accidental formatting
- SD memory card loading errors (e.g., card not detected, card not readable, etc.)
- A broken or scratched SD memory card
- Permanent erasure from the SD memory card
These are some of the most common photo loss scenarios you may face. For most scenarios, we have listed some quick fixes in this article. So try these methods first before moving on to more complex forms of data recovery.
Method 1: Check Recycle Bin
The Recycle Bin folder on a Windows PC contains deleted files and folders. If you accidentally deleted photos from your SD memory card connected to your PC, you’ll find the deleted photos in the Recycle Bin. So, the first thing you should do is check Recycle Bin.
Open the Recycle Bin folder on your desktop. Look for your deleted photos in this folder. If you find them, right-click on the files and hit Restore. Your photos will be restored to their original location.
Method 2: Access the SD Card Using a Different Device
Suppose your SD memory card has become unreadable and is not showing up on your device. The easiest fix is to access the SD memory card using a different device. Most Android smartphones and tablets come with SD memory card support. Insert the SD memory card into another device to see if it shows up.
If the SD memory card is readable on a different device, then there is an issue with your PC or phone’s SD memory card slot or card reader. You need to get your card reader replaced. But if the SD memory card doesn't show up on a different device as well, there is a problem with your SD memory card. In this case, move on to the next method.
Method 3: Assign a New Drive Letter to the SD Card
Every SD memory card has a drive letter assigned to it. When you connect the SD memory card to a computer, the drive letter appears under available storage. If your computer recognizes the SD card but cannot access it, you should try assigning a new drive letter to it. Many users have reported that changing the drive letter made their SD card accessible. Below are the steps to assign a new driver letter to an SD memory card on Windows 10/11.
Step 1: Press the Win + X keys on your keyboard to open the WinX menu.
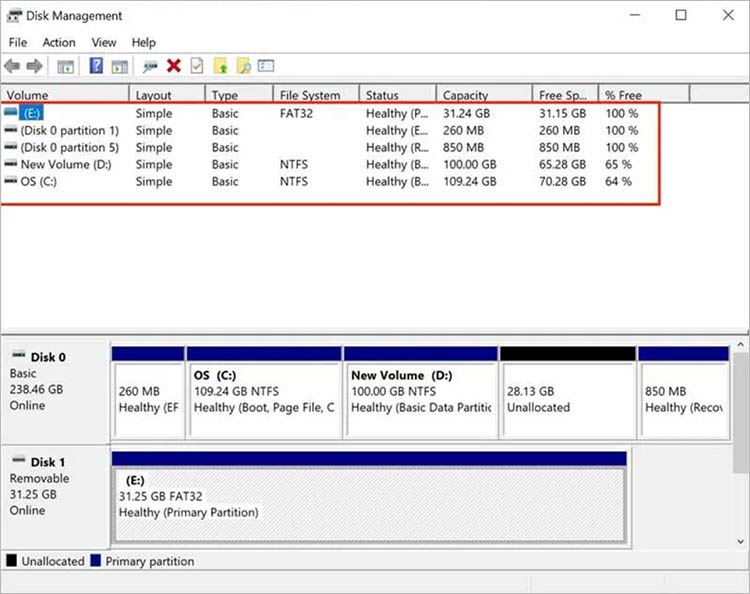
Step 2: From the menu options, select Disk Management. A list of all the internal and connected drives will be displayed.
Step 3: Select your SD memory card and right-click on it.
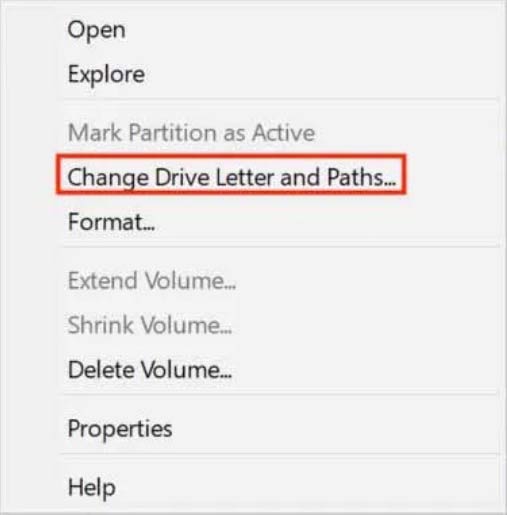
Step 4: Select Change Drive Letter and Paths.
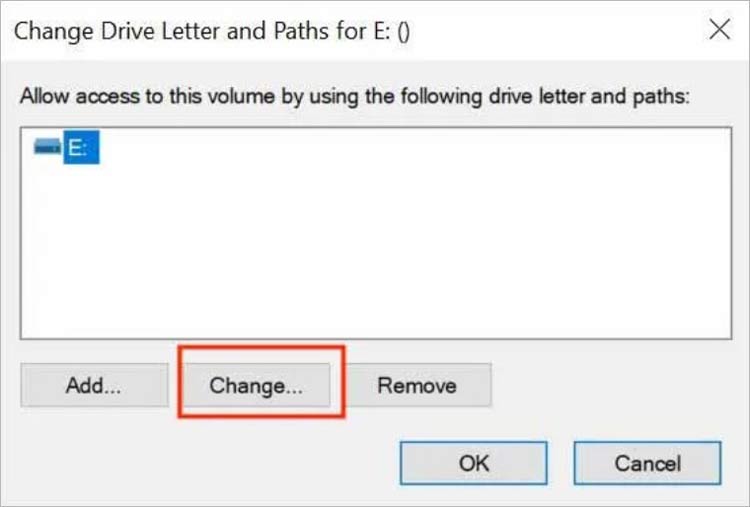
Step 5: On the next screen, click Change.
Step 6: Now tap the drop-down menu icon next to Assign the following drive letter option.
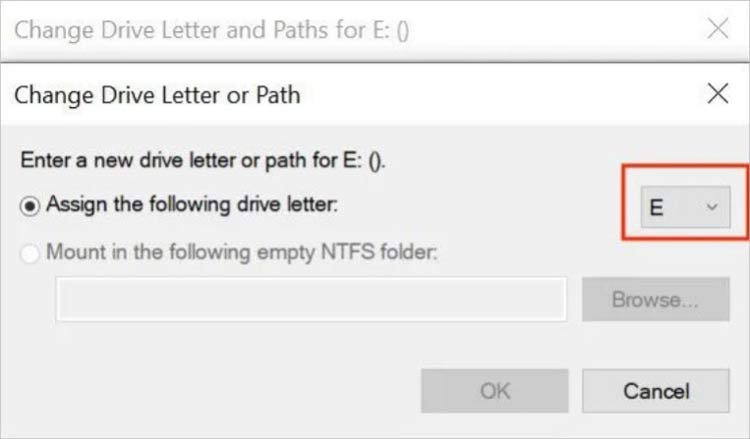
Step 7: Select a new drive letter of your choice from the list and tap OK.
Step 8: You may get a warning saying some programs that rely on drive letters might not run correctly. Click on Yes to give the confirmation.
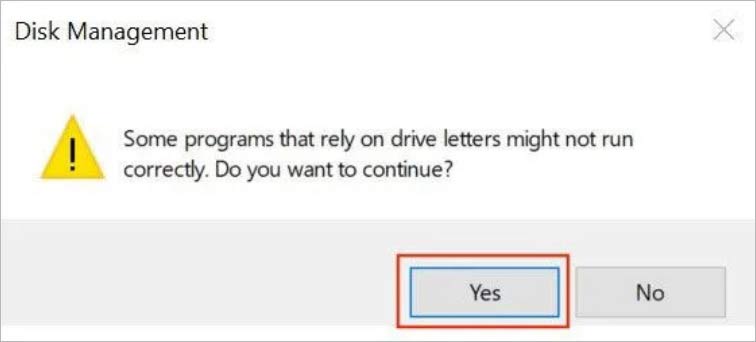
Once you confirm, the system will assign the selected letter to your SD memory card. The new letter will start appearing everywhere, and now, your SD memory card will become accessible.
Method 4: Fix File Attributes to Unhide Hidden Files
Each file on your SD memory card has various attributes. These attributes define how a file will be displayed or manipulated. You may lose access to your files when the file attributes go wrong. Even the files may get hidden. Thankfully, it is possible to fix file attributes with a single command. This command can unhide the hidden files as well. Follow the below steps to fix file attributes on a Windows PC:
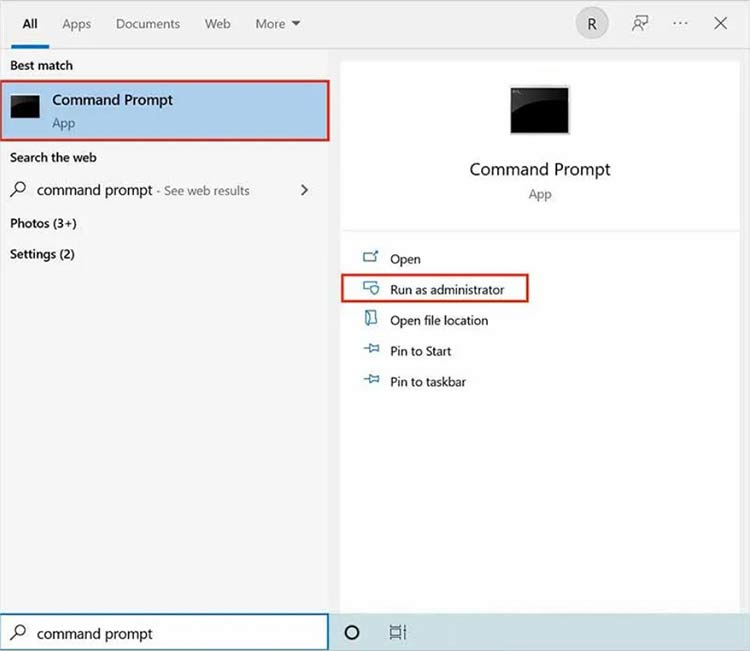
Step 1: Type Command Prompt in the Windows Search bar.
Step 2: Command Prompt will appear as the best match. On the right side, click on Run as administrator to run Command Prompt with administrative rights.
Step 3: In the Command Prompt, enter the following commands and hit Enter: ATTRIB -H -R -S /S /D X:*.*
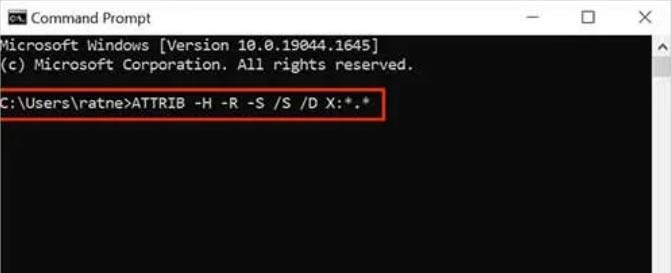
Running the above commands will fix the file attributes and unhide hidden files.
Method 5: Run Windows Error Checking Tool
Windows PCs come with a built-in error-checking tool. The tool checks for file system errors on a connected drive. If an SD memory card has file system errors, the tool immediately scans the errors and notifies. You can run this tool on your PC to see if your SD memory card has a file system error. Below are the steps.
Step 1: Launch File Explorer on your PC.
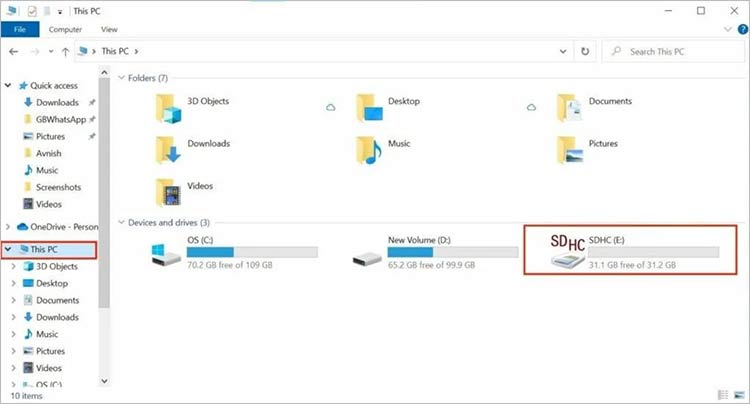
Step 2: In the left sidebar, click on This PC.
Step 3: The connected SD memory card will appear Under Devices and drives. Right-click on your SD memory card.
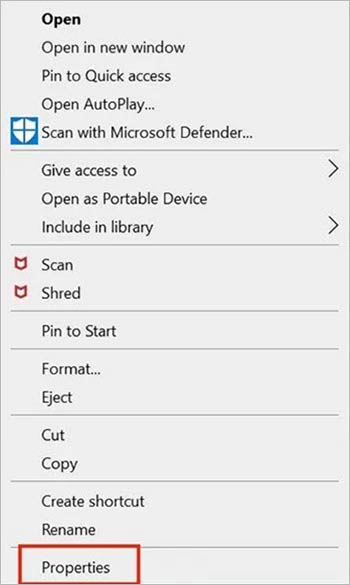
Step 4: From the menu options, click on Properties.
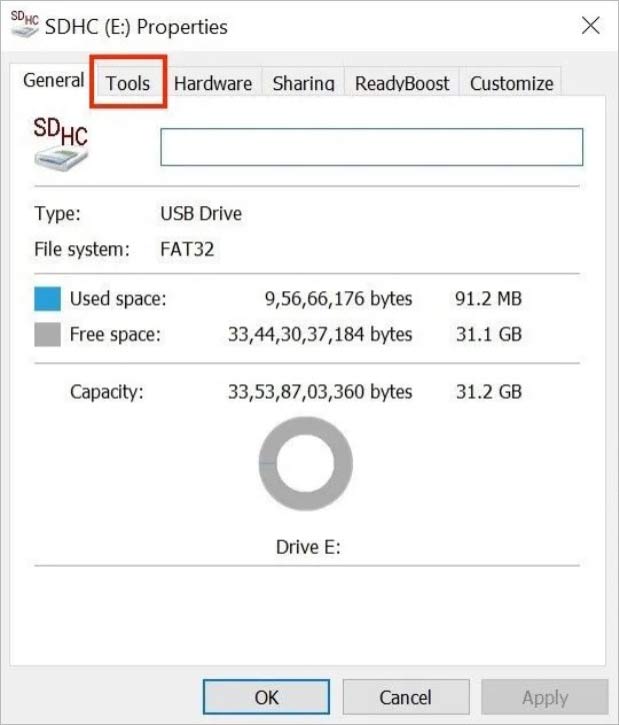
Step 5: In Properties, by default, you should land in the General tab. Switch to the Tools tab.
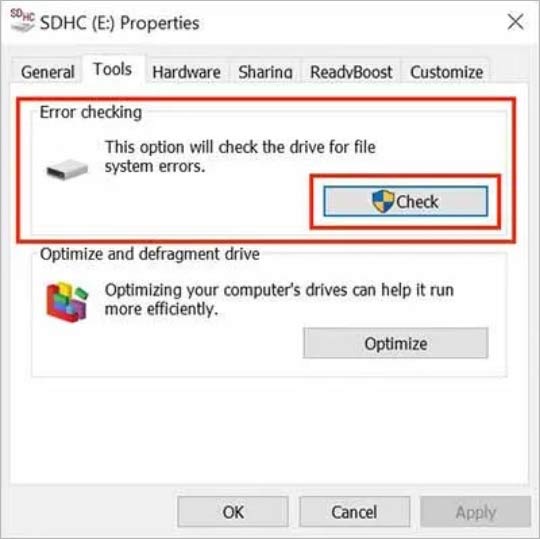
Step 6: In the Tools tab, you will find an Error checking section. Under Error checking, tap on the Check button.
Step 7: The system will show if there’s an existing error on the SD memory card. If it doesn't, click the Scan and repair drive option.
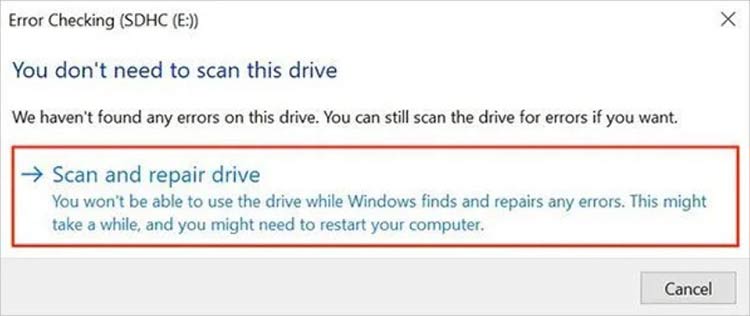
Now Windows will find and repair the errors on your SD memory card. In the meantime, the SD card will be unavailable for use. Depending on the size of your SD card, the process will take some time to complete. You might also need to restart your computer.
Method 6: Scan the SD Card Using CHKDSK
If the Windows Error checking tool didn't show any errors, there is yet another tool you can use to scan your SD memory card for errors. The tool is called CHKDSK and is available on most Windows PCs. It is more like an error checking tool, but instead of a graphical user interface, CHKDSK works through Command Prompt. You can use it to recover data from an SD memory card with a single command.
The best part of CHKDSK is that it checks both logical and physical errors on a drive. Below are the steps to scan your SD memory card using CHKDSK.
Step 1: Type Command Prompt in the Windows Search bar.
Step 2: In the search results, Command Prompt will appear as the Best match. On the right side, click on Run as administrator.
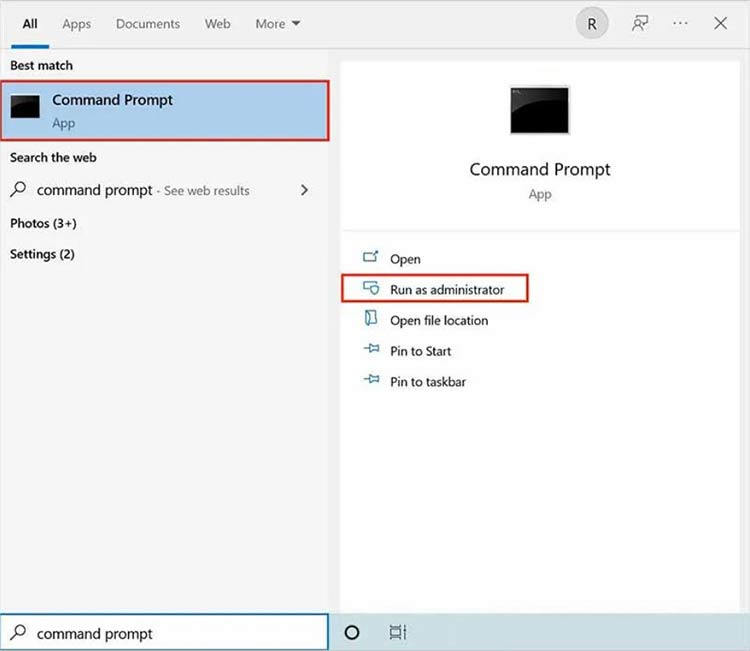
Step 3: In the Command Prompt, enter the following command and hit Enter. Make sure to replace X with the name assigned to your SD memory card.
chkdsk X: /r
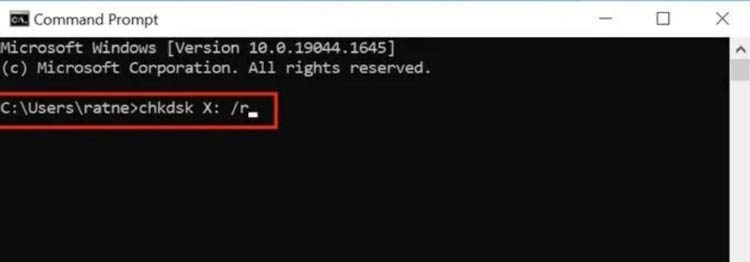
Now the system will start the scanning SD memory card. Wait for the process to complete.
Method 7: Update the SD Card Drivers
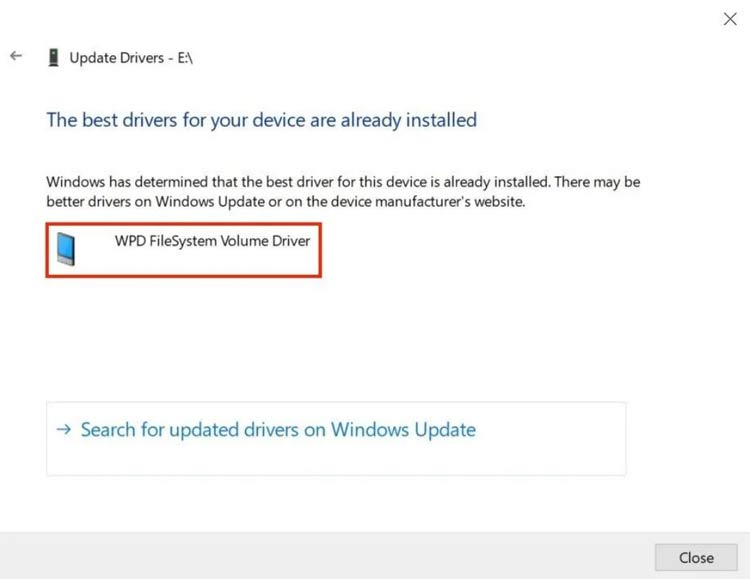
Like every other program and connected device, an SD memory card requires drivers to communicate with the operating system. Although drivers get updated with the Windows updates, you might not get updates for the SD memory card drivers as they are not always connected. So when you face an error on your SD memory card, you should update their drivers.
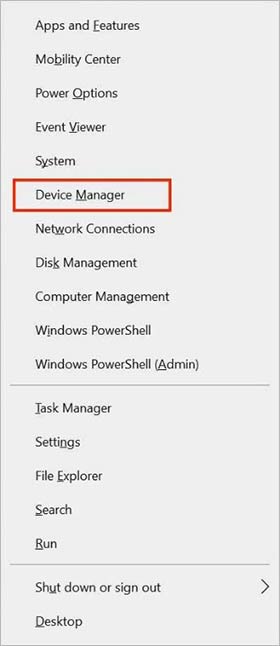
Step 1: Press the Win + X key on your keyboard to open the WinX menu.
Step 2: From the menu options, select Device Manager.
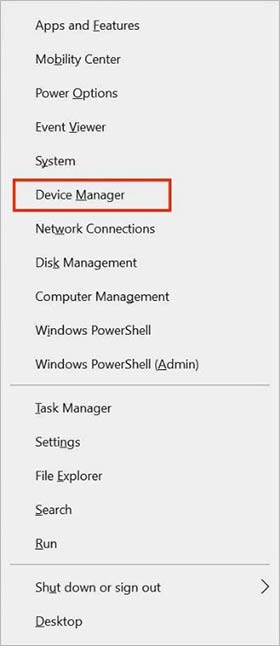
Step 3: In the Device Manager, expand the Portable Devices section.
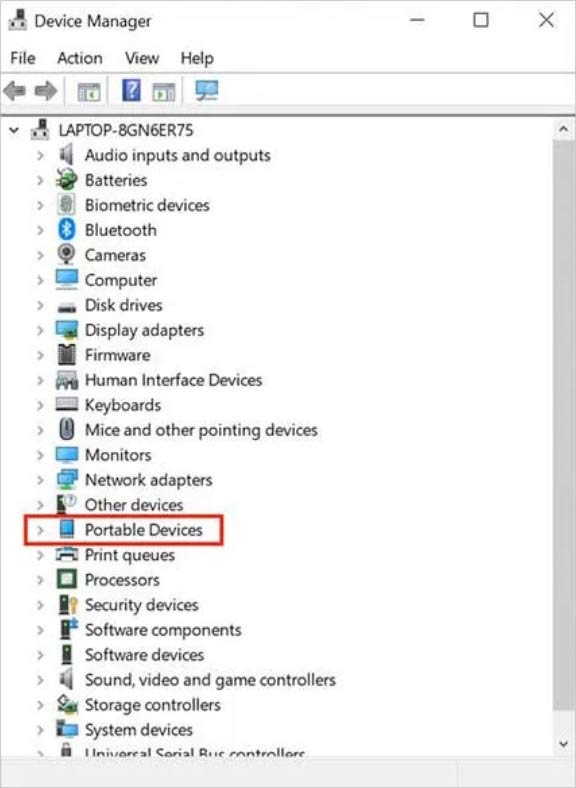
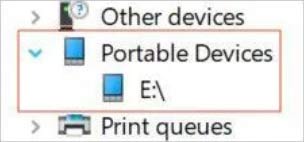
Step 4: You will see your SD memory card here—Right-click on your SD memory card.
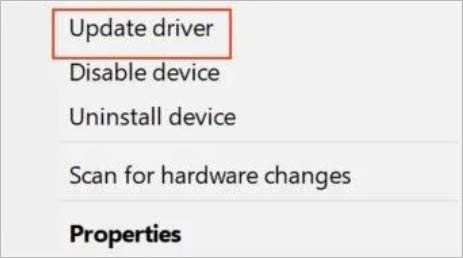
Step 5: A context menu will appear on the screen. From the menu options, click on Update driver.
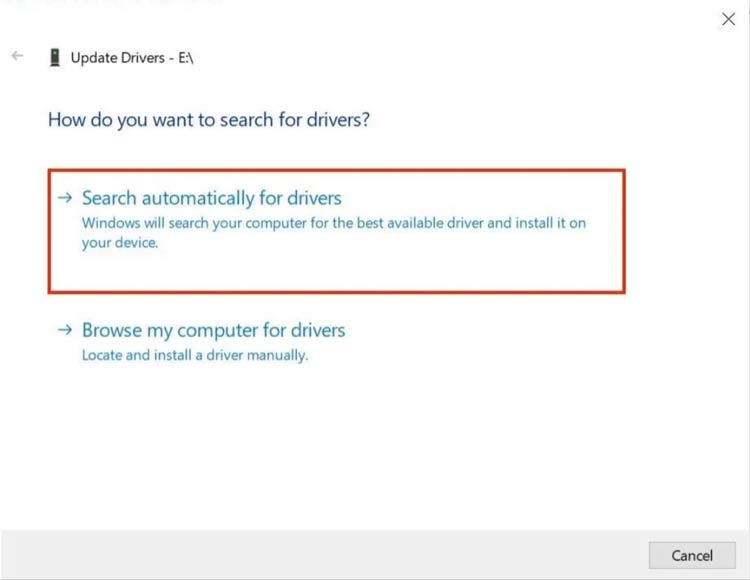
Step 6: Now, the system will ask How do you want to search for drivers? Select Search automatically for drivers.
Step 7: The system will start searching for updates. If a driver update is available, download and install it.
Method 8: Reinstall the SD Card Drivers
If updating the SD memory card drivers didn't help, you should reinstall them. Reinstalling the drivers will ensure that you’ll get their latest version. This should allow you to access the content of your SD memory card.
Step 1: Press the Win+X keyboard shortcut to open the WinX menu.
Step 2: From the WinX Menu, select Device Manager.
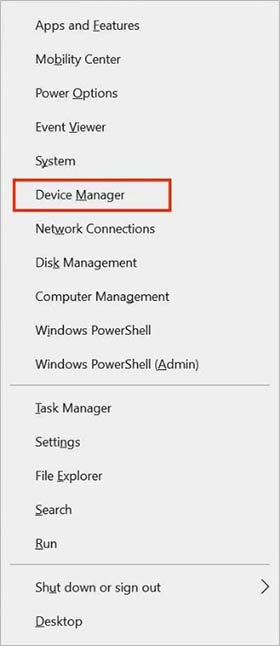
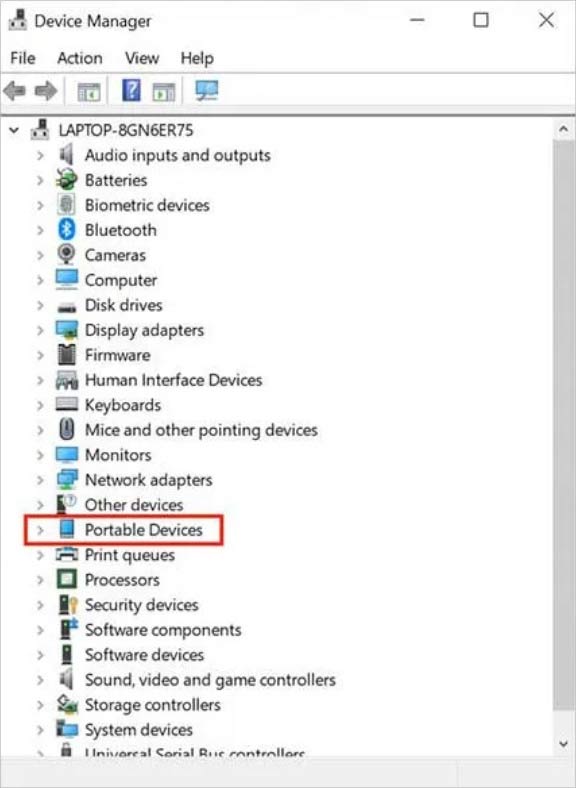
Step 3: Once the Device Manager opens, expand the Portable Devices section.
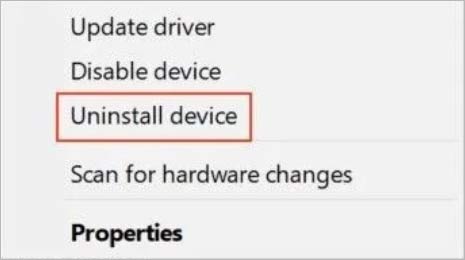
Step 4: Right-click on your SD memory card, and from the context menu, select Uninstall device.
Step 5: A confirmation pop-up will appear on the screen. Click on Uninstall.
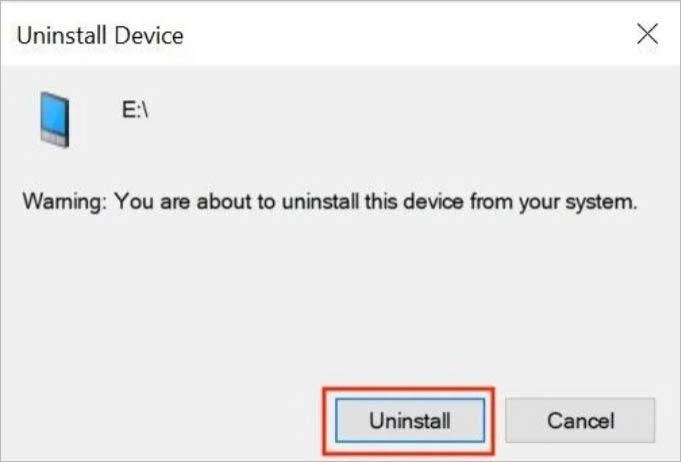
Step 6: Next, remove the SD memory card from your computer.
Step 7: Finally, restart your computer and reinsert the SD memory card.
The system will automatically install the required drivers for the SD memory card to run.
Method 9: Recover Deleted Photos From SD Card Using Professional Software
Stellar Photo Recovery is a reliable photo recovery software that effectively scans the SD card of any capacity and recovers all your deleted photos with their actual names and date timestamps. It supports SD cards from all major brands, such as SanDisk, Samsung, Transcend, Lexar, Toshiba, Patriot, Kingston, Polaroid, Panasonic, Duracell, Verbatim, etc.
Lost photos of almost any file size and file format can be effortlessly recovered with Stellar Photo Recovery, provided the data has not been overwritten. It can recover deleted photos from SD cards of digital cameras, camcorders, Android phones, iPhones, action cameras, drones, etc.
You can restore photos in virtually any format with 3 simple steps — Scan, Recover and Save. If your deleted image file type is not in the supported formats list, the software has a provision to add it by using the Add Header feature.
Why choose Stellar Photo Recovery:
- Recover lost photos from formatted, inaccessible, corrupt, or BitLocker-encrypted SD cards.
- Run a customized scan to get quick and exact results for your deleted files.
- Enjoy seamless photo recovery across all file formats, including RAW, GIF, PNG, and more.
- Recover pictures from Android phone, HDD, 4K Hard Drives, SSD, internal storage, USB Drives, and SD Cards.
Here’s the step-by-step method of recovering deleted photos on your SD card using Stellar Photo recovery:
Step 1: Connect the SD card to the computer via a card reader.
Step 2: Download Stellar Photo Recovery Software on your PC / Mac.
Step 3: On the home screen of the Stellar Photo Recovery software, choose the File type to Scan.
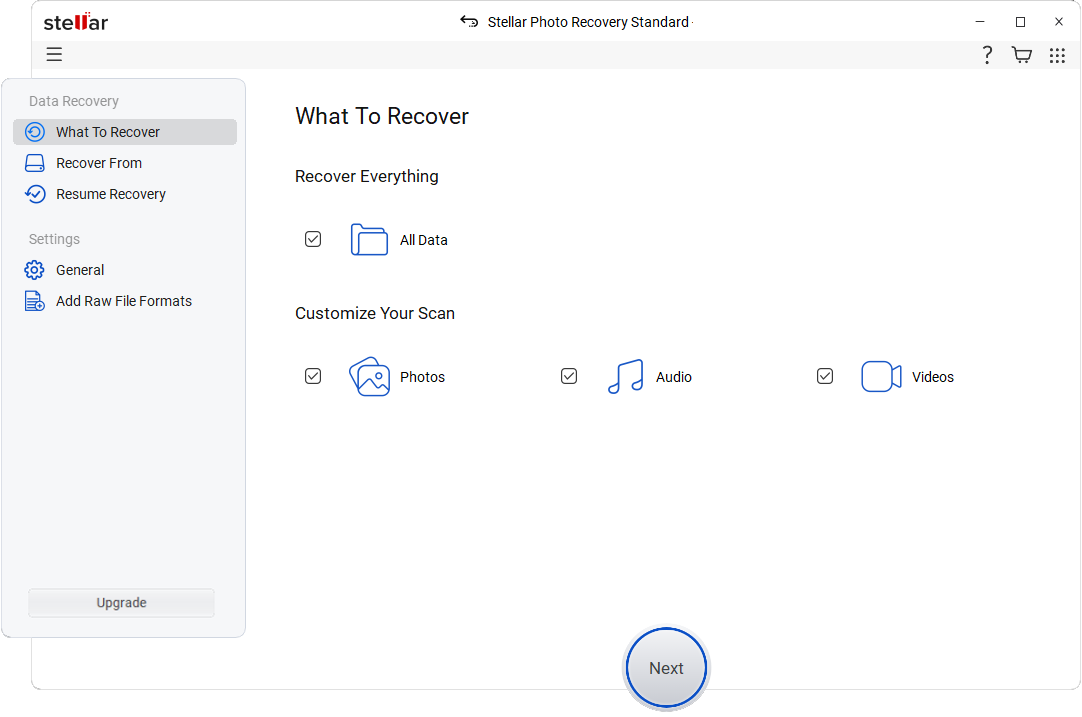
Step 4: After selecting the drive location, Click Scan to start searching for deleted images. Once the scanning is completed, you’ll be able to see all the existing as well as deleted photos on the drive. You can preview recoverable files on the right side of the window.
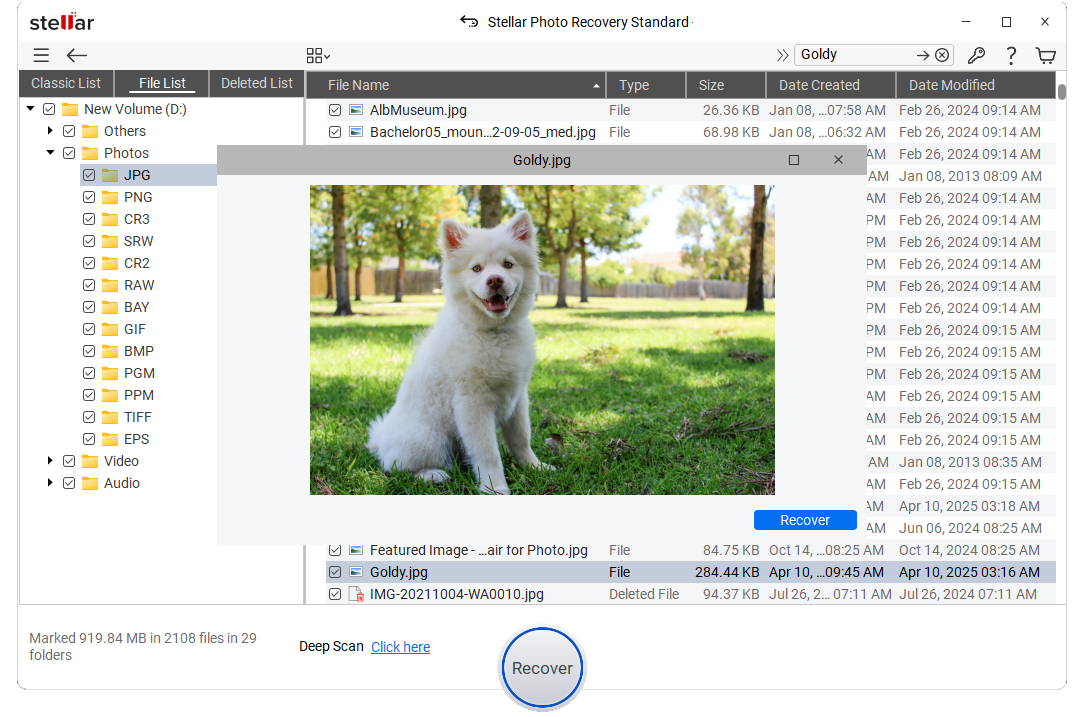
Step 5: Click Recover.
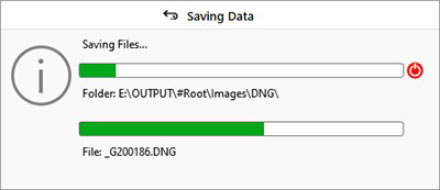
Step 6: In the dialog box, click Browse and select a location to save the recovered photos.
Bottom Line
The guide explains everything you should know about SD card recovery in detail. You learn about what happens when photos are lost from an SD memory card, different photo loss scenarios, and how to tackle them.
We have also explained several manual methods to recover photos from an SD memory card. If these methods don’t work, we recommend using Stellar Photo Recovery as a fool-proof solution to recover your cherished memories.





Can your software recover photos from any card?
Hi Fidyn,
Stellar Photo Recovery software is a data recovery tool that will help you get back the deleted pictures from any SD card. Our software can recover almost any storage drive and any file format, including RAW images as well!
Hi Simona while trying to delete some photos from redminotephone gallery I deleted all photos accidently.please help me in recovering all photos again in my gallery
Hi Pallavi, I would suggest, you can try our free software such as Stellar Data Recovery for Android which easily recover deleted photos from your Android phone internal storage. Thanks!
Hi, can i able to recover the previously deleted photos from my sd card, where I’ve saved some new data using this software?
Hi,
You cannot recover 100% deleted files from an overwritten SD card by using any software.
Thanks for the information I tried stellar photo recovery and it recovers my deleted files. It only takes a few minutes to back up my entire HD, and it doesn’t need to run in the background.
Hi Raghuram, Thanks for using our software and share your valuable feedback with us!
“Very useful post. cheers. There are some manual restore options in the operating systems by which you can recover your lost photos from hard disk, internal memory or flash memory, etc. but these methods are not 100% useful every time. For any type of photo loss recovery from flash storage media or internal storage, professional photo recovery tools are the best way.
Hi Rick, Thanks for reading our blog and sharing your valuable feedback with us!
hello sumona. hope u r in finest of health. can u guide that how far back in time can stellar premium recover the data? as i have a memory card in my dslr and pics taken 1.5 year back. can i recover the data from it? as i deleted the photos and took new ones but can i recover the old ones after an year or two?
Hi Ali, Thanks for asking, It depends on the size of the files. If the data should not overwrite our software able to recover your files from a camera memory card. I would like to suggest you can try our software demo version and see the preview of recovered files. Thanks!