RAID has been around since the mid-‘80s, providing data protection via mirroring or parity. The primary purpose of RAIDs is to provide fault-tolerance and improve performance. RAID can be implemented in various configurations and levels depending on user requirements of better speed, redundancy, or both.
Using SSDs in RAID array configuration, users can achieve reduced access time and faster I/O speed along with more redundancy. Moreover, SSDs enable faster rebuilds in parity-based RAID configuration. However, no RAID configuration is failure proof and the same holds true for the SSD RAIDs. RAID or RAID’s solid-state drives can fail anytime due to the following:
- RAID controller failure
- Software (firmware) failure
- Power failure/ Sudden power surges
- Operator errors
- Normal electronic components’ wear and tear
- CRC errors
- Corroded or worn out SSD connectors
- SSD overheat due to improper ventilation
- Bad Sectors due to NAND flash degradation
- Physical damage
SSDs also eventually fails as they have limited write I/O capacity and erase cycles.
Fortunately, some advanced tools available, like the Stellar Data Recovery Technician can help rebuild RAID 0, RAID 5, or RAID 6 configuration and also recover data from a reconstructed RAID volume without any RAID controller card or other fancy hardware.


Recovery of Data from SSD RAID Array
The SSD consists of two main components and few others on a PCB enclosed in a casing or without it.
1. Controller
An embedded processor and electronic components that bridge the NAND flash memory to the SSD I/O interfaces. It also executes the firmware-level software and is mostly device specific.
2. NAND Flash Memory
NAND flash memory is a non-volatile flash storage technology similar to one that is used in memory cards (NOR). NAND flash memory supports higher capacity data storage and offers faster read/write operations over NOR. Unlike HDD, SSD cannot overwrite existing data and that’s why ‘TRIM’ command is used that simply marks the data as invalid. Actual erasing takes place when the user writes data to NAND (SSD) drive.
Few other components are used to determine the interface – SATA, mSATA, M.2, or PCIe & provide features like OP aka Over-provisioning.
With the help of Stellar’s specialized RAID Data Recovery software, one can expertly recover the data from an SSD RAID array. It has an intuitive user-friendly GUI where you simply add RAID parameters after connecting RAID SSDs and then recover the data with a few clicks.
A Step-by-Step Explanation on SSD RAID Array Data Recovery
Step 1: SSD RAID Parameters
Find out the following RAID parameters in order to recover data from an SSD RAID array:
- Total member disks
- Disk Order
- Stripe or Block Size
- Parity order or Rotation
- Parity repetition or delay
In case of RAID 0, find only the ‘Stripe or Block Size’ parameter. Once you have the RAID parameters, proceed to SSD RAID reconstruction and data recovery with the help of Stellar software.
NOTE: This tool helps to create virtual RAID (0, 5, or 6) if the RAID parameters as required for RAID data recovery are not known.
Step 2: Connect SSD Drives to your PC
Secondly, remove all the SSD from the RAID rack and use HDD/SSD enclosure or SATA to USB 3.0 or 2.0 connector cables to connect each SSD to Windows PC together. Use a USB hub if the USB ports are less on your PC or laptop.
Step 3: Follow these steps for successful SSD RAID recovery
Finally, to recover data from an SSD RAID array, download and install Stellar Data Recovery Technician version on a Windows PC or laptop. Then,
1. Open Disk Management tool and check if all the SSD drives are visible.
2. Run Stellar Data Recovery Technician
3. Choose the type of data to recover from the available options. Check the ‘All Data’ checkbox to recover all file types from an SSD RAID array.

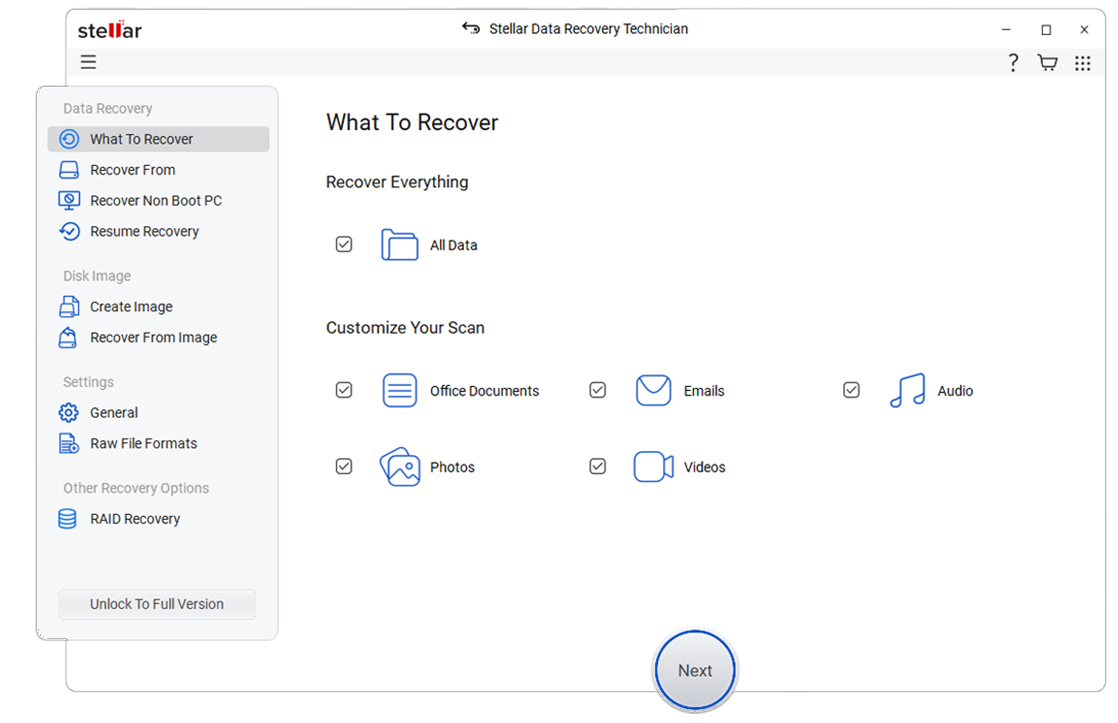
4. Click the ‘Next’ button. A ‘Recover From’ window appears.

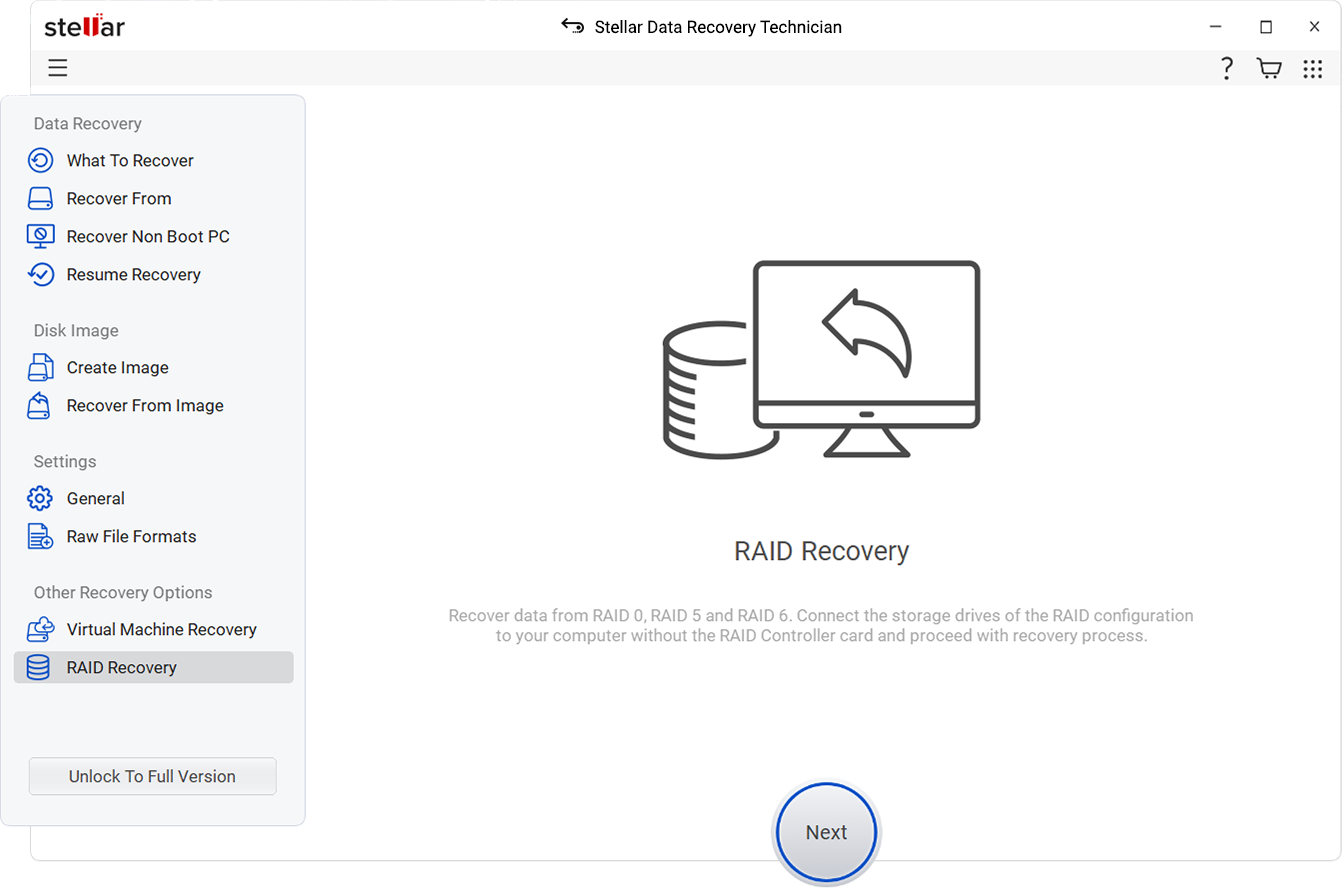
5. Click the ‘Raid Recovery’ checkbox and then click the ‘Scan’ button. A new ‘RAID Construction’ Window appears.

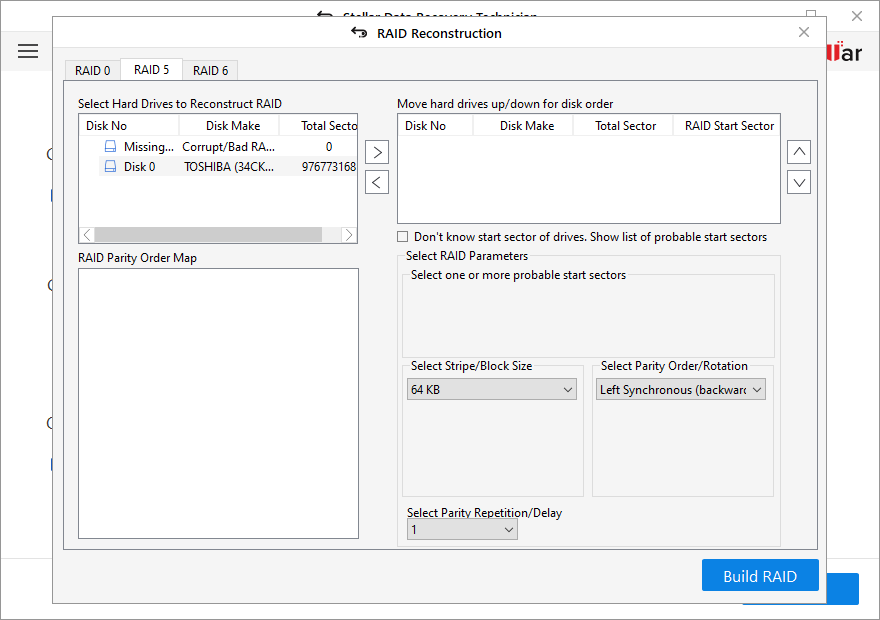
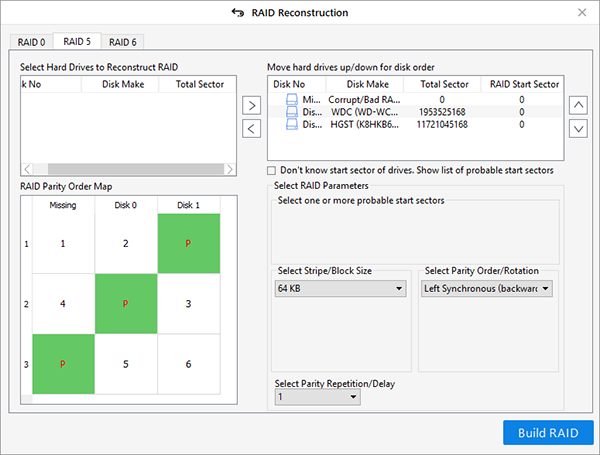
6. Click either RAID 0, RAID 5, or RAID 6 tab as per the SSD RAID configuration. All the SSDs connected to the system are visible under the ‘Select Hard drives to reconstruct RAID’ list box.
7. Click on SSDs, one at a time, and use the arrow button to add or remove RAID drives from the ‘Select Hard drives to Reconstruct RAID’ list box to ‘Move hard drives up/down for disk order’ list box.
8. Use the up or down arrow icons, adjacent to the list view box, to arrange disks in sequence as they were in the RAID stack.
9. Click the ‘don’t know start sector of drives. Show list of probable start sectors’ checkbox if you don’t know the required parameters and start sector of the drive.
10. A new checklist box appears in the ‘Select RAID Parameter’ section. Choose one or more probable start sectors or add desired start sector in text box & click the ‘Add Sector’ button (max 32 sectors can be added) if it’s not listed in the checklist Skip this step if the RAID parameters information is available.

11. Choose stripe or block size from the ‘Select Stripe/Block Size’; parity order or rotation from the ‘Select Parity Order/Rotation’ dropdown; and then the parity repetition or delay from the ‘Select Parity Repetition/Delay’ dropdown. These values are known to the RAID admin or user who built it.
12. Add and select the SSD RAID parameters in the software and click on ‘Build RAID’ button.
13. Wait until the software reconstructs the SSD RAID volume. After construction is over, constructed RAID volume details are displayed in the ‘Select Constructed RAID’ window.
14. Click the ‘Show Volume List’ button.


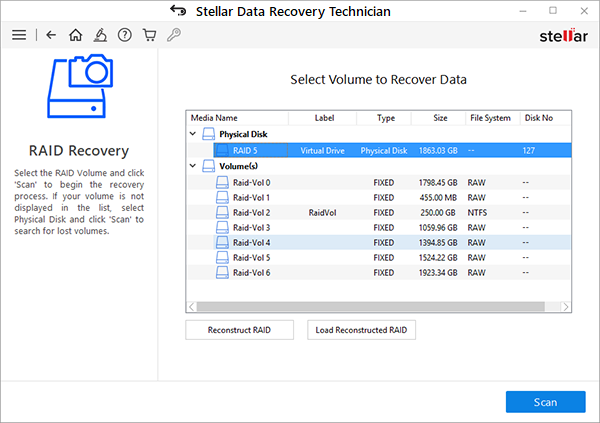
15. In ‘Select Volume to Recover Data’ windows, choose the volume from the listed volumes of SSD RAID – from where data is to be recovered.
16. After selecting the RAID volume, click the ‘Scan’ button. Wait until scan finishes.

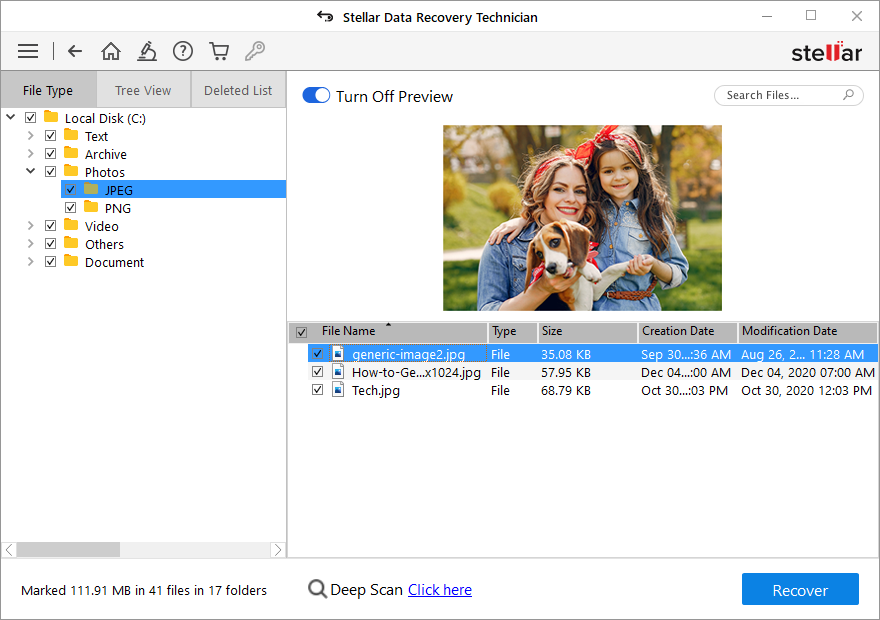
17. If the desired files are not found in the scan results, click on blue coloured ‘Click Here’ link beside Deep Scan text at the bottom of the software to start ‘Deep Scan’ process. After the scan, if you are able to preview your desired files in the Stellar Data Recovery Technician, it means those files can be recovered.
18. In the left ‘Tree View’ pane, view all recovered folders and files. Use the search box on top-right corner to search, preview, and recover specific files and folders. Alternatively, click on the ‘File Type’ tab or search box to easily browse and recover the required data.
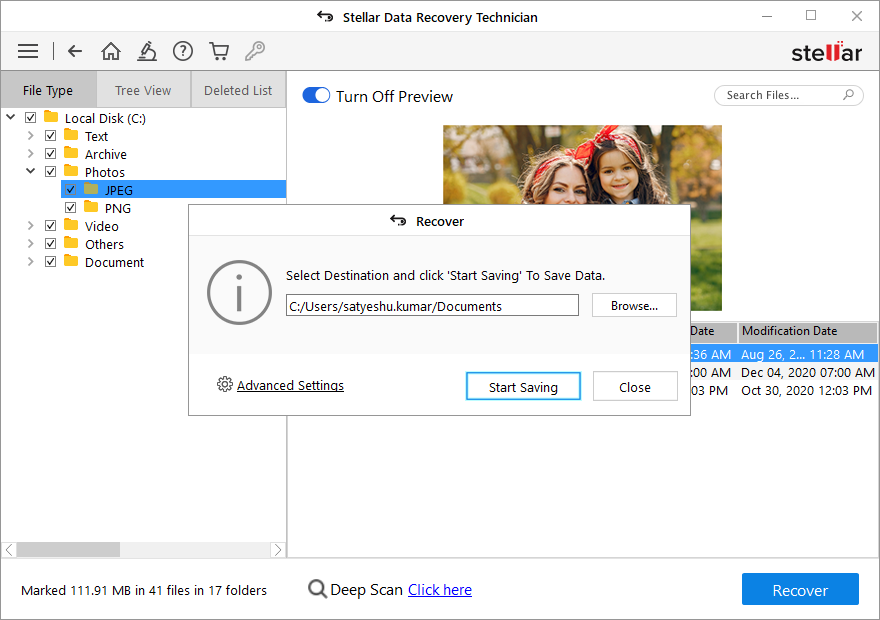
19. Check the checkboxes of the files and folders to recover, and then click the ‘Recover’ A pop up appears.
20. Click the ‘Browse’ button to select the location and save the recovered data. Do not to select the drive which was in the SSD RAID array and now connected. Use an external disk or internal disk with enough space to save recovered data.

21. Click the ‘Start Saving’ button. The selected recovered files and folders are saved at the desired location.
Conclusion
When you use SSDs in RAID configuration, it’s important to ensure the normal erase cycle of SSDs in the RAID using optimum combination of controller, software, cache, and other hardware resources.
However, if there is an issue with SSD RAID recovery, use Stellar Data Recovery Technician tool to recover data from an SSD or HDD RAID 0, RAID 5, or RAID 6 array. The tool can also recover data from a formatted or logically corrupt RAID hard drive and missing or deleted RAID volumes.


