Usually when you format a volume in Windows, whether a drive volume or a RAID volume, it’s ‘Quick’ formatted by default. Therefore, only the file system is replaced and data remains on the volume unless you fully format the volume by unselecting the ‘Quick Format’ option in the disk formatting window.
When a volume is formatted, data is permanently lost. And if it happens with a RAID volume or partition, the problem becomes more complex. In such a case, you can’t use just any data recovery software. You must use a reliable and specialized RAID data recovery software that can rebuild a virtual RAID array for data recovery.
Accidental formatting is common and may happen while managing the RAID partitions. However, you can recover data from a formatted RAID volume, if it’s online and recognized by the system. For this, you will need a data recovery software, such as Stellar Data Recovery.
But if the RAID array went offline, after formatting the RAID volume, you must use Stellar Data Recovery Technician software to reconstruct the RAID array and get back your lost data. This RAID data recovery software can help you recover data from a formatted RAID 0, RAID 5, and RAID 6 volume or partition.
It is a powerful RAID data recovery software that rebuilds a virtual RAID array automatically and lets you save the recovered data to an internal or external disk. Though you need to know the RAID parameters for RAID reconstruction, this advanced software automatically detects the RAID parameters and constructs probable RAID volumes for data recovery.
What’s more, is that you can also find and recover data from lost RAID partitions. Similarly, there are tons of other great features that this software offers to facilitate safe data recovery from formatted, inaccessible, or broken RAID arrays.
The steps to recover data from formatted RAID array are as follows.
Step 1: Connect RAID Drives to Windows PC
First, disconnect the RAID drives from RAID array and connect each RAID drive to your Windows PC as an individual (separate) drive. You can use SATA/IDE connectors on your PC motherboard. You may also use SATA/IDE to USB converter cables or enclosures if you own a laptop or PC with limited SATA/IDE ports. You will also need a USB hub to connect all RAID drives.
Step 2: Inspect RAID Drive’s Health and SMART Status
Stellar Data Recovery Technician comes with a SMART disk monitoring and cloning utility called Drive Monitor. You can access it by installing Stellar Data Recovery Technician software on your PC and then go to More Tools > Monitor Drive.
This utility helps you check the health and critical SMART disk parameters. This step is important as a failing RAID disk or underlying SMART disk error can lead to permeant data loss if the drive stops working during the data recovery process.
Step 3: Construct Virtual RAID Array for Recovery
- Run Stellar Data Recovery Technician software and select the type of files you want to recover. You may also click ‘All Data’ and then click ‘Next’.
- Under other Locations, select ‘RAID Recovery’ and click ‘Scan’. This will open a new ‘RAID Construction’ window.
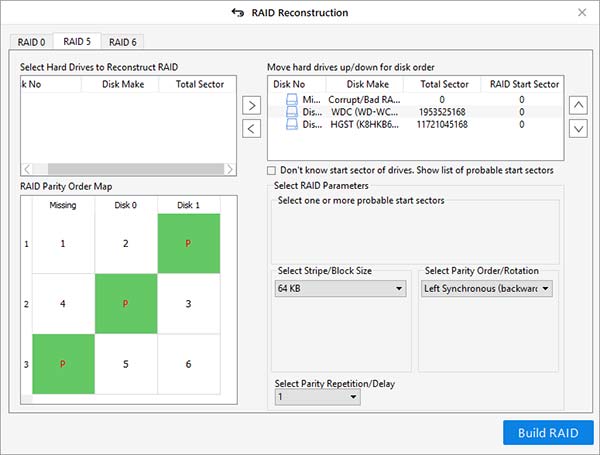
- Click on the RAID tab to choose RAD level, i.e. RAID 0, RAID 5, or RAID 6.
- You will see all the RAID disks that you have connected to the system in ‘Select Hard drives to reconstruct RAID’ list box.
- Click on the RAID drives and move them to ‘Move hard drives up/down for disk order’ list box using the arrow button.
- Now arrange the RAID drives in the exact sequence as they were in the RAID stack using the up/down arrow button.
- Now enter or select the Start Sector of the drives. If you don’t know the start sector of the drive, select the ‘Don’t know start sector of drives. Show a list of probable start sectors’ checkbox.
- A new checklist appears in the ‘Select RAID Parameter’ section. Choose one or more probable start sectors or enter the desired start sector in the text box.
- After selecting or entering the probable start sector, click on the ‘Add Sector’ button.
-
Then select the stripe or block size from the ‘Select Stripe/Block Size’ drop-down.
- Select parity order or rotation from the ‘Select Parity Order/Rotation’ drop-down.
- Then choose the parity repetition or delay from the ‘Select Parity Repetition/Delay’ drop-down. These values are known to RAID admin or user who built it.
- After selecting and adding required RAID parameters in the software, click on the ‘Build RAID’ button
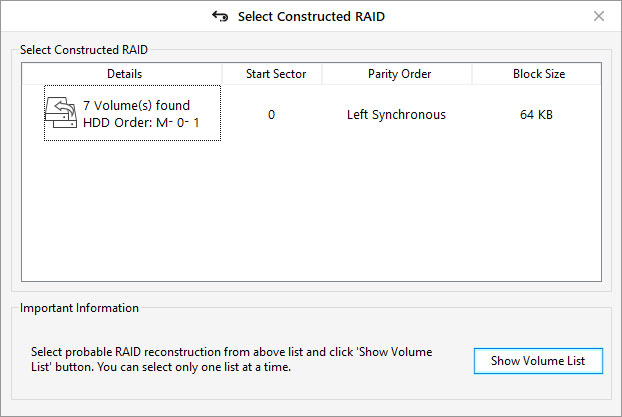
However, if you don’t know, select Don’t know option from the respective drop-downs. The software intelligently rebuilds a few probable RAID constructions which you can choose to run a scan and get back lost data.
After RAID construction is finished, the software displays constructed RAID volume (or volumes) in the ‘Select Constructed RAID’ window. Click on ‘Show Volume List’ button
Step 4: Scan and Recover Formatted Data from RAID
- In ‘Select Volume to Recover Data’, choose the RAID volume that you formatted and from where data needs to be recovered
- After choosing the RAID volume, click on the ‘Scan’ button. Wait for the scan to finish.
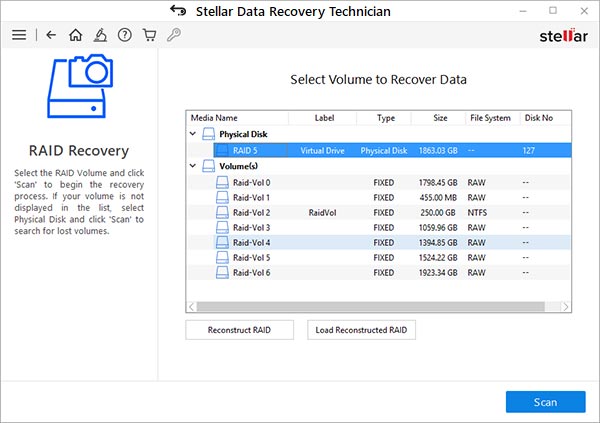
- If the desired files are not found in the initial scan, click on the ‘Click Here’ link beside Deep Scan text at the bottom to begin ‘Deep Scan’.
Deep Scan is an advanced scan method that thoroughly scans and locates lost files from formatted drive based on file-signatures and facilitates RAW data recovery by digging deep into the RAID drives. Therefore, it takes much more time than the ‘Quick Scan’ but gets back maximum recoverable data from the RAID volume.
- After the scan, you can click on a file to see its preview before saving it. Then select the files that you want to recover and save.
- After selecting the required files, click on the ‘Recover’ button. A pop-up will appear.
- Click on the ‘Browse’ button to choose a save location. Choose a different drive, other than the RAID drives to save your data. Use a different external disk or internal disk with enough space to save recovered data.
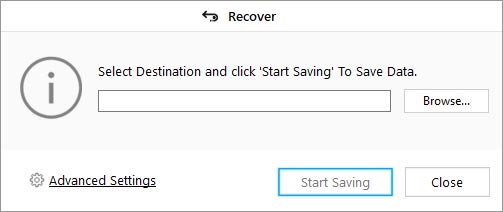
- Finally, click on the ‘Start Saving’ button. The selected files will be recovered and saved at the desired location
NOTE: You will need to activate the software to save the recovered files from the reconstructed virtual RAID array.
So that’s how you recover data from a formatted RAID array, such as RAID 0, RAID 5, or RAID 6, safely.
Conclusion
Data recovery from formatted RAID array volume is a complex task and thus, requires a specialized tool to scan and recover data. In case you accidentally formatted a RAID volume or partition, use Stellar Data Recovery Technician software to avoid any further damage to your data.
No hit and trial method but only a RAID data recovery software can help you in such a grave data loss situation. This software is free to download and supports RAID 0, RAID 5, and RAID 6 arrays. Also, it’s powered by advanced RAID recovery algorithms that rebuild a virtual RAID array and helps recover data from a formatted, corrupt, broken or inaccessible RAID array.
For more help on RAID data recovery, leave a comment or get in touch with our data recovery experts via the Self Help & Support page.
Was this article helpful?