RAID partition recovery is a process of recovering inaccessible data from a lost, deleted, or undetected RAID partition or volume. If you have accidentally deleted a RAID partition that contains important data, this guide is for you. You may also follow this guide if a RAID partition is missing or can’t be detected.
Reasons for RAID Partition Loss
RAID partition loss may happen due to logical error caused
by various reasons, such as:
- Human errors
- Malware or virus intrusion
- Sudden power failure
- Abrupt system shutdown
- Server crash
- Bad sectors
- Other software and hardware related errors
Further, due to these reasons, a healthy RAID partition may
get corrupt, making it inaccessible and unusable. One way to fix such corrupt RAID
partition is to format it. However, formatting a corrupt RAID partition will
delete all the data. Thus, if data is important, do not format.
In this article, we have discussed various ways to fix a
corrupt or undetected RAID 0, RAID 5, or RAID 6 partition. In addition, we have
mentioned steps to recover data from missing, deleted, or inaccessible partitions.
There are several ways to perform RAID partition recovery,
based on the cause of partition loss. But before you begin RAID partition
recovery, consider the following:
- Check disk health and SMART status.
- Observe disk for any clicking or screeching noise.
- If disk health is poor or you hear clicking noise, clone the disk or back up the data from RAID volumes or partitions.
- Keep a spare drive available for saving recovered data.
1. Restore RAID Partition via Disk Management Tool
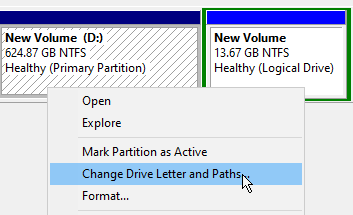
A RAID partition can’t be accessed if the system fails to assign a drive letter due to system-related issues. To check if the RAID partition is without a drive letter, open the Disk Management tool. Then follow these steps to assign a drive letter:
- In the Disk Management tool, right-click on the
RAID partition (without drive letter) and choose ‘Change Drive Letter and Paths…’
NOTE: If the partition isn’t visible in Disk Management tool, it’s probably deleted.

- Click ‘Add’
and select a drive letter from the drop-down
- Click ‘OK’
and then ‘OK’ again

- Open File Explorer and try to access the drive volume
If it is accessible, back up your data immediately.
In case you see a prompt to format the partition or error such as ‘File system can’t be recognized’, the RAID partition is probably corrupt due to file system error. Follow the next method to repair the file system of a corrupt RAID partition.
2. Repair Corrupt RAID Partition via CHKDSK Scan
CHKDSK or Check Disk scan helps fix file system errors on a
corrupt NTFS RAID volume or partition. Follow these steps:
WARNING: CHKDSK
isn’t completely safe. It may cause data loss if the disk is old and has too
many bad sectors. Run the CHKDSK scan at your own risk.
- Open elevated command prompt window
- Type chkdsk
/f X: and press ‘Enter’
After repair, try to access the RAID partition. If
accessible, copy your files to a safe location. In case of error or CHKDSK
fails to fix the corruption, head to the next method.
3. Use a RAID Partition Recovery Tool
A RAID recovery tool such as Stellar Data Recovery Technician not only helps recover data from a RAW or corrupt RAID partition but also retrieves data from deleted or missing RAID partitions, which are not visible in the Disk Management tool.
Before you begin,
- Label all the RAID member disks before removing them from the rack. Also, mark the cables and controller ports. This will help reassembled the array if needed.
- Disconnect the disks from RAID controller and then connect them to a Windows PC as standalone (separate) disks.
- You can use SATA connectors or SATA to USB converter cable/enclosure to connect drives to PC.
- Install Stellar Data Recovery Technician software.
Follow these steps:
- Launch the software. Select ‘All Data’ and click ‘Next’.
- Select ‘RAID Recovery’ and click ‘Scan’.
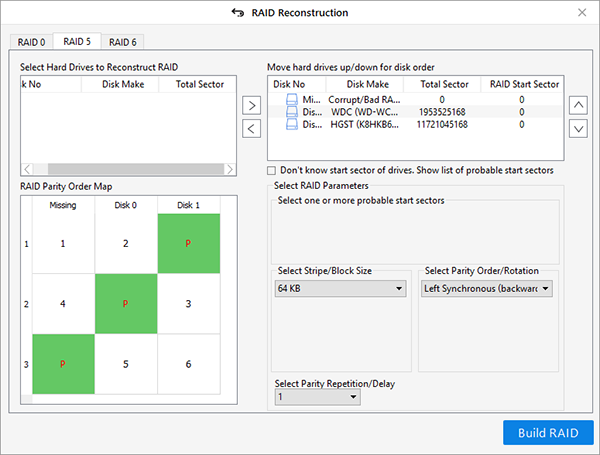
- Select RAID 0, RAID 5, or RAID 6 tab (whichever RAID you using) and move the RAID disks from ‘Select Hard Drives to Reconstruct RAID’ to ‘Move hard drives up/down for disk order’ list box using the arrow buttons.
- Use the up-down arrow buttons to arrange RAID drives in the same sequence as they were in RAID array.
- Then select or enter the RAID parameters. If you don’t know the parameters, you may choose ‘Don’t know …’ option or select/enter a probable value.

- Click on ‘Build
RAID’ button
Based on the provided RAID parameters, the software identifies and constructs a virtual
read-only RAID configuration. However, if the entered parameters are wrong, the
software automatically detects the RAID factors and constructs a few probable
RAID constructions.
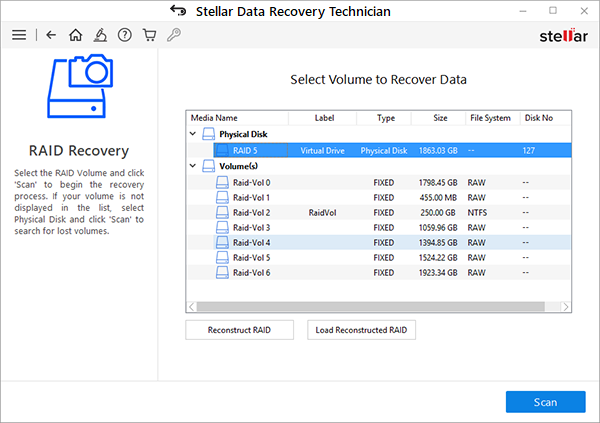
- Choose the virtual RAID construction and click on ‘Show Volume List’.

- Select the RAID virtual drive under ‘Physical Disk’ and click ‘Scan’

- Select the RAID drive and click ‘Search’.
- After the search, if you do not find the missing or deleted partition, click ‘Click Here’ link at the bottom to run ‘Extensive Scan’
- Then select the RAID partition from the list and click ‘Scan’.
- After the scan, click on ‘Click Here’ link at the bottom-left to begin ‘Deep Scan’.
- You may click on a document, photo, video, audio, PDF, or text file to see its preview before saving.
- Choose the files you want to recover and click on ‘Recover’.
- Connect the spare drive to the PC and click ‘Browse’ to choose the drive as to save location.
- Then click ‘Start Saving’ to save the recovered files.
- Once data is restored, connect all the disks to the physical RAID array. Turn on RAID and then format the corrupt partition.
Once formatted, transfer the recovered data
back to the repaired RAID partition. To avoid such data loss situations, always
keep a backup of your RAID data.
Conclusion
Partition loss or corruption in the RAID array may happen due to accidental deletion, human errors, bad sectors, drive errors, abrupt shutdown, crash, etc. While you may try to fix a corrupt RAID partition by using CHKDSK command, there is no way to restore a lost or deleted partition other than using a RAID recovery software.
Software such as Stellar
Data Recovery Technician can help find and recover inaccessible data from
lost, deleted, or corrupt RAID partition. Also, you can use the software to reconstruct
a broken RAID 0, RAID 5, or RAID 6 array.
Was this article helpful?