Microsoft Outlook has a search feature that allows users to search for specific emails or other information using specific keywords. It is a helpful tool when you need to find an important item from an enormous mailbox database instantly. However, sometimes, this helpful Outlook feature stops working. It can be a real hindrance to your productivity. Below, we’ll explore possible reasons for the Outlook Search not working problem and discuss some effective methods to fix it.
Possible Causes of Outlook 2019 Search not Working in Windows 11
Let’s look at some possible causes of the issue.
Corrupt Outlook Profile: A corrupted Outlook profile can lead to various problems, including issues with the search function. When the profile gets corrupted, Outlook may be unable to search your emails correctly.
Indexing Problem: Outlook uses an indexing system to help you quickly search through your emails. If the indexing system is not functioning correctly, Outlook may not be able to find the emails you’re looking for.
Outdated Outlook Version: If you’re using an outdated version of Outlook, it may not be compatible with the latest Windows 11. It can lead to issues with the search function, among other problems.
Third-Party Add-Ins: Third-party add-ins can sometimes conflict with Outlook and cause various issues. If you have recently installed an add-in, it’s worth checking if it’s causing the search problem.
Corrupt Outlook Data File (OST): If your OST file gets corrupted or damaged, it may lead to various issues, including the Outlook search not working.
Methods to Fix the Outlook Search Not Working Issue
Now that you know the possible causes of the search not working issue in Outlook, let’s proceed to the solutions to fix this issue.
Method 1: Enable Registry Entry
You can enable the registry entry to fix the Outlook search issue on Windows 11. Here’s the step-by-step process to enable the registry entry:
- Right-click on the Start button and select Run.
- In the Open field in the Run utility, type “regedit” and press OK. It will open the Registry Editor. Alternatively, you can also press the Windows + R keys, type regedit.exe, and click OK or hit the Enter key to open the Registry Editor.
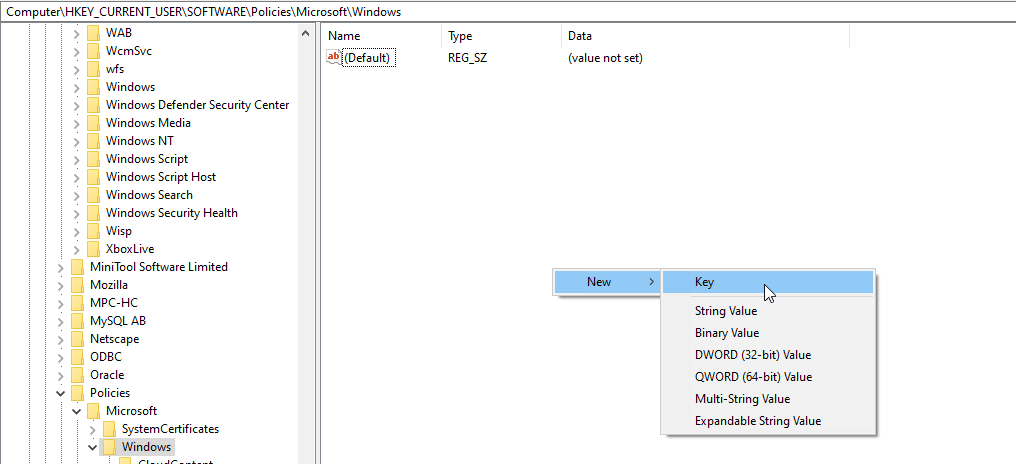
- Navigate to this subkey in the registry: HKEY_LOCAL_MACHINE\SOFTWARE\Policies\Microsoft\Windows

- Click on the subkey to select it.
- Select the newly created “Windows Search” key.
- Choose Edit > New > DWORD (32-bit) Value.
- Write “PreventIndexingOutlook” and press Enter.
- Right-click on “PreventIndexingOutlook” and choose Modify.
- In the Value data box, type “1” to enable the registry entry and select OK.
- Close the Registry Editor and restart Windows 11.
Choose Edit > New > Key, and name the new “Windows Search” key.
Method 2: Uninstall the Windows Update
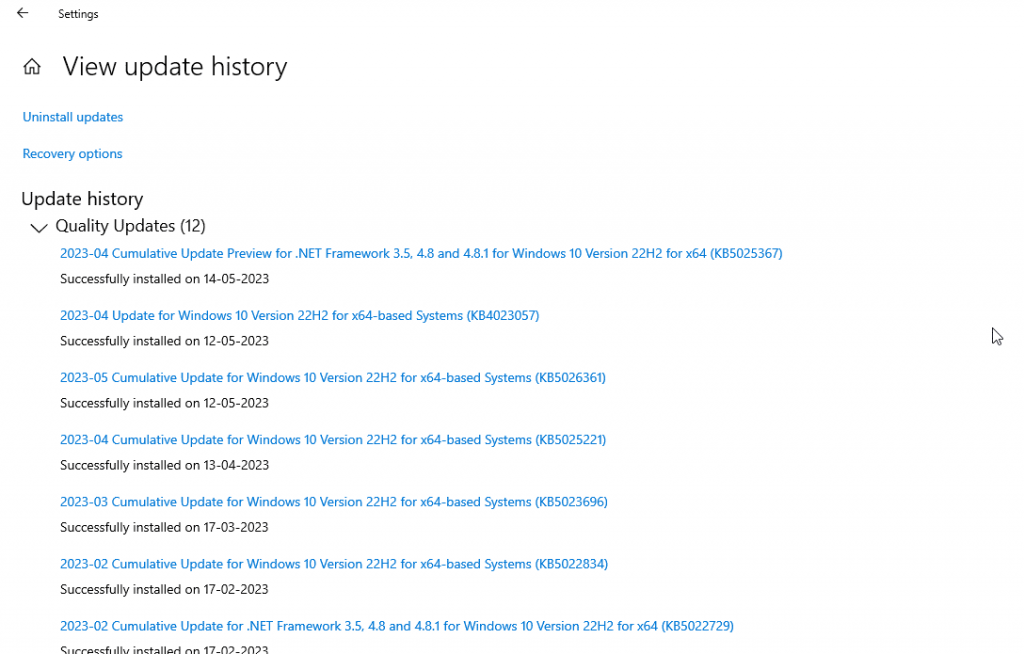
Microsoft’s security update called KB5008212 for Windows 11 has caused problems with searching in Outlook. You can roll back or uninstall the update to resolve the issue. Here’s the step-by-step procedure to uninstall the KB5008212 update:
- Click on the Search button on Windows 11 desktop.
- Type Uninstall Updates and press Enter. You may also navigate to Settings > Update & Security > Windows Update > View update history > Uninstall updates.

- Look for the KB5008212 update in the list of installed updates.
- Click on the KB5008212 update and then click on the Uninstall button.
- Follow the prompts to complete the uninstallation process.
- Once the update has been uninstalled, restart your computer.
- Launch Outlook and check if the search issue has been resolved.
Method 3: Repair Corrupt OST File
Sometimes, Outlook search won’t work due to corruption in the offline Outlook data file (.ost). If your OST file is corrupted, you can use the Inbox Repair Tool (Scanpst.exe) to fix it. Here’s how you can do it:
- Close Outlook and go to the location where the OST file is saved.
- Right-click on the OST file and select “Properties.“
- In the “General” tab, click on the “Advanced” button.
- In the “Advanced Attributes” window, uncheck the “Encrypt contents to secure data” option.
- Click on “OK.”
- Open the “Scanpst.exe” tool. It’s usually located in %programfiles%/Microsoft Office/ or C:\Program Files (x86)/Microsoft Office/ folder.
- Click on “Browse” and select the OST file that needs to be repaired.
- Click on “Start” to begin the scan process.
- Once the process is complete, click the Repair button. The tool will create a backup and repair your OST file.
- After the repair, open Outlook and check if the search issue is resolved.
Method 4: Recreate the OST File
When nothing works, you can try to recreate the OST file. To do so, follow these steps:
- Close Outlook and press Windows + R.
- Go to the Control Panel, click the Mail icon, and then click Data Files to view the path of your OST files.
- The account Setting Pop-Up screen will open, Click on the “Open File Location” option to open the OST file and rename it. You may also copy the OST file to a different folder or drive and then delete it.
- Now, start Outlook. As soon as Outlook starts, it will create a new OST file at the default location and synchronize the mail items from the online mailbox server.
After recreating the OST file, check for any missing mail items. If there are some missing items, you can use OST to PST converter tool such as Stellar Converter for OST to extract the mail items from the backup OST file and save them to Outlook importable PST format. You can then import this PST file into your Outlook profile to store the missing mail items.
The Outlook 2019 search not working issue can be frustrating. However, you can follow the methods mentioned above to fix the issue. You can rebuild the index or create a new Outlook profile to fix the problem. In case the issue is caused by an oversized or large OST file or an inconsistent OST file, you can recreate the OST file. If you’re still having trouble, contact Microsoft support for further assistance.