OST or Offline Storage Table is a replica of the user mailbox on the Exchange Server. The file is stored on the system locally and is synchronized with the user mailbox on the server. With continuous sending/receiving of new messages and other items, the OST file size gradually grows. When the OST file size reaches the threshold or the limit set by the administrator, you may receive an error message, saying “OST file has reached the maximum size.” The complete error message reads as:
“The Outlook data file has reached the maximum. To reduce the amount of data in this file, permanently delete some items.”

In such a case, you may not able to send and receive new emails, and face several other issues until you resolve the error. Let’s see how to resolve the OST has reached the maximum size error.
Ways to Resolve OST has Reached the Maximum Size Error
One way to resolve the error is to ask your Exchange admin to increase the mailbox size limit. Once the mailbox size is increased, it should probably fix the error. However, the error will soon appear when OST reaches the new threshold limit. Besides, large OST file requires more processing power, more RAM, and faster storage. However, the best option is to reduce the OST file size. Below, we have shared a few methods that will help you reduce the size of the OST file and resolve this error.
Method 1: Compact the OST File
Outlook has the option to compact the Outlook data (OST and PST) files to reduce their size. This option basically compresses the file by removing the empty data blocks created by deleted emails or attachments. If you often delete emails, this can help reduce the OST file size significantly. The steps to compact the OST file are as follows:
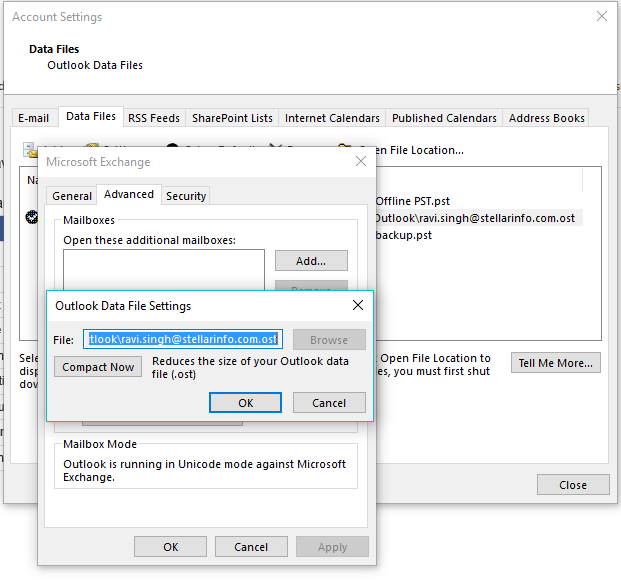
- Click File > Account Settings > Account Settings.
- Under the Data Files tab, select the OST data file that you want to compact
- Click Settings> Advanced > Outlook Data File Settings…
- Click Compact Now and then click OK.
This will compress the OST file to an extent and may resolve the issue temporarily.
Method 2: Move Mail Items to PST File
You can create a local PST file and then move your emails from your OST file to this local PST file. The steps are as follows:
- In Outlook, go to File > Account Settings > Account Settings.
- Click Data Files tab and then click Add.
- Choose Outlook data file (.pst) and click OK.
- Browse a location where you would like to save this new PST file, give it a name, click OK, and then click Close.
- This PST file will appear in your Outlook in the left side bar.
- Right-click on it and create a mail folder.
- Then, expand your main mailbox in Outlook and select the mail folders or mail items you would like to move to this local PST file.
- Right-click on the selected item, choose Move and then select the new PST file you created.
- To move the selected item to a particular folder, choose Move > Other Folder. Then, choose the folder you created in the new PST file and click OK.
This will move the selected mail items or mail folders to the new PST file. You can create more local PSTs, name them properly, and then move mail items from the OST file to PST files.
Method 3: Clean Up the Mailbox
You can also clean up your mailbox to reduce the OST file size. However, this method requires you to delete older emails. The steps are as follows:
- Click File > Info and then click on Cleanup Tools, beside Mailbox Cleanup.
- Click on the Mailbox Cleanup option.
- You can view your current mailbox size by clicking on the ‘View Mailbox Size’ button.
- Enter the number of days to find the older emails and delete them. You can also Find items larger than and deleted them. You can also Empty the Deleted Items folder, and Empty Conflicts to reduce the OST file size.
Further, you can look for large emails, download all the attachments, and then remove the attachments from emails to reduce the OST file size.
Method 4: Disable Shared Folder Synchronization
Shared Folders can also increase the OST file size and cause Outlook performance issues. To resolve this, you can disable the Shared Folders synchronization by following these steps:
- Click File > Account Settings > Account Settings.
- Under the Data Files tab, select the OST file.
- Click Settings > Advanced > Outlook Data File Settings.
- Uncheck the Download Shared Folders option and click OK.
Read more: Outlook Performance Issues When There Are Too Many Items or Folders in Cached Mode .OST or .PST File
Method 5: Adjust the ‘Mail to Keep Offline’ Setting
Outlook provides an option to limit synchronization, enabling you to choose how much data or mail items you want to synchronize to the local OST file. The setting is called Mail to keep offline. You can adjust the Mail to keep offline setting to change how much data you want to keep offline. This can help you significantly reduce the OST file size. The steps are as follows:
- In Outlook, go to File > Info > Account Settings > Account Settings.
- Click on your email account/profile and then click Change.
- Adjust the Mail to keep offline slider.
- If the slider is at 2 years or more, move it to 1 year or 6 months, and check the OST file size after a while. You will notice that the OST file size has reduced significantly.
Note: You may not get the emails that are older than the range you’ve selected in Mail to keep offline settings during the search.
Method 6: Use Registry Key to Configure OST File Size Limit
If you don’t want to delete older emails or remove attachments from emails, there’s an alternative way. You can use the registry editor to reconfigure the OST file size limit by changing the registry key’s entries and values. There are four registry entries that you can edit and set the maximum size to which OST can grow. These are:
- MaxLargeFileSize and WarnLargeFileSize
This lets you set the Unicode formatted OST file size limit to a maximum of 50 GB for Outlook 2010 and later or 20 GB for Outlook 2007 and 2003.
- MaxFileSize and WarnFileSize
Refers to the ANSI formatted OST file size limit. This lets you to set the OST file size limit to a maximum of 2 GB (Outlook 2000).
The following are the default and valid range of ANSI and Unicode formatted OST that you can change for Outlook 2019, 2016, 2013 and 2010.
| Name | Valid Data Range | Default |
| MaxFileSize | 0x001F4400 – 0x7C004400 | 0×7BB04400 2,075,149,312(1.933 GB) |
| WarnFileSize | 0×00042400 –0×7C004400 | 0×74404400 1,950,368,768 (1.816 GB) |
| MaxLargeFileSize | 0×00000001 –0×0000C800 | 0×0000C800 51,200 (50 GB) |
| WarnLargeFileSize | 0×00000000 –0×0000BE00 | 0×0000BE00 48,640 (47.5 GB) |
Refer to the Microsoft Support page to set the new or reconfigure the OST file size limit.
Method 7: Archive Old Emails
Instead of deleting older emails, you can also archive them. This can help reduce OST file size significantly. To do this, follow these steps:
- In Outlook 2013, go to File > Cleanup Tools > Archive. In Outlook 2016 or 2019, go to File > Info > Tools > Clean up old items.
- Then, select the Archive this folder and all subfolders option.
- Select a folder from the list for archive.
- Then, choose a date in the ‘Archive items older than’ section.
- Click on Browse to choose a save location and click on OK.
Tip: You can also create a new folder in Outlook and move all emails with large attachments to this folder. Then, by following the above steps, archive the folder. This will help you reduce the OST file size and keep large email items.
Method 8: Use Microsoft Support and Recovery Assistant (MSARA) Tool
Microsoft provides a support and recovery assistant tool that you can use to diagnose and fix Outlook issues and problems, such as the OST file has reached the maximum size error. To use the tool, follow these steps:
- Select Other problems and then click Next.
- Click Yes if you are encountering the issue on the same system and complete the wizard.
The tool will attempt to resolve the issues with Outlook and your mailbox server. It may also suggest solutions that you can apply to resolve the issue.
Conclusion
When OST reaches the maximum size, it prevents you from sending and receiving emails. You can follow the methods mentioned above to reduce the OST file size. You can also use a professional OST converter tool, such as Stellar Converter for OST. This tool helps you to convert large OST file into manageable PST files. This helps preserve data integrity and ensure you can continue accessing your Outlook data without performance issues or errors like this. In case the OST becomes inaccessible due to large size, you can convert it to PST format or export directly to a live Exchange Server or Microsoft 365 (formerly Office 365) mailbox using this professional OST to PST converter tool.
For more help, leave a comment or reach our Self Help & Support page.
Was this article helpful?