There are several scenarios where you may need to mount an Exchange Server database on a different server. For instance, in case of migration from a decommissioned server, you need to transfer and mount the database from original server on the new server. If the Exchange Server has failed and is rebuilt using the recovery mode, the databases need to be re-mounted. You may need to move an additional database to a secondary server if you’re using the Exchange Server’s Standard license, which allows to mount only five databases. In this post, we will look at the process to mount the EDB file on another server.
Stepwise Process to Mount the EDB File on a Different Exchange Server
Before proceeding to transfer and mount the EDB files on different Exchange Server, you need to fulfil the following prerequisites:
1. Assign the required roles and permissions to your user account
Ensure the user account (you’ll be using) has Databases role assigned. To assign this role, use the below-mentioned PowerShell cmdlet in the EMS:
New-ManagementRoleAssignment -Name Admin -User "Anubhuti@exch16adib.com" -Role "Databases"
To verify if the role has been successfully assigned to the user, run the following command:
Get-ManagementRoleAssignment -RoleAssignee "Anubhuti@exch16adib.com"

From the list of roles, check that the Databases role is assigned to your user account.
2. Prepare the destination Exchange Server
To mount an orphaned EDB file on a different Exchange Server, you need to rebuild the destination server with the same configurations of the original server. You need to ensure that new server has the same operating system, IP addresses, drives, drive letters, Exchange Server version, and computer name. Also, when rebuilding the server, you need to keep the following media in hand:
- The operating system installation media.
- Installation media of the same installed version of Exchange Server.
3. Recover the EDB file from backup
If the original server is not in working condition, transfer the latest backup to the destination server. You can use one of the below mentioned process depending on the scenario:
- If you’ve saved the backup on an external drive, disconnect it from the original server and connect it to the destination server.
- If you’re using a network share, access the share location from the destination server where the backup is stored.
Let us now look at the process to restore backup on the destination server.
Note: For demonstration purpose, we will describe the process to restore the backup using Windows Server Backup. However, you can use any other backup recovery software that is compatible with your Exchange Server.
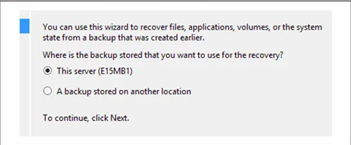
- Run Windows Server Backup and select Recovery.
- Select the location where database backup is stored. Choose ‘A backup stored on another location’. Then, click Next.
- Select the most recent backup’s date and time. The backup date will be highlighted in bold in the calendar.

- Select the Files and Folders option to restore the database and log files.
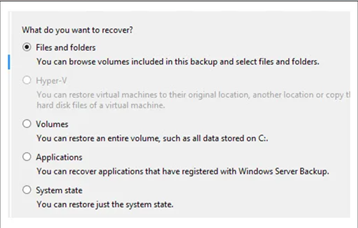
- From the list, choose the database and log files that you want to restore.
- Select a location where you want to restore the backup.
- Confirm and enter required admin credentials. Then, click on the Recover button to start the database recovery process. Go to the selected location and confirm if the database is restored successfully.
4. Check the state of recovered database and repair it if required
Verify that the database that you’ve restored from backup is in the clean shutdown state. Use the EseUtil /mh command (as given below) to check the state of database.
Eseutil /mh “Path to the database”
The State field in the command output will show either Clean Shutdown or Dirty Shutdown. If it shows Dirty Shutdown, perform EseUtil Soft Recovery process using the eseutil /R command as shown below:
eseutil /r E00 /l “C:\Path to log file” /d “C:\Path to database”
Confirm the state of the database again using the Eseutil /mh command. It should now be in Clean Shutdown state.
5. Create a New Database
Now that the database is restored from backup and is in the clean shutdown state, you can use the New-MailboxDatabase cmdlet and create a new database on the destination server. You can use the syntax given below:
New-MailboxDatabase -Server Stellar -Name RDB01 -Recovery -EdbFilePath “C:\Database\IBDB01.EDB" -LogFolderPath "C:\Database\IBDB01"
In the above command, replace the locations of EDB file and Log files with the locations where you’ve saved your recovered files.
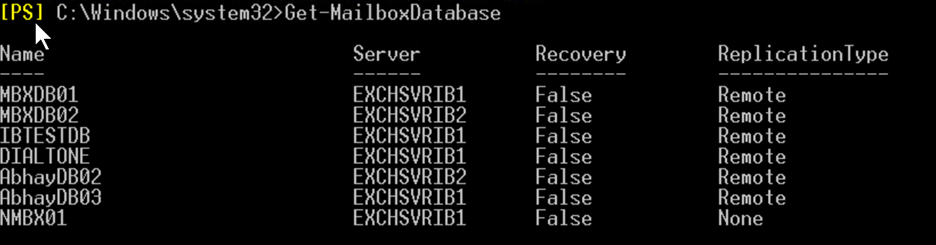
To verify that database is successfully created, run the following command:
Get-MailboxDatabase
6. Mount the Database on the Destination Server
To mount the database on the server, you can use the Mount-Database command as given below:
Mount-Database <database name>
Now, run the Get-MailboxDatabase command to ensure that the database is successfully mounted on the server (see the below example).
Get-MailboxDatabase -Status | Sort Name | Format-Table Name, Server, Mounted

The above-described process is time-consuming and requires a lot of manual work. To avoid the hassles, you can take the help of third-party Exchange recovery tools, like Stellar Repair for Exchange. This tool comes in handy when the backup is unavailable or obsolete and the database is in dirty shutdown state. You can open offline EDB file from a decommissioned Exchange Server of any version and directly export the EDB file data to another live Exchange Server. You can also export the EDB file data to Microsoft 365 (Office 365).
To Sum Up
You may need to mount the EDB file of one Exchange Server on another server in case the original server has failed due to a disaster or other issue. If you want to retrieve data from the EDB file of a decommissioned Exchange Server, then you can mount the EDB file on a new Exchange Server. To mount the EDB file on a different Exchange Server, you can follow the stepwise process mentioned above. However, the process is lengthy and requires technical expertise. Additionally, this process will not work if the backup is unavailable. As an alternative, you can use Stellar Repair for Exchange to scan the EDB file of decommissioned Exchange Server and recover data from it. You can then directly export this data to another live Exchange Server. The software is compatible with all the versions of Exchange Server – from 5.5 to 2019.
Was this article helpful?