Disk Management is a traditional yet popular way to manage disks and partitions currently installed on your machine, either locally or remotely. It’s a major part of Microsoft management console comes inbuilt with latest Windows such as Windows XP / Vista and Windows 8. Though, it has same set of features and options found in the older copy of Windows like Windows 7 except Windows 8 is ready for great sizes of single hard disk and ensures you for being capable of managing all the desired disk functions on large disks of up to 2.2 TB.
 Disk Management lets you perform all the major disk functions, such as:
- Extend/Shrink Volume
- Change Drive Letters or assign a new desired drive name
- Format / Wipe to erase stuff inside the Storage Media
- Open/Explore any volume
- Convert between MBR disk to GPT disk or GPT to MBR
- Convert basic disk to dynamic disk and vice versa
Before its introduction, fdisk command was used to manage disks and partitions.
Open Disk Management in Windows 8
You can easily reach at the Disk Management screen by going to,
My Computer > Right Click and Choose Manage > Select Disk Management below the ‘Storage’ option.
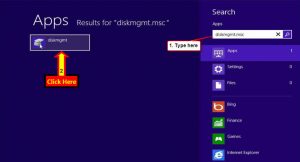
Alternatively, you can use the traditional way of accessing disk management utility which is by using command prompt. At the home or desktop screen, press ‘Windows button + ‘R’ key’ to open ‘Run’ window, type ‘diskmgmt.msc’ in the text box and hit OK.
At the disk management screen, you may able to see all the drives as well as partitions along with all its details like drive capacity, file system type, partitions, drive letters, free and used space and many more.
Format, Shrink/Extend Volumes in Windows 8
Once you reached at disk management, can select and perform multiple functions of your needs like formatting, extending/shrinking any volume which is of two most widely used tasks of disk management.
Here’s how you can do it on your own without taking helps from specialized hands:
- At the top of the screen, you’ll see all the partitions and drives attached to your computer.
- Right click on any drive, you want to format and choose ‘format’.
- Confirmation window will asks you to confirm the action, click yes.
- For resizing the partitions, choose ‘extend volume’ to increase the size capacity or ‘Shrink volume’ to divide partitions into other small size partition.
- There are various other options available after right clicking on any drive or partitions like ‘Mark Partition Active’, ‘Change drive letters and paths’, ‘add mirror’ etc. and you could choose any of them to perform action of your choice.
Windows 8 would suppose to be the biggest launch of 2012 and you could expect even more advantages other than this great disk utility feature in coming days.
Was this article helpful?