Many Mac owners choose not to use macOS Terminal. It is easy to understand why. Its plain interface and the absence of familiar buttons may discourage an inexperienced Mac user. Indeed, it doesn’t resemble any other application on your Mac. However, Terminal is a sensational tool that allows you to unleash hidden features and take controlling your Mac performance to the next level.
We offer you to get acquainted with the 10 most useful Mac Terminal commands to utilize the macOS command line tool to its best potential.
1. Managing Files
Copying files through Finder is quick and easy. Why should you bother with a command line, then? There are several situations when managing your files via Mac Terminal is necessary.
The most common ones include:
- Not being able to access Finder due to various Mac issues.
- Accessing files and folders hidden in Finder.
- You need to move or copy multiple files at once.
Copying a File
If you want to copy a file through the Terminal, use the cp command:
- Open the Terminal via Launchpad.
 Launchpad > Terminal
- Create a copy using the syntax cp [source destination].
Mind, copying all the files from a directory using the -R flag with the cp command is possible. This command copies every item in the folder to the location you choose.
To copy a directory from your Downloads to your Documents folder, use the following command:
cp -R ~/Downloads/MyFolder /Documents
Moving a File
Similar to the previous one, the mv command offers to manage files via Terminal to relocate files from one folder to another. However, you should know that the mv command moves a file to another location while deleting an original.
Use this command to transfer files to a backup disk:
mv ~/Downloads/MyFile.rtf /Volumes/Backup/MyFolder
2. Viewing Hidden Files and Folders
Apple hides some files and folders to prevent you from accidentally deleting them. However, showing hidden files and folders is necessary to troubleshoot some macOS bugs or back up essential data.
Using Mac Terminal commands is one of the easiest ways to access hidden files and folders on your Mac.
Open Terminal and type:
defaults write com.apple.finder AppleShowAllFiles -bool TRUE
killall Finder
If you must hide the files again, use the same command but change TRUE to FALSE.
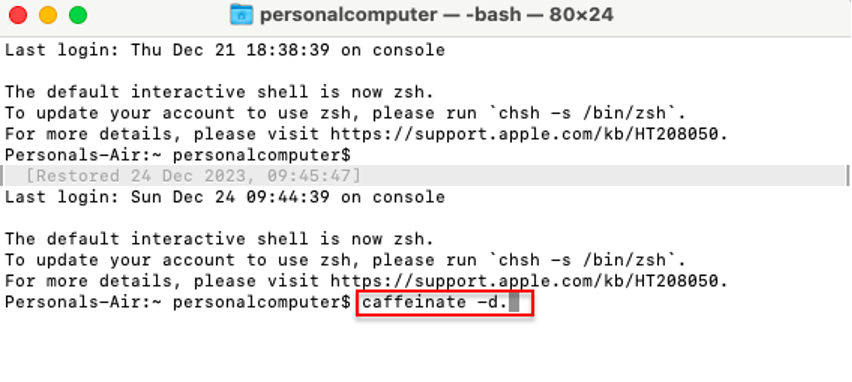
3. Preventing Mac from Sleeping
You can keep your Mac from sleeping during periods of inactivity in several ways.
One of them is a straightforward command in Terminal:
caffeinate -d.
 Launchpad > Terminal
To indicate the precise time you want your Mac to stay awake, use the caffeinate -t X, where X represents the number of seconds.
4. Hiding Inactive Apps in Your Dock
If your Dock panel is overcrowded, use Mac Terminal commands to remove unused application icons.
Type the following command to delete unwanted application icons:
defaults write com.apple.dock static-only -bool TRUE
killall Dock
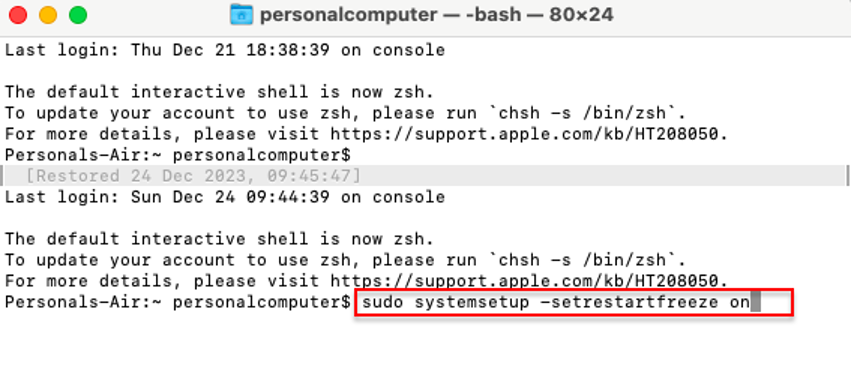
5. Restarting Your Mac Automatically
You may have experienced a situation when your Mac freezes, and the only solution to the problem is to manually shut down your Mac by pressing and holding the power button.
Did you know that Mac Terminal commands can set up your Mac to restart automatically when it runs into a crash?
The command to use is sudo systemsetup -setrestartfreeze on
 Launchpad > Terminal
 6. Checking macOS Updates
Every Mac user knows how important it is to update macOS regularly. System updates give you access to the newest macOS features and resolve security issues and other performance glitches. If you want your Mac to check for available updates more frequently, use the following command:
defaults write com.apple.SoftwareUpdate ScheduleFrequency -int 1
7. Changing the Default Screenshot Location
You can easily change the folder in which your screenshots are saved by doing the following steps:
- Open Terminal.
- Type the command defaults write com.apple.screencapture location [new screenshot location].
- Hit Enter.
- Type killall SystemUIServer
- Hit Enter one more time.
Related reading: 7 Ways To Fix Screenshot Not Working On Mac
8. Downloading Files Without a Browser
Mac Terminal commands can download a URL for you without using any web browser.
First, you must set a Terminal’s location to a folder where you want to store your file. You can do it by typing the full path or dragging and dropping the folder to Terminal.
The command to use is:
cd ~/Downloads/
To download the desired file, use the command:
curl -O [file’s URL]
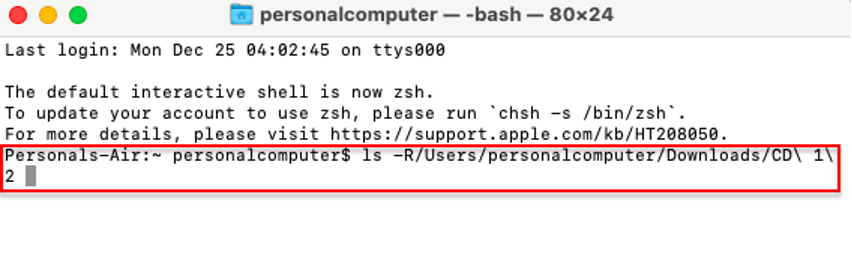
9. Listing Folder Contents
Use the command with the -R flag to see all the folder contents.
This is what the command will look like ls -R [the path of the directory]
 Launchpad > Terminal
 10. Displaying File Contents
Occasionally, you may need help opening a file because of its corruption or lack of a proper application. However, Mac Terminal commands can help you view the contents of any file. However, the text displayed will only disclose a little information for specific files like video or audio. Other files can reveal just enough for you to understand their contents.
Type the command:
cat [file path]
You can type an entire path yourself or drag and drop the file to the Terminal window and place it right after the command.
How Do You Restore Files Accidentally Deleted When Using Mac Terminal Commands?
Mac Terminal is a powerful tool that can access different files, folders, and system settings. One of the potential dangers of using Mac Terminal commands, such as mv to move files is that you can accidentally lose essential data.
Luckily, nowadays, you can restore deleted files using software recovery tools. Choose Stellar Data Recovery Professional for Mac to restore deleted audio, videos, documents, photos, and other files. It’s simple and intuitive interface facilitates the data recovery process.
Let’s look at how you can recover data with Stellar Data Recovery Professional for Mac:
- Download Stellar Data Recovery Professional for Mac.
- Open the app and choose the type of files to recover.
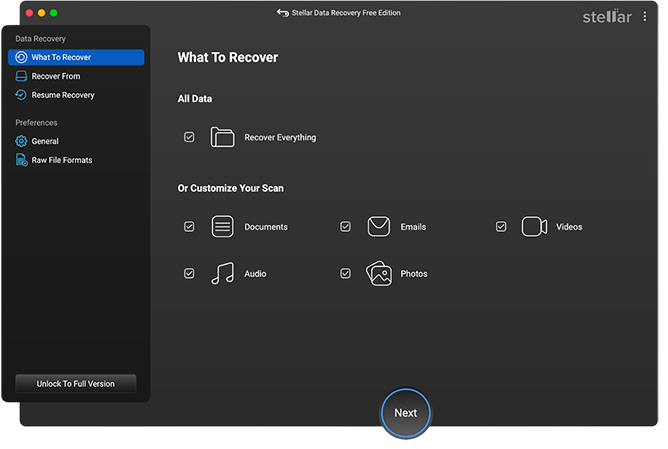 Stellar Data Recovery > Select What To Recover
- Select where you need to restore deleted files from.
- Run the Scan to find the missing files.
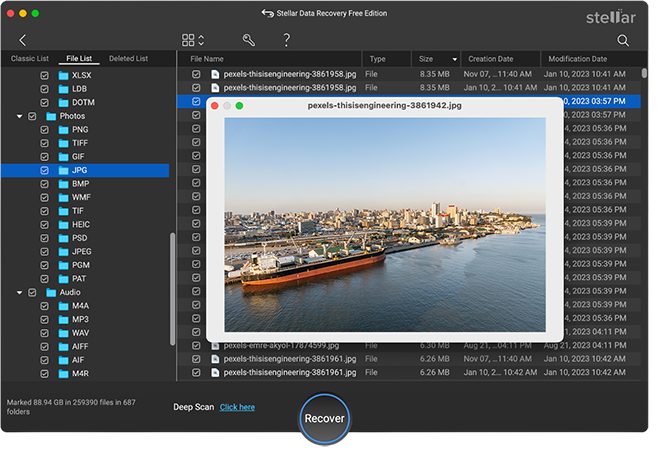 Stellar Data Recovery > Preview and Recover
- If the app identifies the files you deleted, recover them.
Bottom Line
Mac Terminal can be challenging due to its specific graphic interface. However, it unlocks many options that can help you improve your user experience. Even if you aren’t an advanced Mac user, getting to know basic Mac Terminal commands makes it easier to perform some mundane tasks. Use the command line cautiously, double-check the commands you want to run, and pay extra attention to file safety.
Read more:
Was this article helpful?