‘I shot some images in RAW using my Nikon camera to work on Lightroom. I uploaded the NEF file format images from camera to Photos app on Mac. But as I open the images in Lightroom they are auto converted from RAW to JPEG. I am not able to get the RAW file to edit.’
The problem is extremely annoying when you desperately need camera RAW files to work. Usually, its noted that RAW files auto convert to JPG when users import images by using Photos app on Mac. Although there are other complaints too, such as
- RAW photos convert to JPEG when imported from camera to computer.
- Imports auto converted from RAW to JPG in Lightroom.
- MacBook Photos app auto converting RAW to JPEG after importing to the Affinity editing software.
So, the question is why image import gets auto converted from RAW to JPG. And how to tackle the issue?
This post answers all and shares how you can fix the RAW photos import issue in any situation.
Why imports get auto converted from RAW to JPG?
If you are wondering why your RAW photos are uploading as JPEG on computer or editing software, here are the probable reasons:
- You have disabled the ‘Download Originals to this Mac’ option in Photos app.
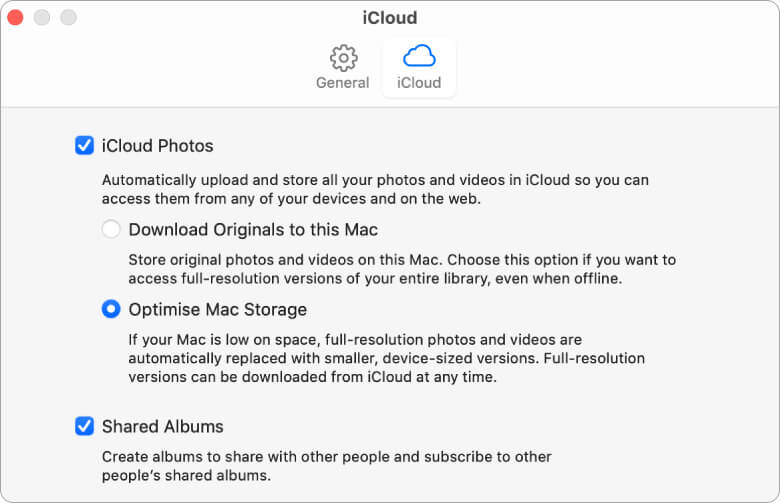
- You have turned on ‘Optimise Mac Storage’ in Photos due to which the app doesn’t save pictures in RAW format. It keeps the smaller JPEG files while the RAW versions are saved in iCloud Photos.
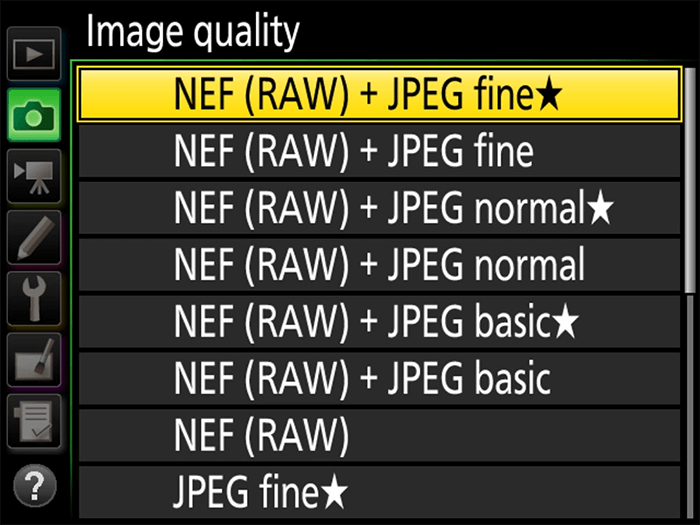
- You have chosen RAW+JPEG format in camera settings while shooting. When these photos are imported from camera to computer, the Photos app by default picks only the JPEG version and you think that your pictures auto convert to JPG from RAW.
- If RAW files auto convert to JPG in Lightroom or other editing software, you are probably using Photos app for importing, which contains the compressed JPEG versions of image files.
- The pictures are shot in JPEG and not RAW.
- Your photo editing software is not updated or has a bug.
Best 6 methods to fix photo imports being auto converted from RAW to JPG
1. Check camera settings
 Figure: Image settings in Nikon camera
You might have forgot to change the camera settings and captured the photos in JPEG and not RAW. Now you have to either reshoot the pictures or settle with the JPEG files!
2. Turn on ‘Download Originals to this Mac’
If you have turned off the ‘Download Originals to this Mac’ option in Photos app, the RAW files will convert to JPEG on import to Mac from camera.
So turn on ‘Download Originals to this Mac’ option by following the below steps:
- Go to Photos app on Mac.
- Navigate to Preferences > iCloud

- Check in Download Originals to this Mac option. Now you can save the original, full-resolution RAW photos both on your Mac and on iCloud.
3. ‘Use RAW as Original’ to import image in Photos app on Mac
The image files convert to JPEG after import on Mac if you have turned on the ‘Optimise Mac Storage’ preference in Photos app. The preference helps to save the disk space and the smaller JPEG files are quicker to load. As a result, the Photos app displays only the optimized JPEG version of your RAW images. While it saves the RAW version in iCloud Photos.
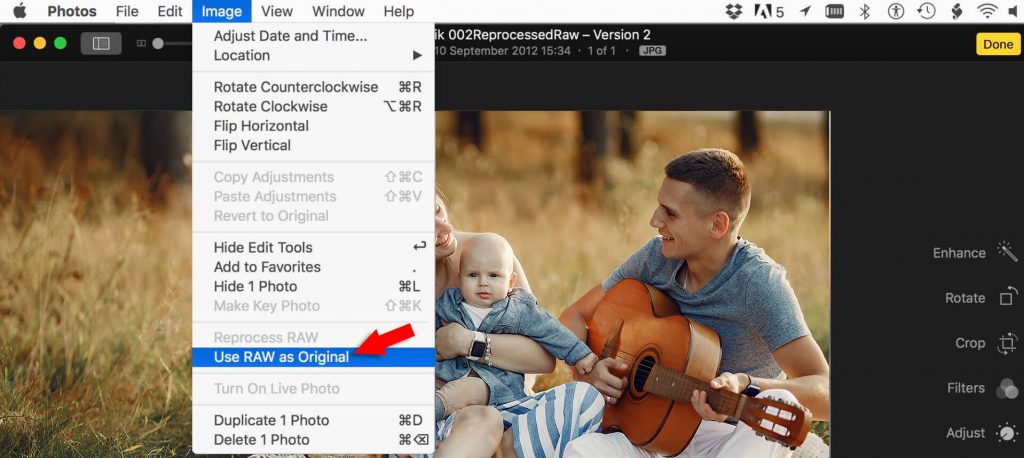
However, if you need to edit the RAW image on Mac, Photos can still download the RAW file of that image. Here are the steps to import RAW photos instead of JPEG in Photos app for editing:
- On Mac, go to the Photos app.
- Double-click on a photo that you want to open in RAW.
- From the toolbar, go to the Edit mode.

- Choose Image > Use RAW as Original.
Note: After editing, Photos app doesn’t export the image in RAW. It exports the modified photos in JPEG format only.
4. Import RAW photos from other location instead of Apple’s Photos app
If RAW photos imported to Lightroom convert to JPEG on Mac, try this solution. As Apple’s Photos app usually keeps the JPEG version of the image file and saves the RAW form in iCloud Photos, don’t directly import pictures from Photos app to Lightroom or other editing software.
Instead, download RAW files from iCloud Photos and save them at another location on your computer (not in Photos app). Thereafter, import the pictures from the new location into Lightroom. This method successfully imports the RAW pictures into editing software without converting them to JPEG.
5. Update the photo editing software
If none of the above methods helps to fix imports being auto converted from RAW to JPEG, try updating the photo editing software. Be it Lightroom, Photoshop, Affinity, or other, updating the software fixes bugs and resolves many issues.
6. Import RAW files directly from the camera SD card
To avoid photos auto converting from RAW to JPG, import directly from the camera memory card to the editing software.
Connect the memory card to the computer via card reader and follow the usual process to import photos. You can directly import RAW files to Lightroom or Photoshop from camera.
Bonus Tip: Sometimes, RAW or JPEG files get corrupted during wrong import or transfer from camera, iPhone, or Android to computer. As a result, they turn greyed-out, black, grainy, or throw error. You can repair such photos with
Stellar Repair for Photo — an advanced tool that repairs image file header, data, invalid image file structure, unknown or invalid marker, etc. the free trial is available for Mac and PC.
Wrapping up
You are always sure to choose RAW over JPEG when it comes to quality. However, unexpected auto convert of RAW files to JPEG on import can be a big nuisance. But don’t sweat it as this post resolves the problem of photo imports auto convert RAW to JPG by offering the proven workable solutions. So whether RAW photos converting to JPEG when imported from camera or files getting auto converted from RAW to JPEG after import to Lightroom, now you know how to fix the problem.
Meanwhile, do share with our readers how you were able to stop auto convert of RAW to JPEG on import issue in your case.
You may be interested to know:
Which is Highest Quality Image Format for Photographers – JPEG, TIFF, PNG, PSD, or RAW?
Does Editing JPGs in Lightroom Reduce Image Quality?
Was this article helpful?