Summary: A number of users wanting to import PST file into Office 365 webmail for better access to their Outlook mailbox. However, migrating PST file to Office 365 isn’t straightforward. In this blog, we have compiled a few solutions which may help you in importing PST files to Office 365 webmail with ease.
PST [Personal Storage Table] file is a repository file format used by Microsoft Outlook to manage emails, contacts, calendar, notes, events, and other Outlook data. Outlook application access is device restricted and therefore, a lot of users wanting to import Outlook PST files into Office 365 webmail. Outlook is accessible on web when your account is set up with Exchange Online and Microsoft application.
To access Outlook on web, you can go to Outlook Web Access (OWA) from a browser. OWA is equivalent of the Outlook application and works on the browser. It doesn’t differ in look and feel from Outlook application, but it offers users with the flexibility of accessing mailbox from anywhere, irrespective of your location and presence of Outlook application on your system.
The OWA is no different in functional aspect of the Outlook. The majority of functions are present. You will find the familiarity in interface and other properties which are required in maintaining the professional communication. Even if, Outlook app and Office 365 Webmail are nearly common in functionalities and properties then why users want to import PST files to Office 365 Webmail?
Important Reasons to Import PST files to Outlook 365 Webmail
There are numerous reasons behind users wanting to import PST to Office 365 webmail. Here are few grounds on which Outlook users wanting to access PST files on Outlook 365 webmail:
- Office 365 is a cloud-based service from Microsoft which offers better security that prevents data loss.
- There is data backup feature in Outlook 365 webmail which allows users to access their Outlook data anytime.
- It comes with a simple and modern interface, making it easy for user to understand and navigate Outlook 365.
The above reasons attract users to switch from Outlook app to Office 365. However, importing PST files to Office 365 webmail isn’t easy. You need to be skilled and have technical knowledge to move your PST files to Outlook 365. However, we have compiled a few workable solutions, methods which can be used to import PST files to Office 365 webmail.
Method 1: Import PST file into Office 365 using Network Upload
Network Upload method is commonly used to import PST files to Office 365 manually. It is little complex though, and therefore requires good technical skills to execute the process successfully. In the following section we have explained the step-by-step guide to import PST files to Office 365 webmail using this method.
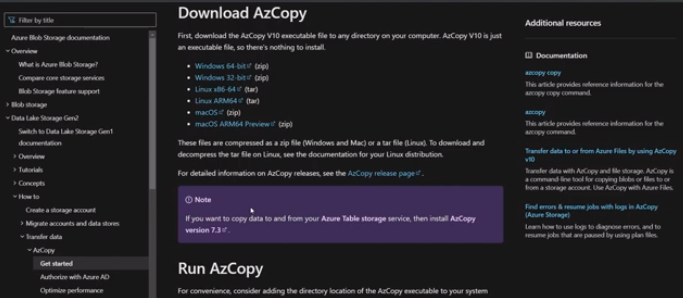
Phase 1: Download and Install Azure AzCopy Tool
Before you download and install Azure AzCopy, you need to know that is it a command-line tool that can copy data to and from Azure Storage. Therefore, Azure AzCopy tool is essential to import PST files into Office 365 in Network upload method.
- Go to https://protection.office.com/ and log in with your Office 365 global administrator credentials.


- Once you are signed in, navigate to Security & Compliance Center. Find and select Data Governance and click ‘Import’.

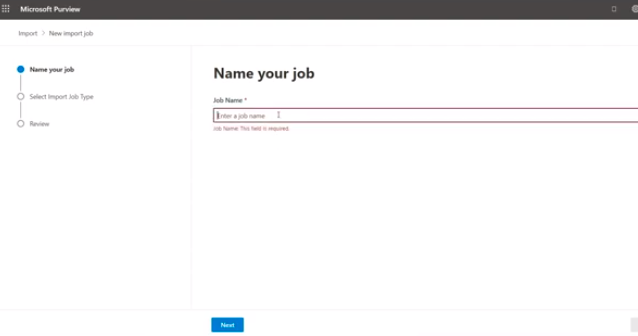
- This will open the Import wizard, from there click on +New Import job, and enter a name for the import job.

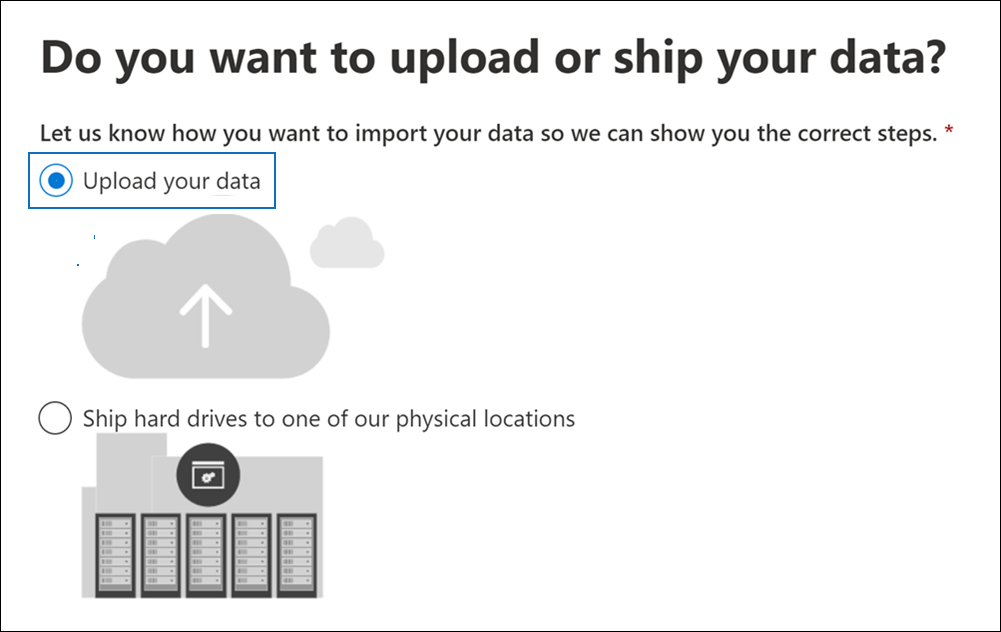
- On the next page, choose ‘Upload your data’ from the options.

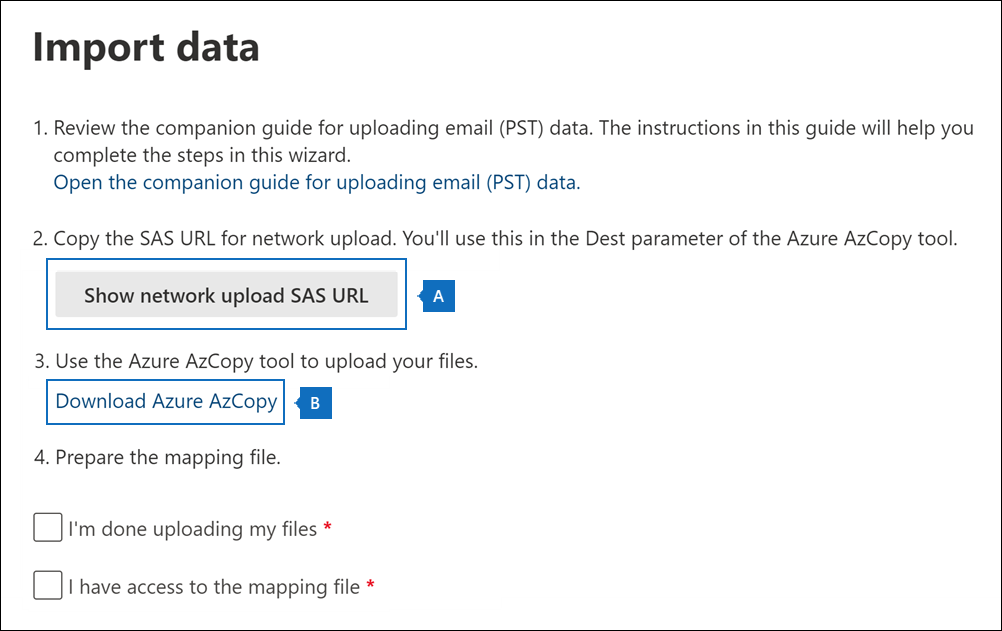
- In the ‘Import data’ page, click on ‘Show Network Upload SAS URL’, and copy the proceeding URL.

- Now, click on the ‘Download Azure AzCopy’. It will download the Azure AzCopy Tool.
Now, you can upload PST files to Office 365 using AzCopy tool. The tool helps in uploading storing PST files in Microsoft Azure Storage location in the Microsoft cloud.
- Run the downloaded Azure AzCopy software to import the PST to Outlook web application.

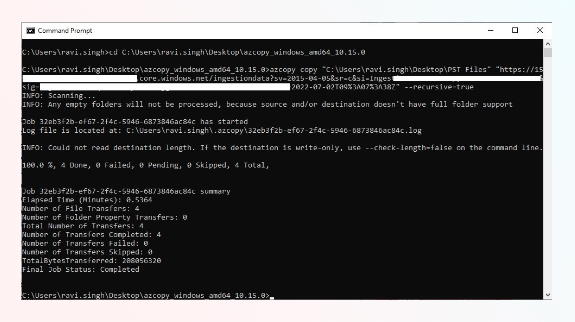
- You are required to run ‘AzCopy.exe/Source:/Destination (URL path created from Show Network Upload SAS URL)/V: (Verbose log file)/Y’ command to open PST file in Outlook Webmail.


Phase 2: Create PST Import Mapping File
After uploading the PST files to Azure Storage location, the next steps is to create a CSV file (comma-separated value) that specifies the user mailbox where PST files will be imported. The CSV file is submitted in the following step when you create the PST Import job.

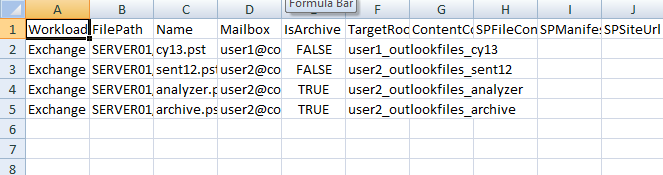
Download the mapping template ‘PstImportMappingFile.csv’, and fill it. This will be used when you are creating the import job.
Phase 3: Create PST Import job to Office 365
- Go to the Office 365 ‘import data’ wizard and check on the options ‘I’m done uploading my files’ and also ‘I have access to the mapping file’ (you will get a .csv file), and then click on ‘Next’.

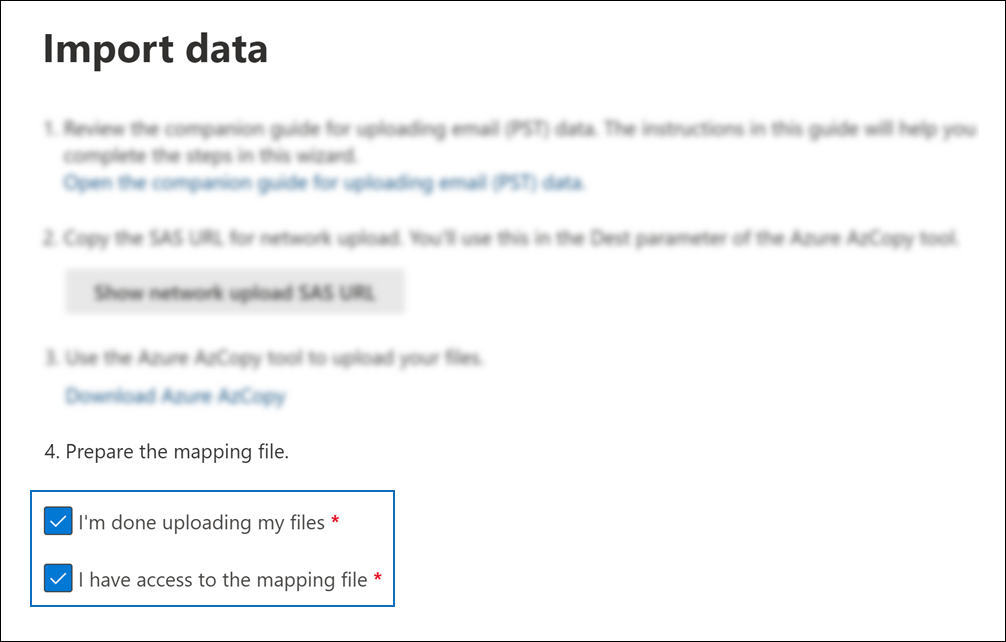
- You will be redirected to ‘Microsoft Purview’ page. In the ‘Select mapping file’ click on (+select mapping file) which is the .csv file which we have created in the previous step. Upload the .csv file and tap on ‘Validate’, and then click on ‘Next’.


- This will allow Office 365 to start analyzing the data. Now, the users can set specific filters, if they want, before importing the PST files to Office 365. Click on ‘Import’ data and initiate the import job.
You have successfully imported PST files to Office 365. Now, you can access the PST files data through Outlook Web Access (OWA).
Method 2: Use Drive Shipping to Import PST files to Office 365
Drive shipping is another manual method which can be used to import PST files to Office 365. This method can be used to bulk-import PST files to user mailboxes. In the ‘ship drive’ method you will keep the files in BitLocker-encrypted hard drive, if the size and volume of PST files are too large, and then ship it to Microsoft.
Once Microsoft receives the PST files, it will store them to the temporary Azure Storage location, and from there you can import the PST files to the mailboxes using Import PST files of Office 365 Import Services.
Method 3: Use Stellar Migrator for Outlook to Import PST files into Outlook 365 Webmail with Ease.
The limitations of manual solution ‘Network upload’ and ‘Drive shipping’ can be annoyingly lengthy for the users. These methods are lengthy and tedious, requires proficiency in technology. There is also underlying risk of data loss, if you accidentally made any mistake in executing the commands.
Hence, you may use a professional solution like Stellar Migrator for Outlook to import, migrate your PST files to Outlook 365 webmail. This tool is the best available option for the job. The software is designed to automate and simplify the otherwise complicated process of migrating Outlook data from PST files to Outlook 365 mailboxes. It also supports Unicode and ANSI PST files created in different Outlook versions.
The robust algorithm of Stellar Migrator for Outlook ensure all your PST file data is easily and efficiently imported to Outlook 365 with utmost data integrity and security. It uses Microsoft Modern Authentication to connect and import PST files into Office365 mailboxes.
The key features of Stellar Migrator for Outlook:
- It allows selective mail items and mailbox migration.
- You can use advanced filtering to exclude or include mail items.
- It offers freedom of choice with pay-per-mailbox pricing feature.
- You can simultaneously migrate multiple PSTs at once from different systems.
- Allows importing large PST files, 50GB or more, to Office 365 with complete integrity.
Follow the steps given below to import/migrate PST files to Office 365:
- Launch the ‘Stellar Migrator for Outlook’.
- From the interface window, tap on ‘Choose Mailbox Manually’ and then Browse and select the PST file that you want to migrate to Office 365.

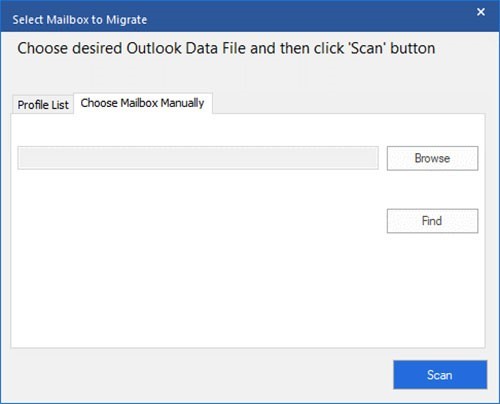
- The Software also offers the option of ‘Profile List’ which enables you to view all the PST files associated with your profile on your computer.

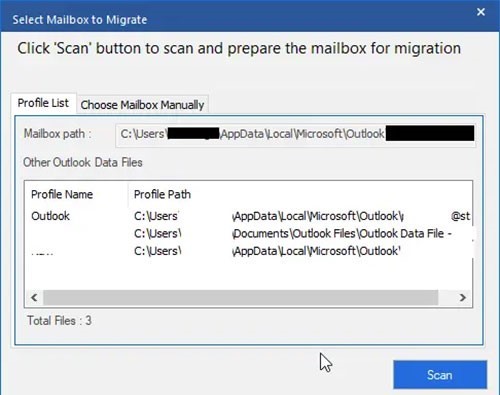
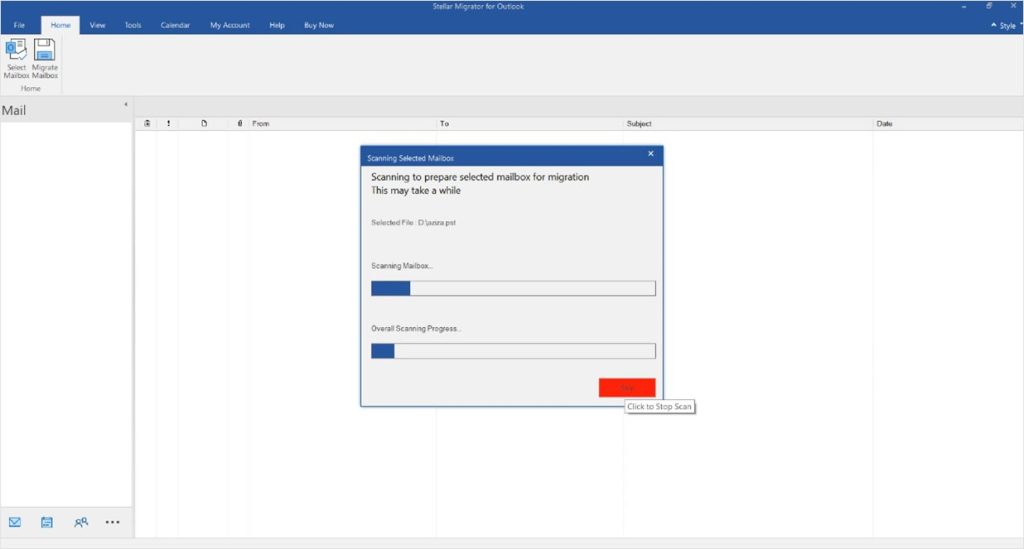
- After selecting the PST files, click ‘Scan’ button at the bottom right to initiate the scanning process. You can check the scanning process in the progress bars.

- Once scanning is complete, you can view all the file items in the left panel. To preview the items, expand the folder.
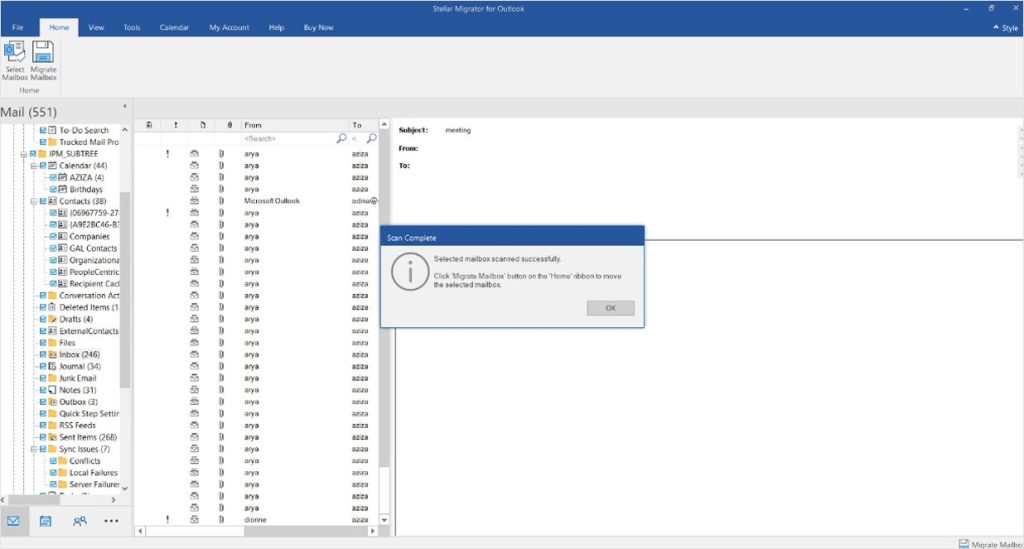
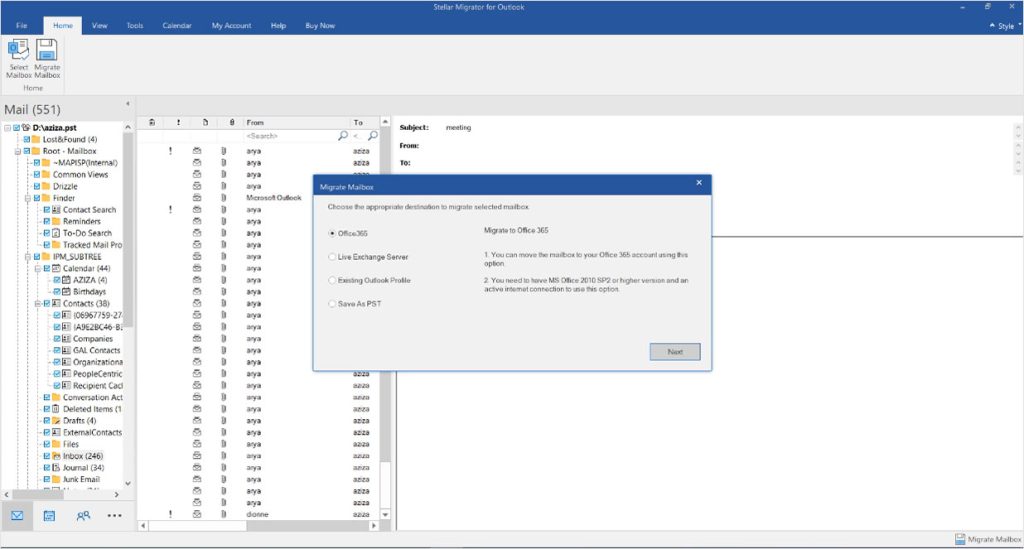
- Select the mail folders and items that you want to upload to Office 365 account, and then click Migrate Mailbox from Home tab.
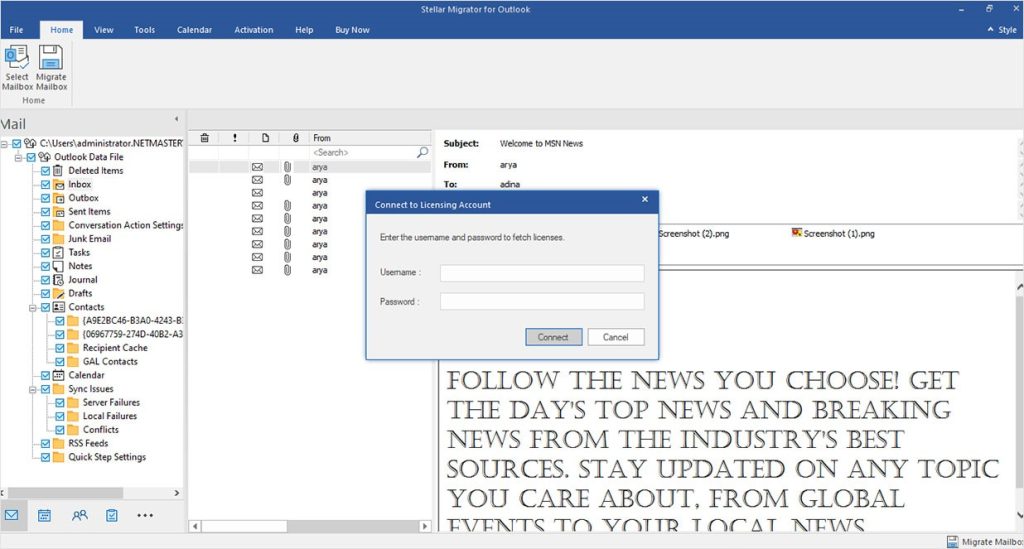
- You will be asked to Connect to Licensing Account, enter the username and password for your account for Migrator license.
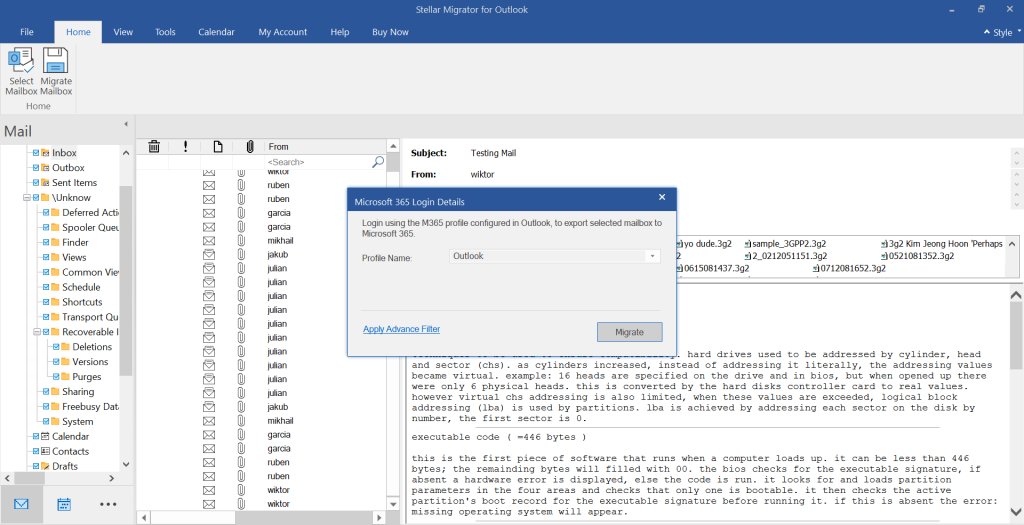
- Once connected, you will receive ‘Migrate Mailbox’ dialog box. From there choose ‘Microsoft 365’ and then click on ‘Next’ to initiate the process. The software will redirect you to the already configured Office 365 account.
- Choose Microsoft 365 account which is configured in your system, and click on ‘Migrate’. It will connect to the Office 365 using Microsoft Modern Authentication and once authenticated, the tool will start moving your selected mail items to Office 365.

- Wait for a while till the process is complete. It may take time depending upon the file size and network speed. When PST import to Office 365 is successful, you will receive a message ‘Mailbox successfully moved to Office 365’. Click OK to end the process.

- You can also track the PST to Office 365 import progress/license usage/remaining license or purchase more in your Stellar® Cloud account.
Conclusion:
Importing PST file into Office 365 webmail using manual method requires a lot of consideration due to its limitations. Although, Network Upload and Drive Shipping facilitate the PST file migration to Office 365 in bulk, it requires proficient technical skills to complete the process. Moreover, the method is tedious and can consume a lot of time. Therefore, an advance tool like Stellar Migrator of Outlook can be a better option to import PST file into Office 365 webmail. The software comes with multiple features that make PST file migration to Outlook 365 a lot easier and efficient.

