OLM file is the Outlook data file that stores mailbox items in Outlook for Mac. Sometimes, you need to migrate OLM file to Outlook for Windows due to various reasons. However, you cannot directly migrate the OLM file data to Outlook for Windows as it does not support the OLM file format. Below, we will mention different ways to import OLM file into Windows Outlook.
Reasons to Transfer OLM File Data to MS Outlook for Windows
Here are some reasons why users need to import OLM files into Outlook for Windows:
- To access OLM file data in Outlook for Windows
- Switching from Mac to Windows PC
- To share OLM file or its data with a non-Mac user
- Need to access data from old/archived OLM files
- To migrate OLM file data to Office 365
Methods to Import OLM File into Windows Outlook
There is no direct way to import OLM files into Windows Outlook. However, there is a workaround that can help you to import OLM file data into Outlook for Windows. For this, you need to configure an IMAP account (Gmail account) in Outlook for Mac and then add the same account in Windows Outlook to transfer the data. Here is the stepwise process:
Note: To configure another email account in Mac Outlook or use the import/export functionality, you need to purchase its license. Else, the import export option will appear grayed-out in Outlook for Mac.
Part 1 – Add Gmail Account in Outlook
The first step is to add an email account (Gmail, Yahoo, AOL, etc.) in the Outlook for Mac application. Here, we will be using a Gmail account.
Follow the steps below to add Gmail account in Mac Outlook:
- Launch Outlook for Mac.
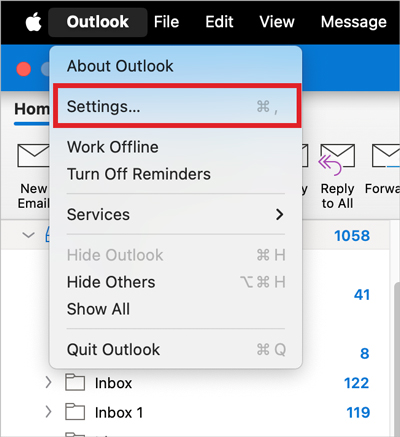
- Click on Outlook > Settings.
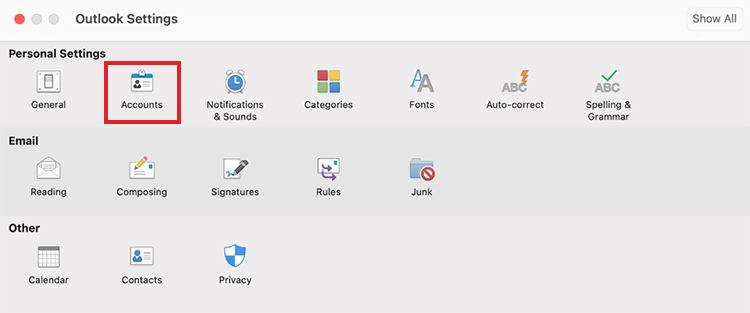
- Click on Accounts under Personal Settings.
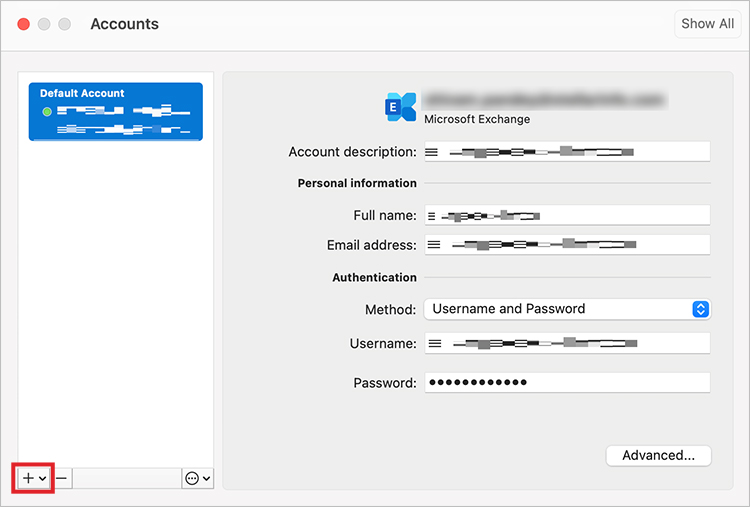
- Click on the + icon in the lower left corner.
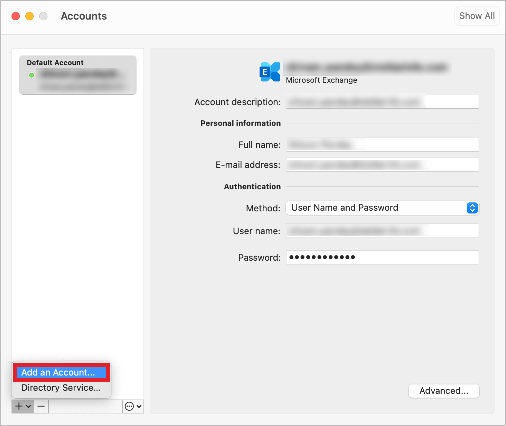
- It will show the Set Up Your Email wizard.
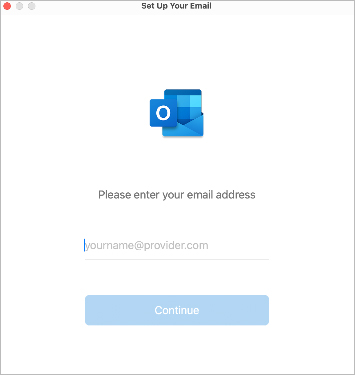
- Follow the onscreen instructions to add your Gmail account in your Mac Outlook account.
Part 2 – Move the OLM File Data to the Gmail Account
Next, you need to transfer the data to the Gmail account added in Mac Outlook. Here are the steps:
- Relaunch Outlook for Mac. Press the Control key and click on the newly-added Gmail account. Select the New Folder option and rename the folder.
- Now, select the newly created folder and click on File > Import.
- Select the mailbox folder that you want to export from Outlook for Mac to Windows Outlook. Press the Control key and click on it. Then, select Move > Choose Folder.
- Next, select the items that you want to move from the selected folder. Then, press the Control key and click on them. Select Move > Choose Folder.
- Go to the Gmail folder and click Copy. This will move the selected data to the Gmail account.
Part 3 – Configure the Gmail Account in Outlook for Windows
Now, you can configure the same Gmail account in Outlook for Windows to access the OLM data. Here are the steps:
- Launch Microsoft Outlook on your Windows PC.
- Configure the same Gmail account that you’ve configured in the Outlook for Mac application.
- You will see the Outlook for Mac mailbox data in your Windows Outlook.
Drawbacks of the Above Workaround
Though the above method is free to use, it has some limitations, such as:
- It is lengthy and time-consuming.
- It requires you to create additional email accounts.
- It also requires you to purchase license of Outlook for Mac to import/export data.
- Gmail has a 15 GB mailbox limit for free. For moving data from OLM files larger than 15 GB, you need to purchase additional Gmail storage.
A Simple Way to Import OLM Files into Outlook for Windows
To overcome the limitations of above method and ensure an accurate data import from OLM file into Outlook for Windows, you can use Stellar Converter for OLM. It is a DIY OLM to PST converter software designed specifically to convert OLM files to PST files without any issues or data inconsistencies. You can apply Advanced Filters to auto-split large OLM files and save them as multiple PST files.
Here is how to use Stellar Converter for OLM:
- Download and install Stellar Converter for OLM on your Windows PC.
- Launch it.
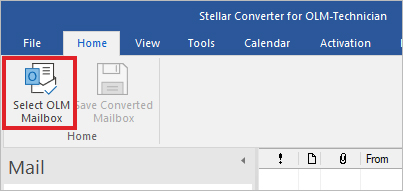
- On the Home screen, click on the Select OLM Mailbox option.
- Select the OLM file and click on Convert.
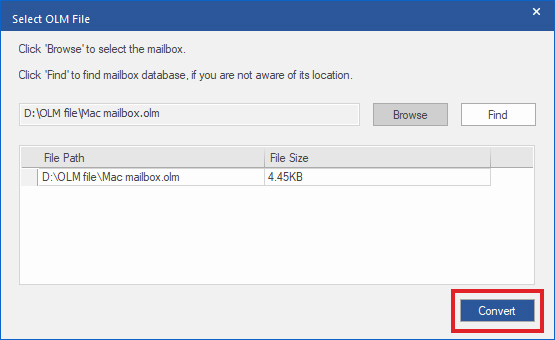
- The software will scan the selected OLM file.
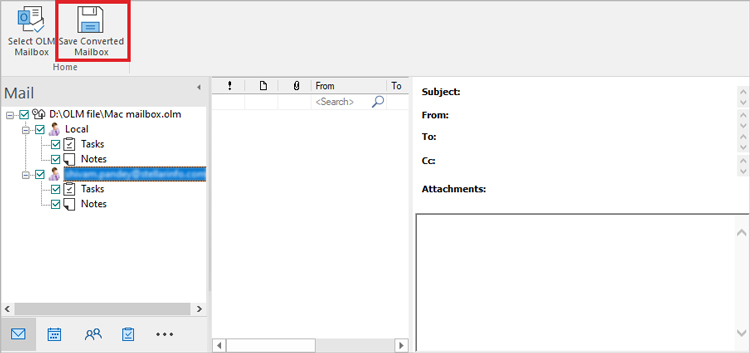
- Once the scan is complete, it will show all the OLM file data. Preview and verify the mailbox items.
- Select the items you want to save and click on the Save Converted Mailbox option.
- You can save the converted mailbox items in PST file, export them to an existing Outlook profile, or save them in other file formats, like MSG and EML.
- After the selecting the option, click Save.
Conclusion
There is no direct way to import OLM files into Outlook for Windows. Above, we have explained the workaround to transfer OLM file data to Outlook for Windows. This includes configuring a Gmail account in Outlook for Mac, transferring the OLM data to Gmail account, and then configuring the same Gmail account in Windows Outlook. However, it is complicated, time-consuming, and requires technical know-how.
The safest way to import OLM files into Outlook is by using Stellar Converter for OLM. This is an easy-to use software that helps you convert OLM files into Outlook importable PST file format. You can also use the software to directly export the data from OLM file to an Outlook or Office 365 account.
Was this article helpful?