Sometimes, while working on an Excel file, you accidentally close the file or your system shuts down suddenly due to power failure, or the Excel program crashes due to an issue.
As a result, the file you’re working on will not be saved and you fear losing your data. However, there is no need to worry as the Excel program has features that can help you restore such unsaved files.
One such feature in the Excel application is the AutoRecover feature. If this feature is enabled, it automatically saves the versions of the file.
In this article, we’ll mention different ways to restore the previous version of the Excel file.
Methods to Restore Previous Version of Excel File
Follow the below-listed methods to restore the previous version of the Excel file using the inbuilt functions of Excel and Windows.
Method 1: Use Document Recovery Pane in Excel
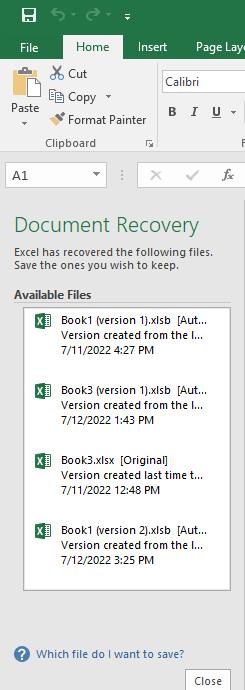
The Document Recovery pane in Microsoft Excel helps to review, open, and save the recovered files. If your Excel program closes unexpectedly before saving the changes, you can use the Document Recovery pane to restore the file.
Here are the steps to restore the file using the Document Recovery pane:
- Open the Microsoft Excel.
- Click on Show Recovered Files.
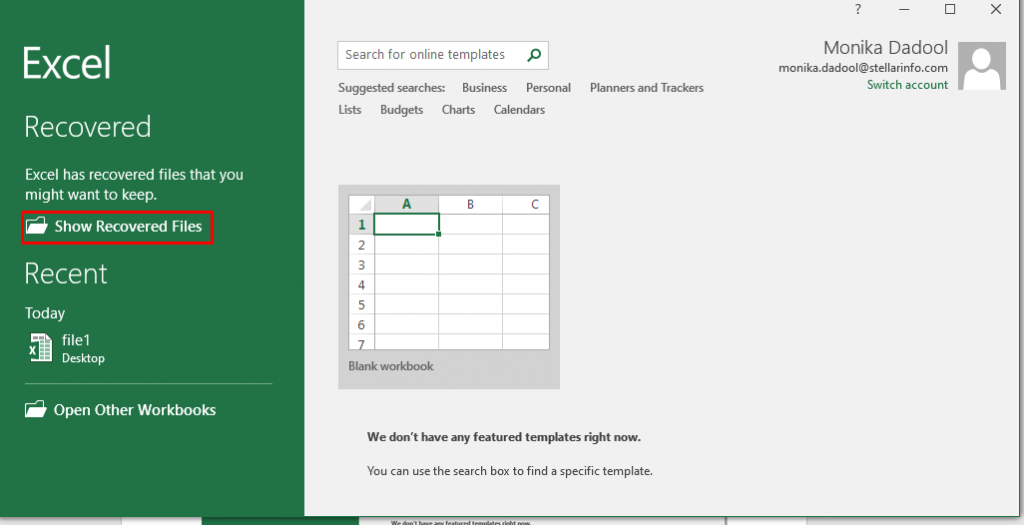
- The Document Recovery Pane appears, showing the recovered files.
Method 2: Use the Manage Workbook Option in Excel
Manage Workbook is an inbuilt feature in Excel that you can use to recover the previous version of the Excel file. If your Excel file is closed without saving, this option can help you to open the file and save it. Follow these steps to restore the file:
- Open the Excel program.
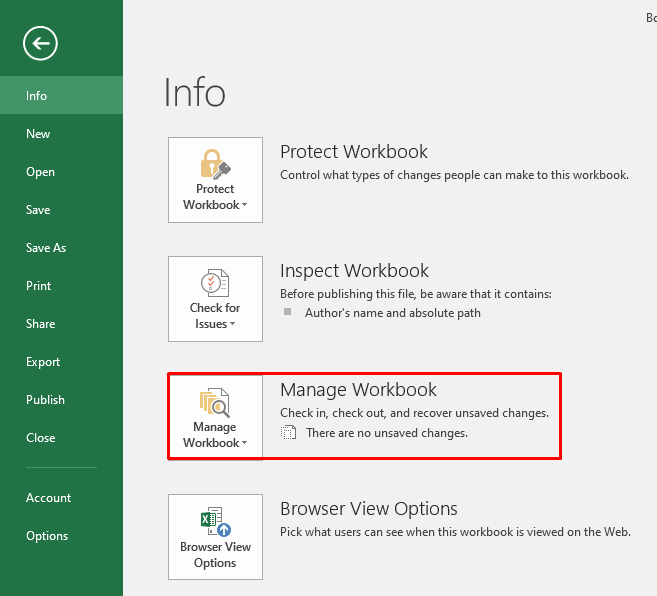
- Go to File > Info.
- Choose the Manage Workbook option.
- Click Recover Unsaved Workbooks.
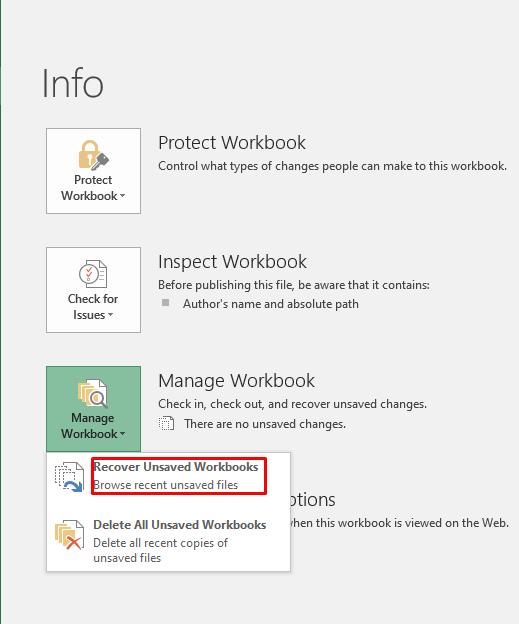
- Choose the desired file and click Open.
- When the file is open, go to the File tab and select the Save As an option to save the file.
Method 3: Use the File History Feature in Windows
You can also restore the previous version of the Excel file by using the Windows File History feature. However, to use this feature, you must have enabled it beforehand. Here are the steps:
- First, choose the desired file on your system.
- Right-click on File and select the Properties tab.

- In the dialog box that opens, click the Previous Versions option.
- Then, click the Recover Previous Version of Excel File option.
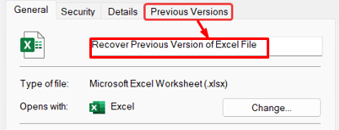
- Click on the required file from the list of earlier versions.
- Hit Open and then click OK.
What if the file doesn’t open?
If the Excel file doesn’t open, it indicates corruption in the file. An Excel file may get corrupted due to an abrupt system or program shutdown, system or application crash, etc.
When Microsoft Excel detects a corrupted worksheet upon opening, it automatically starts File Recovery mode and starts repairing it. However, if the File Recovery mode fails to start, then you can use the Open and Repair utility in Excel to recover the corrupted workbook. Follow these steps:
- Click File > Open.
- In the Open dialog box, choose the corrupted workbook.
- Click the arrow next to the Open tab and click the Open and Repair option.
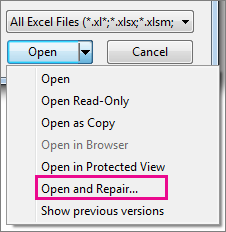
- To recover as much as data from the workbook, click Repair.
- Click Extract Data to extract values and formulas from the workbook, if Repair is not able to recover your data.
If the Open and Repair tool does not work, then you can use advanced Excel repair software, such as Stellar Repair for Excel. This Excel repair software can easily repair severely corrupted Excel files and recover all the data in just a few steps.
Conclusion
You can use the methods mentioned above to restore the previous version of the Excel File. If the file is corrupt, you can repair the file using Microsoft’s Open and Repair tool or use a professional Excel file recovery tool, such as Stellar Repair for Excel. This tool can repair severely corrupted files and restore all the Excel file data with complete integrity. You can download the free version of the software to scan the corrupt Excel file and preview the recoverable data.
Was this article helpful?