Several users have reported encountering the QuickBooks® error H303 when trying to enable multi-user hosting without admin permissions. It is one of the H series errors in QuickBooks® that can prevent you to access your company file. The error usually occurs when there is a configuration issue in the company file connected to the multi-user network. However, it also occurs when the QuickBooks® services are not running. Let’s discuss the reasons behind this error and the solutions to fix it.
What causes the QuickBooks® Error H303?
The error H303 in QuickBooks® can occur due to the below reasons:
- QuickBooks® and server connection failure
- Corrupt Network Data (.ND) file
- Incorrect hosting configuration settings
- The firewall is interrupting the communication
- Network issues
- Outdated QuickBooks® version
- QuickBooks®-related services (QBCF Monitor or QuickBooks® Database Server Manager) are not running
- Damaged or corrupted Company file
Methods to Resolve the QuickBooks® Error H303
Make sure your server is the only system that is set to host multi-user mode. Once you verified this, then follow the methods discussed below:
Method 1: Check the QuickBooks® Services
The error H303 can occur if the QB services (QBCFMonitor and QuickBooks® DBXX) are not working on the server. You can check and run these services to fix the issue. Here are the steps:
- In the Server system, navigate to the Windows Start option.
- Enter Run in the search box and then press the Enter key.
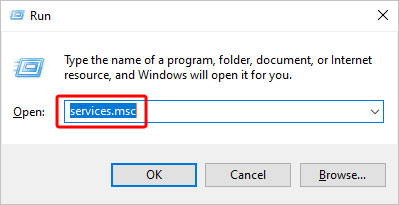
- In the Run window, type “services.msc” and then click OK or press Enter.
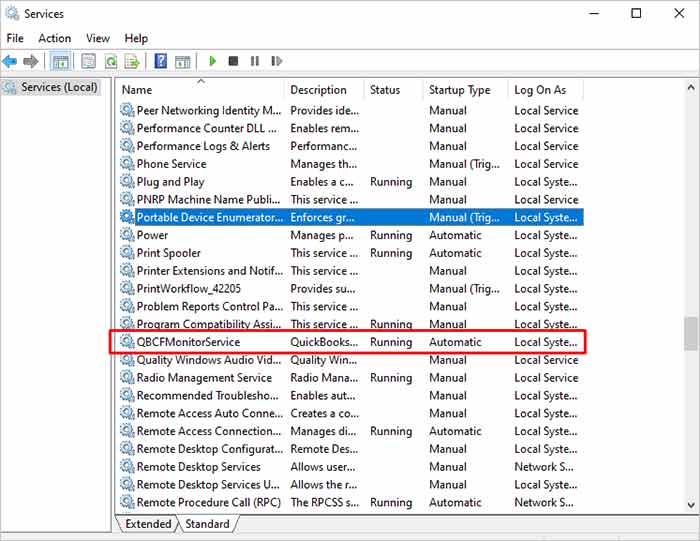
- In the Services window, find QBCFMonitor Service in the list and double-click on it.
- In the QBCFMonitorService Properties window, select the Automatic option from the Startup type.
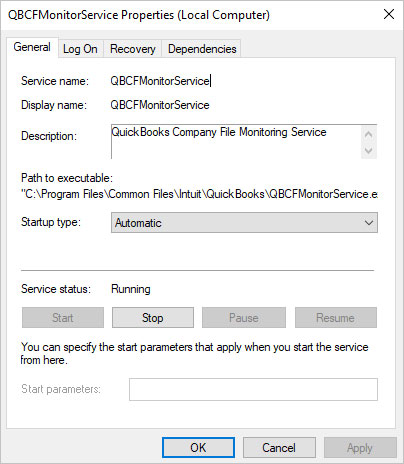
- Verify the service status. It should be “Running”.
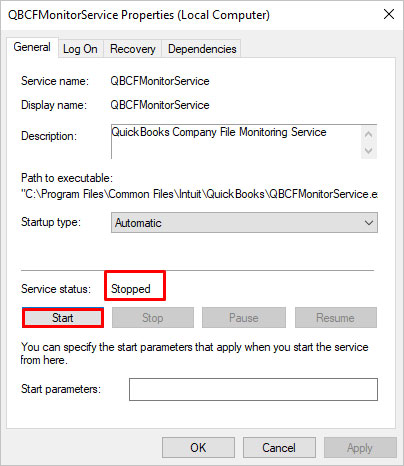
- If the status is Stopped, click Start and then OK.
- If the service fails to start, then click on the Recovery option and select “Restart the Service” from each of the dropdown menus: First failure, Second failure, and Subsequent failures.
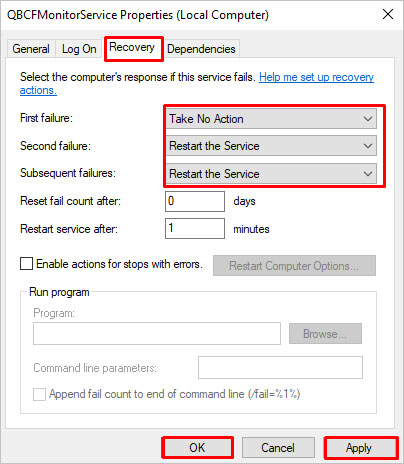
- Click Apply and then OK to save the applied changes.
You can repeat the above steps to check and run the QuickBooks®DBXX service. Once you are done with this, then re-open your QuickBooks® to check if the error is resolved.
Method 2: Add the QuickBooks® Services to the Admin Group
The QuickBooks® error H303 can also occur if QuickBooks® services, such as QuickBooks®DBXX and QBCFMonitor are not assigned with admin permissions. You can check and assign the correct permissions using the below steps:
- Open File Explorer.
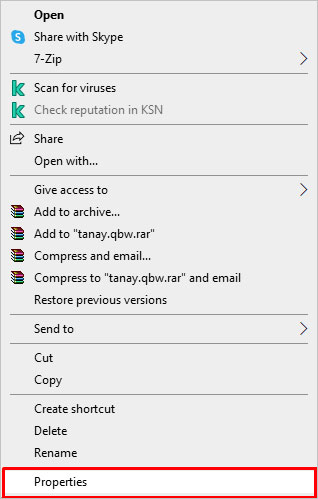
- Search for the folder where the QBW file is located. Right-click on the folder and then click Properties.
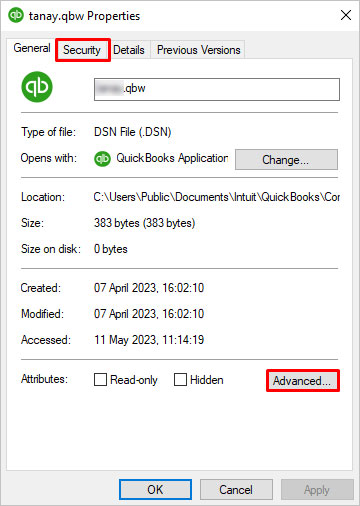
- In the Properties window, click Security and then click on Advanced.
- Click QBDataServiceUserXX and then click Edit.
- Now, click Advanced permissions, check and enable the below permissions:
- List Folder/Read Data
- Traverse Folder/Execute File
- Read Attributes
- Read Extended Attributes
- Write Attributes
- Read Permissions
- Create Folders/Append Data
- Create Files/Write Data
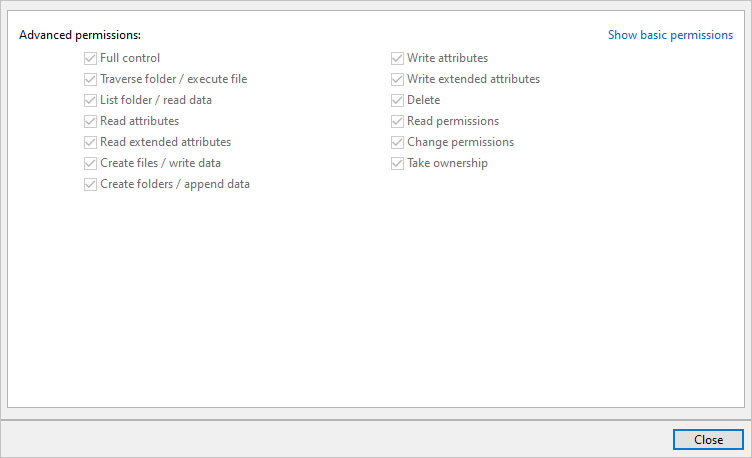
- Click on the Close button.
- Make sure you set the permissions correctly. If not, then again right-click on the folder and then select Properties.
- Click Security and then click Edit.
- Select the desired QuickBooks® service (QBCFMonitor) and then click Full Control.
- Click Allow > Apply > OK.
Method 3: Verify the Firewall Configuration
You may encounter the QuickBooks® error H303 if the Firewall is blocking internet access for QuickBooks® files. You can check and reconfigure Firewall settings using the below steps:
- Go to the Windows Start option.
- Type Windows Firewall in the search field and press the Enter key.
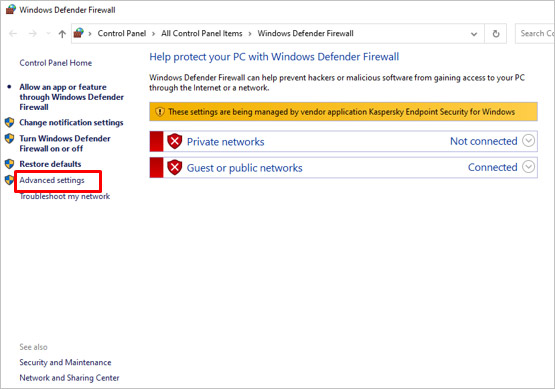
- In Windows Firewall, click Advanced Settings.
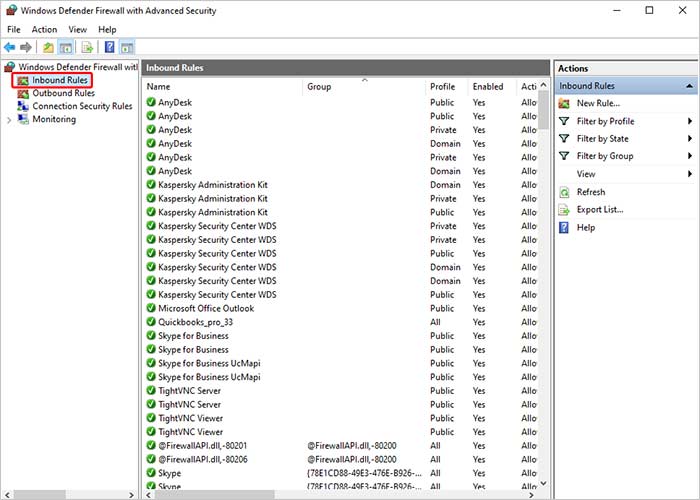
- Click Inbound Rules and then click New Rule.
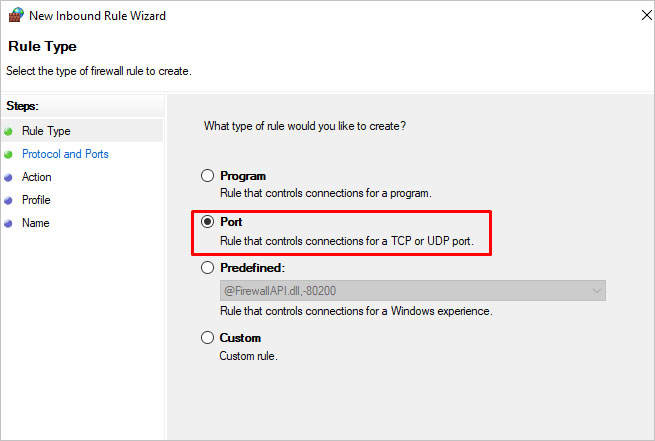
- Click Port and then click Next.
- In the Protocols and Ports window, make sure you have selected TCP under the question, “Does this rule apply to TCP or UDP?
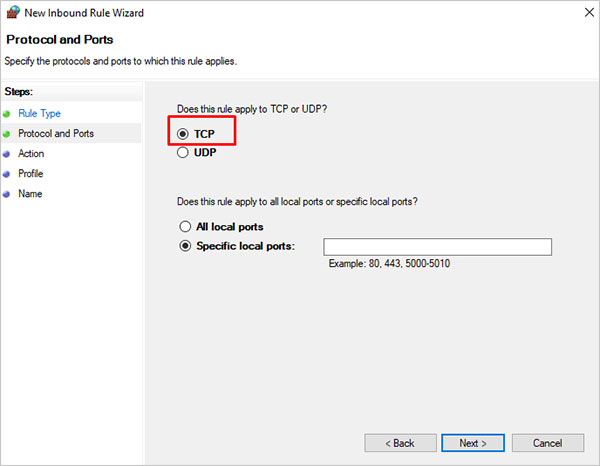
- In the Specific Local Ports field, type the specific ports required for your QuickBooks® version and click Next.
Note: The port number may vary depending on the QuickBooks® version you are using.
- Now, select “Allow the connection” and then click Next.
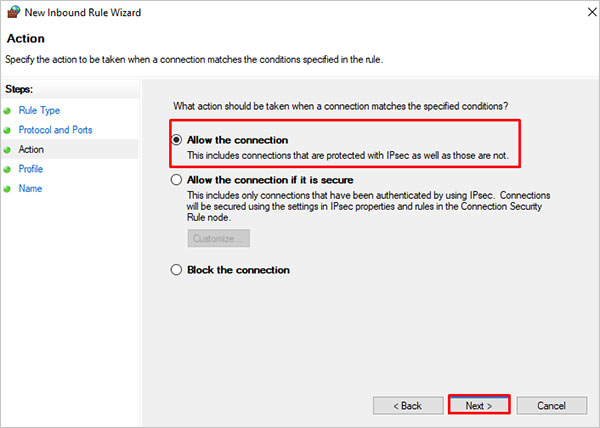
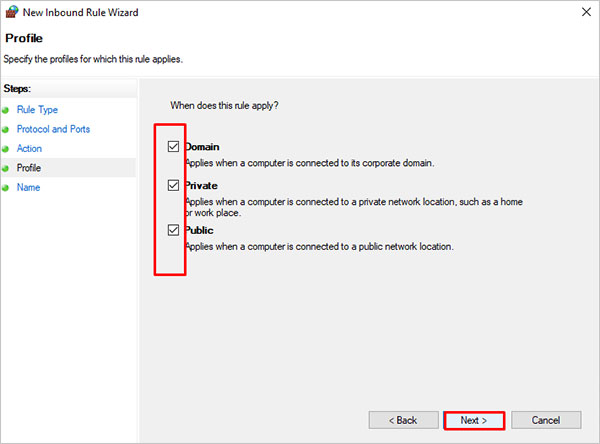
- In the Profile window, you can select all the profiles and then click Next.
- You can specify the name and description of the rule.
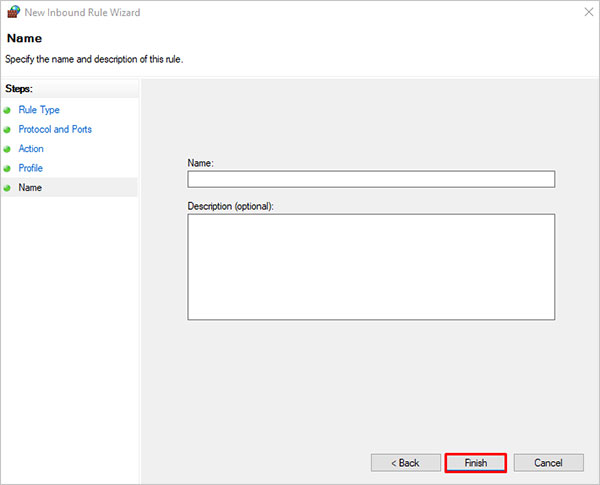
- Once you’re done, then click on the Finish option.
Now, repeat the above steps to create outbound rules but select Outbound Rules instead of Inbound Rules. After reconfiguring Firewall settings, try to open QuickBooks® to check if the error is fixed or not.
Method 4: Check the Internet Connection
You can encounter the error H303 if QuickBooks® fails to establish a connection with the server. To fix the error, you can check your internet connection. Here are the steps:
- Make sure Network Discovery is enabled on your server system.
- Navigate to the Windows Start option on your system.
- Type Network in the search field and press the Enter key.
- In the Network and Sharing Center window, click Change Advanced sharing settings.
- The “Turn on network discovery” option should be selected in the Network Discovery. If not, select it.
- After this, open the CMD (Command prompt) window, type “ipconfig/all”, and then hit the Enter key.
- It will display all the information related to the system.
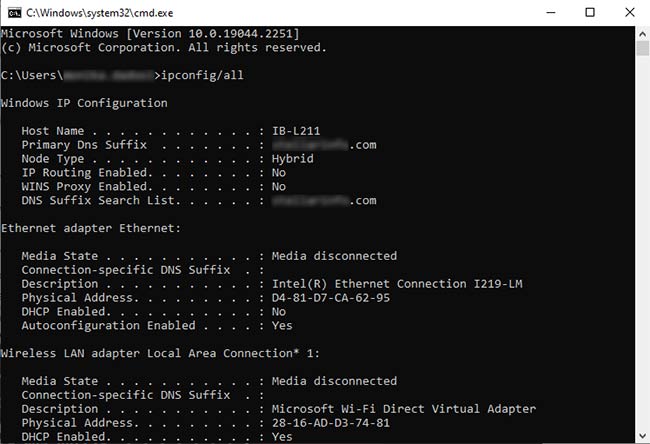
- Search for the host name and server name under the Windows IP configuration.
Now, note down the host name, and verify the server system and workstations connection using the below steps:
- Open the Command Prompt window.
- Enter ping “your server name” and then press the Enter key.
- If you get a reply that means your network is working fine. If you don’t get a response, then reach out to your IT support team for further assistance.
Method 5: Check Your QuickBooks® Hosting Settings
An H series error, like H303, can also occur if the hosting setting in QuickBooks® is incorrect. In multi-user mode, your server system should host your company file and other workstations access it. So, make sure the multi-user mode is turned off on all the workstations. Here are the steps to turn off multi-user mode:
- Open QuickBooks® on any workstation.
- Without opening the company file, locate your File and then click Utilities.
- If you see the Host Multi-User Access option, then do not select it.
- However, if you see Stop Hosting Multi-User Access, then select it.
- Repeat the above steps on all the workstations where you’re encountering the error.
If the error persists, move to your server system that is hosting the company files. Then, follow the below steps:
- On the server system, open QuickBooks®.
- Navigate to File and then click Utilities.
- If the Stop Hosting Multi-User Access option is available, then don’t select it. You need to select the Host Multi-User Access option.
Sometimes, the QuickBooks® error H303 can occur if the company file is damaged or corrupted. To repair the damaged company file, you can use QuickBooks® Tool Hub. Follow the below steps:
- Close your QuickBooks® application.
- Next, download and install the QuickBooks® Tool Hub.
- In Tool Hub, click Company Files issues.
- Run QuickBooks® File Doctor.
- In the QuickBooks® File Doctor window, click on the dropdown to select the company file.
- Choose “Check your file” and then click Continue.
- You will get a prompt to enter your QuickBooks® admin password. Enter the credentials and then click Next.
If you are unable to fix the QuickBooks error H303 using the QuickBooks® Tool Hub, then use an advanced QuickBooks® repair tool, such as Stellar Repair for QuickBooks®. It can easily repair severely corrupted company files and recover all the data, with complete data integrity. The tool is compatible with all QuickBooks® versions. To check its functionality, download the software’s free demo version.
To Conclude
This post discussed the methods to resolve the QuickBooks error H303 with stepwise instructions. If the error has occurred due to corrupted QuickBooks® company file, an easy and quick solution is to use an advanced QuickBooks® repair tool, such as Stellar Repair for QuickBooks®. It can help you fix major corruption-related errors, including the H series errors.
Was this article helpful?