In Microsoft Exchange Server environment, Exchange Search is a crucial constituent of the mailbox servers as it facilitates the search process. This indexes the mailboxes and related attachments in mailboxes. Sometimes, you face a situation where the users complain that the search is taking too long or it doesn’t return any results. This can happen due to corruption or any other issues in the content index. To resolve such issues, you can rebuild the Exchange search index. Below, we will see how to rebuild the search index for Exchange Servers that are not part of the Database Availability Group (DAG). In a DAG setup, you can simply reseed the index catalog from other member in the group.
Process to Rebuild the Exchange Search Index
If you’re facing issues with the search index, follow the steps given below to rebuild the Exchange search index.
Note: The below process is applicable for Exchange Server 2016 and earlier versions.
Step 1: Check the Indexing Status
You need to first check the status of indexing. For this, open the Exchange Management Shell (EMS) and run the following command:
Get-MailboxDatabaseCopyStatus * | Sort Name | Select Name, Status, ContentIndexState
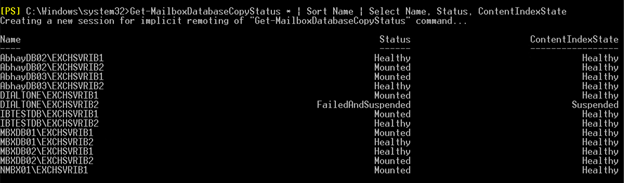
In the command output, if you see the ContentIndexState as Failed or FailedAndSuspended, then you need to rebuild the index.
Step 2: Stop the Services
The next step is to stop the Fast Search and Host Controller Services. To do so, run the commands as given below:
Stop-Service MSExchangeFastSearch
Stop-Service HostControllerService

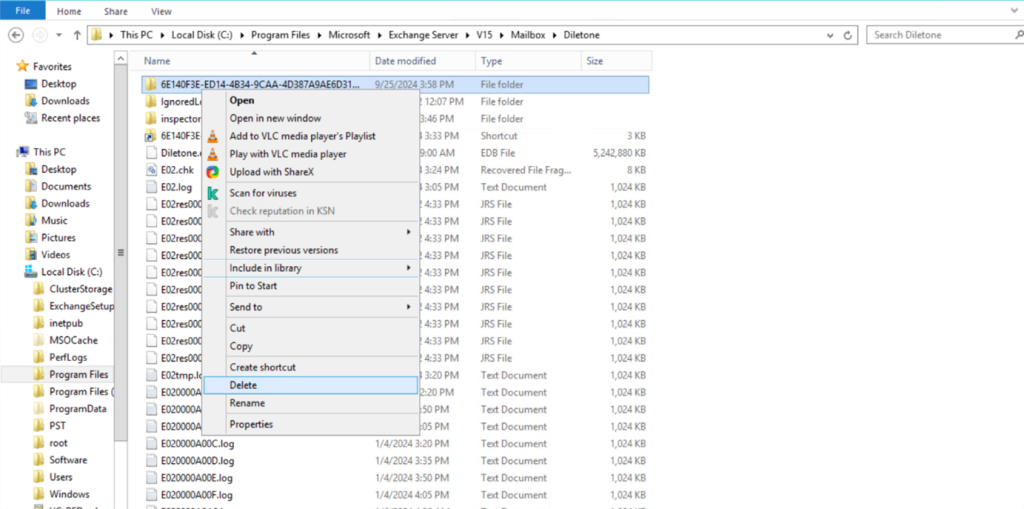
Step 3: Delete the Indexing Folder
Now, you need to delete the indexing (GUID) folder. It is available at same location as the EDB file.
Step 4: Start the Services
Once you have deleted the indexing folder, start the services again using the following cmdlets:
Start-Service MSExchangeFastSearch
Start-Service HostControllerService
When both the services are stated, a new GUID folder will be created in the directory.
Step 5: Confirm the Indexing Status
To confirm the status of the search index, run the following cmdlet:
Get-MailboxDatabaseCopyStatus * | Sort Name | Select Name, Status, ContentIndexState
In the command output, the ContentIndexState will be displayed as Healthy. If it shows the ContentIndexState as failed and suspended, then read How to Fix Content Index State Failed and Suspended Issue.
How to Check and Fix Indexing Issues in Exchange Server 2019?
In Exchange Server 2019, unlike the previous versions, indexing for every mailbox is stored in the mailbox and not in the database. To resolve the indexing issues in Exchange Server 2019, you can move the mailbox with indexing issues to another database.
However, if the mailbox items are not indexed for an extended period, the items will go into a permanent failure state. To resolve this, you need to create a new override for the non-indexed items and then re-index them. Here are the steps:
Step 1: Check the Non-Indexed Items
First, check how many mailbox items are not being indexed by the server. For this, you can use the Get-MailboxStatistics cmdlet as given below:
Get-MailboxStatistics <usermailbox> | FL BigFunnel*
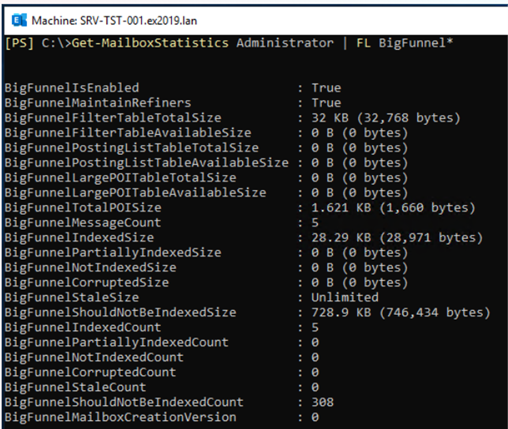
The above command will show a lot of information regarding the mailbox index status and information. However, you can check the following fields:
- BigFunnelNotIndexedSize
- BigFunnelNotIndexedCount
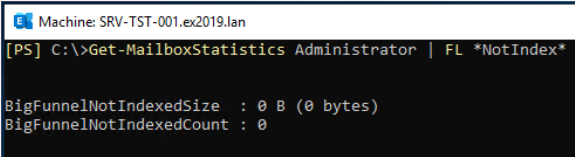
Alternatively, you can use the command mentioned below to get details of only the non-indexed items for a specific mailbox.
Get-MailboxStatistics <usermailbox> | FL *NotIndex*
If you want the number of non-indexed mailbox items for all the mailboxes, use the following cmdlet:
Get-Mailbox -ResultSize Unlimited | Get-MailboxStatistics | ? {$_.BigfunnelNotIndexedCount -ge "1"} | ft DisplayName,BigfunnelNotIndexedCount
The output of this command will display a list of all mailbox items that are not indexed and the extent of damage.
Step 2: Create a New Override
You need to create a new override for the items that are in a permanent failure state. Use the following cmdlet:
New-SettingOverride -Name "Big Funnel Permanent Retry" -Component "BigFunnel" -Section "BigFunnelFailedItemsQuerySettings" -Parameters @("ExcludePermanentFailures=false") -Reason "Re-Index Messages" -MinVersion "<Build Number>" -MaxVersion "<Build Number>"
In the build number field, enter the version of the server where the mailbox is residing.
Step 3: Update the Configuration
Now, you need to update the configuration. For this, use the following cmdlet:
Get-ExchangeDiagnosticInfo -Process Microsoft.Exchange.Directory.TopologyService -Component VariantConfiguration -Argument Refresh
After running the above command, you will see the file named – BigFunnel.Overrides.ini in the %ExchangeInstallPath%\v15\config directory.
Step 4: Re-index the Items
Now, you need to trigger the Exchange Server to index the mailbox items that were not indexed earlier. To do this, run the following command:
Start-MailboxAssistant -Identity <mailbox ID> -AssistantName BigFunnelRetryFeederTimeBasedAssistant
Step 5: Check if the Items are Indexed
To confirm if the process has worked, recheck the number of non-indexed items by using the following command:
Get-Mailbox -ResultSize Unlimited | Get-MailboxStatistics | ? {$_.BigfunnelNotIndexedCount -ge "1"} | ft DisplayName,BigfunnelNotIndexedCount
In the output, check the BigFunnelNotIndexedSize and the BigFunnelNotIndexedCount fields. If these fields display the value as Zero, this means that the non-indexed items have been indexed successfully.
Conclusion
If the users are facing trouble when using the search function, it is most probably due to issues with the search index. To resolve the issues, you can rebuild the search index in Exchange Server. Above, we have explained the process to rebuild the search index in Exchange Server. However, if the problem persists, it is probably due to corruption in the database. In this case, you can repair the database by using EseUtil commands. However, the hard recovery process can result in significant data loss. As an alternative, you can use Stellar Repair for Exchange – an Exchange repair tool that can repair the corrupted database and recover all the data. It supports all Exchange Server versions – from Exchange Server 5.5 to Exchange Server 2019. This tool can recover mailboxes, public folders, archives, and other items from corrupted or damaged Exchange databases and save them in PST and other formats. It can also export the EDB file items to a live Exchange Server or Office 365.
Was this article helpful?