Digital photography has changed how people see, observe, and capture memories. It has truly inspired us to unleash our creativity like never before. Today, we can take hundreds of photographs simultaneously, thanks to digital cameras and smartphones. However, sometimes, you need to transfer those photos from your camera to computer to see, edit, and share improved pictures on social media or just to archive them.
This blog will show you how to import photos from a camera to a Mac. Whether you want to free up space on your camera, safeguard precious memories, or access them anytime, you can use these methods to transfer photos from camera to Mac.
Let’s get into the detailed steps of each method.
How to transfer photos from a camera to a laptop?
You can transfer photos from a digital camera to a Mac by using a USB cable and memory card, or transfer them wirelessly via Bluetooth or Wi-Fi without using a memory card or USB cable.
The camera-to-Mac photo transfer process is simple. But you have to ensure a couple of things:
- Ensure your camera has a sufficient battery and your Mac is plugged into the charger.
- Check the storage space on your Mac.
- Install all the necessary software or drivers used while transferring photos.
- Ensure your Mac runs the latest macOS version and the camera uses the latest firmware.
This will prevent device compatibility issues and glitches during the photo transfer process from camera to Mac.
Ways to import photos from camera to Mac
- Use USB Cable
- Use SD Card
- Wireless Transfer via Bluetooth or Wi-Fi
A. How to Transfer Photos from the Camera to a Mac with a USB Cable?
Most professional photography cameras come with USB Type-C to USB Type-A cables, which allow users to connect them to other devices, such as a Mac or a PC.
Connect the USB Type-C end to your camera and the USB Type-A end to your Mac (if your Mac has USB-A ports). If your Mac only has USB-C/Thunderbolt ports, use a USB-C to USB-A adapter or a USB-C to USB-C cable (supported by your digital camera). Check the camera's user manual to see which cable can connect the camera to Mac.
Close all the image capture programs or applications that automatically commence when your Apple device mounts the camera. Now, import photos from the camera to the Mac using the Photos or Finder apps using these steps.
- Connect the camera to your Mac via a USB cable.
- Now, turn on the camera and set it to the correct mode to import photos.
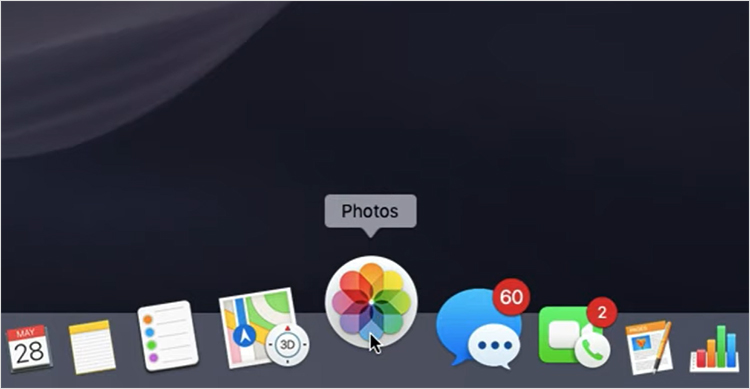
- On your Mac, open the Photos app.
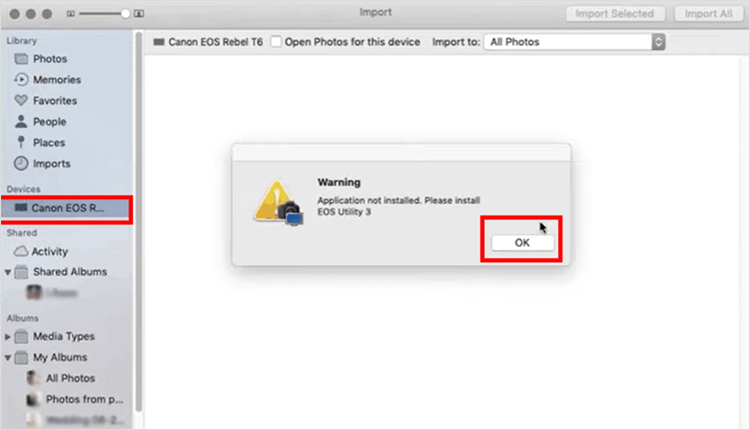
- Find your camera under the Devices section on the left sidebar. Click the camera icon to display all the photos.
- A warning message ‘Application not installed. Please install’ will appear. Click OK.
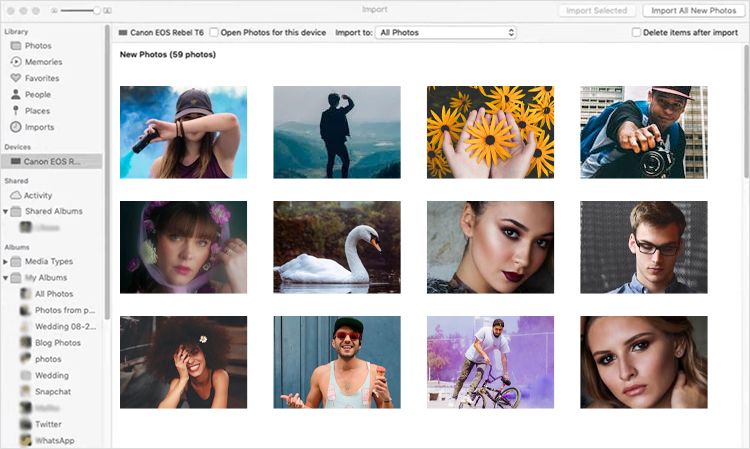
- You can now see all the photos from your digital camera. Click on the 'Import to' drop-down menu and set where you want to save the imported photos on your Mac.
- Tap the Import All New Photos button and click Import Selected.
- Disconnect the camera from your Mac.
B. Transfer photos from the camera's SD card to Mac:
You can even import camera photos on a Mac using a memory card (compact flash card) reader slot. If your camera has a removable SD card, extract it, and insert it into your MacBook. If your Mac doesn't have an SD card slot, you must connect a macOS-compatible card reader to the Apple device to import photos. Follow these steps to transfer photos to Mac:
- Insert the camera’s SD card into your Mac SD card slot or use a card reader to connect the SD card.
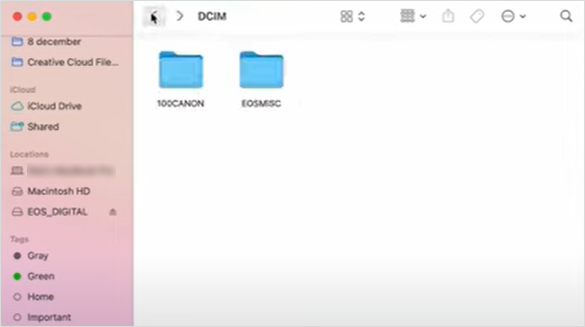
- Open the Finder app on your Mac. Click the SD card under the Locations section on the left-hand side of the Finder window.
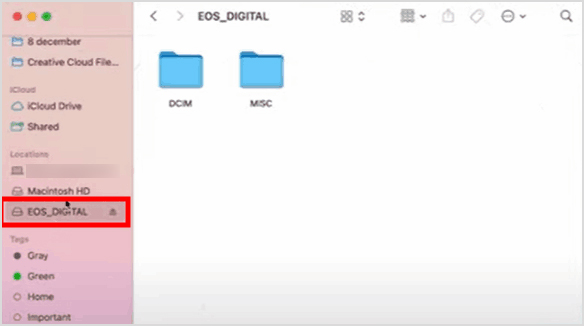
- Now, click on the DCIM folder and then the camera folder (which must be named as the camera model).
- Next, select the photos you want to transfer, then right-click and choose Copy option.
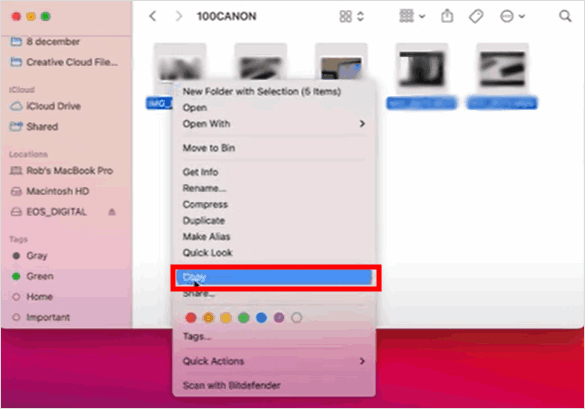
- Paste the selected photos to your desired folder on Mac.
Note: After importing the photos to the Mac, a message will pop up seeking your consent to delete or keep them on your SD/Memory card. You can choose to Delete Items or Keep them.
- Eject the SD card or card reader once all the photos are imported to your Mac.
C. Wireless Transfer – Transfer Photos from Camera to Laptop using Bluetooth or Wi-Fi
Most modern digital cameras have built-in Bluetooth or Wi-Fi capabilities, allowing you to easily connect them to your smartphones, computer, or Mac.
1. How to import photos from camera to Mac using Wi-Fi:
Note: First, install the latest version of PlayMemories Home on your Mac; it will also install the Wireless Auto Import application simultaneously.
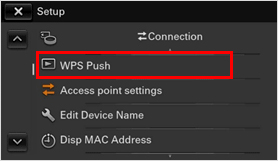
Part 1: Register Access point to your camera
- After powering on the camera, press the MENU button > Setup > WPS Push. Follow the on-screen instructions and press the WPS button on the access point within 2 minutes. When the message Registered appears, access point registration has finished.
Part 2: Set your Mac as the device that wirelessly imports files from the Sony camera
- On your Mac, go to Finder > Applications > PlayMemories Home.
- Click on the PlayMemories Home tab and select Preferences.

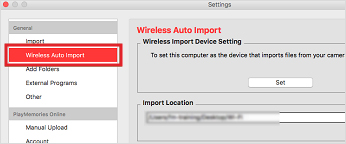
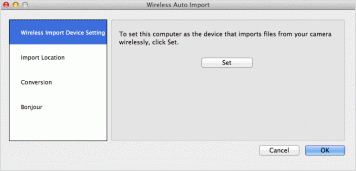
- On the Settings window that will appear, select Wireless Auto Import.
- In the Wireless Auto Import window, click Wireless Import Device Setting and select Set. If you are prompted to enter an administrator password, enter it. Then click the OK button.
- Next, select Import Location and select the destination folder to save the photos you have imported to your Mac.
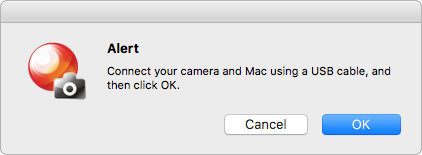
- Turn on your camera. When the message ‘Connect your camera and Mac using a USB cable’ appears, connect your camera and Mac using a USB cable. Then, click OK.
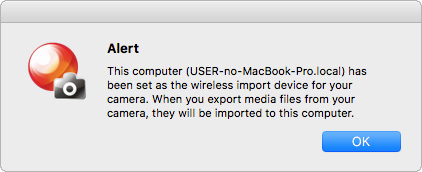
- When the pop-up ‘This computer has been set as the wireless import device for your camera’ appears, click OK, and disconnect the camera from your Mac.
Part 3: Importing videos and photos from your camera to your Mac
- Turn on the Mac and connect it to Wi-Fi.
- Next, turn on the camera and press the Playback button.
- Now, press the Menu button > Wireless > select Send to Computer.
- When the Wi-Fi connection is established, photo import starts automatically, and the progress is shown at the bottom-right of the screen on the Mac.
2. How to transfer photos from camera to Mac using Bluetooth
Make sure your digital camera is equipped with Bluetooth transfer capability. Now, follow these steps.
- Please turn on the camera and pair it with your Mac using Bluetooth. You can check the camera's user manual to see how to do this.
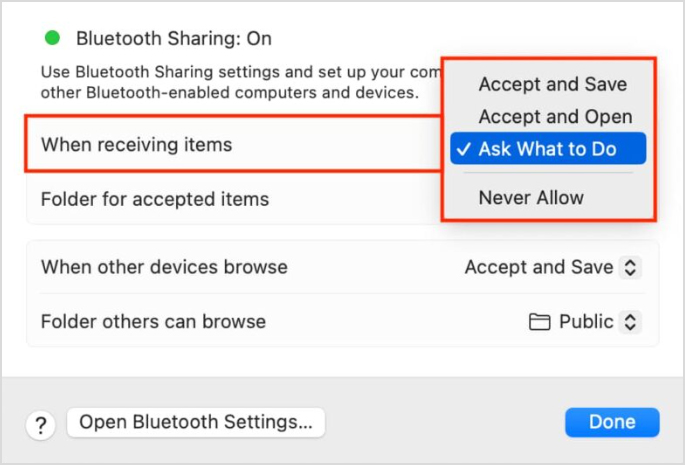
- On your Mac, go to System Settings > Sharing > turn on the toggle next to Bluetooth Sharing.

- Next, click the info button next to the Bluetooth Sharing toggle.
- Click the drop-down menu next to ‘When receiving items’ and select the 'Ask What to Do' option. Choose the 'folder for accepted items' option. Hit Done to save the changes.
- On your camera, select the photos you want to transfer to Mac and choose the option to send them through Bluetooth. The steps for doing this depends on your camera's model; check the user manual for help.
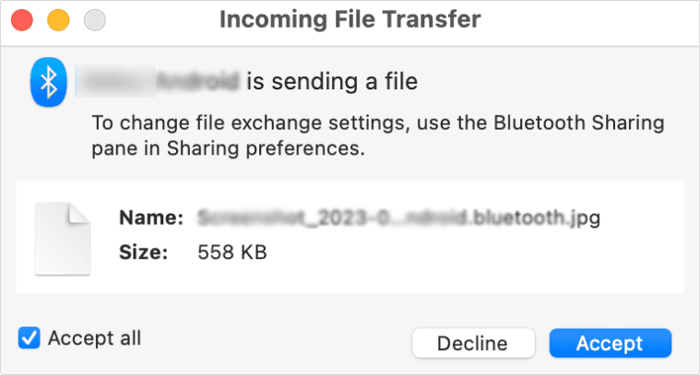
- On your Mac, you should receive a prompt asking you to Accept or Decline the Bluetooth transfer from your camera. For a multi-item request, tick the ‘Accept all‘ box to receive everything in bulk.
What to do if Photos are lost during transfer?
Sometimes, while transferring photos from one camera to Mac, the process gets interrupted, resulting in a data loss scenario. This happens when you improperly eject the SD card or there’s a sudden system crash or freeze. It can even occur when the Mac has low storage space or the drive where you are transferring the photos is corrupted or has a virus. Or, you might have accidentally deleted the photo files.
To help you overcome photo loss, we recommend using Stellar Photo Recovery for Mac. The software supports recovering lost and deleted photos, videos, music collections, and podcasts imported from digital cameras, iPods, SD cards, volumes, and partitions.
Try the Free Demo to recover your lost and deleted photos on a Mac System.

Conclusion
Transferring photos from a camera to a Mac is crucial for photographers, content creators, and anyone who wants to preserve and edit their photos. Try any of the above methods and transfer all your captured photos and videos from camera to your Mac.
How can I transfer photos from my camera to my laptop?
Use a USB cable or memory card reader to transfer photos from your camera to your laptop. Once your laptop detects the device, you can use the Photos app (on Mac) or Windows File Explorer (on PC) to import your images.
Was this article helpful?