When a hectic day begins, you may want to check your emails on the computer first, but sometimes instead of the normal desktop, you see a cache manager BSOD. Well, it’s not uncommon for PCs to show these crash screens.
Your device may experience Blue Screen of Death (BSOD) difficulties for several causes, including bad memory, damaged hardware, corrupt system drivers, overheated components, and many more.
Thankfully, you may quickly fix this problem by using a few workarounds. There are a few tools in Windows that may be used to resolve the problem. In this article, we’ll show you where to find these repair tools so you may utilize them to solve the problem.
What causes CACHE MANAGER error in Windows 10/11?
The memory manager and the Cache Manager work together to enable data caching for all Windows file system drivers. The Cache Manager is a collection of kernel-mode operations and system threads.
Common issues like outdated drivers, antivirus issues, or complex memory malfunctions may be the root of this problem. Another thing that may be the reason for this bug check, according to Microsoft, is a memory shortage.
How can I fix the CACHE MANAGER error in Windows 10/11?
1. Run chkdsk
As previously stated, mainly bad memory causes the stop code Cache Manager to occur. Therefore, the first step on your how-to list should be to run memory-related troubleshooters. A tool called CHKDSK (check disk) checks your hard drive for file system issues on Windows operating systems. Utilizing the CHKDSK application keeps your system data organized while checking for and fixing hard disk issues.
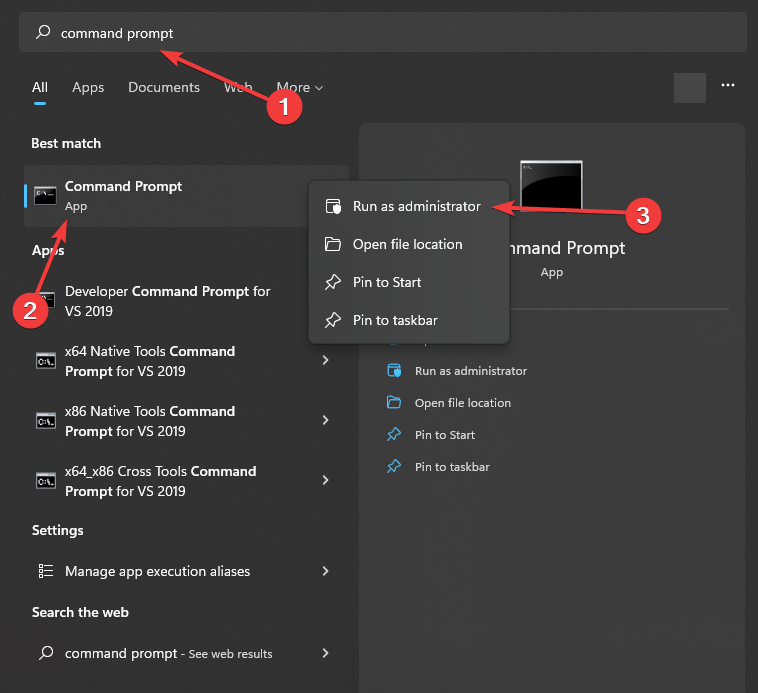
- In the Start menu, search the Command Prompt, right-click the best result, and choose Run as Administrator.
- Type in chkdsk /f /r C: and press Enter.
- You must carry out this Scan for each hard drive partition, so be sure to replace C with a hard drive letter that corresponds.
2. Use memory diagnostics
It is time to test your RAM. You should make use of a program called Memory Diagnostics to do this. This tool works by writing data to each RAM sector of your computer and reading it back one sector at a time. The tool will read a different value if it detects a problem with your RAM. This will let you know if there is anything wrong with your RAM.
- Press Windows Key + R, type mdsched.exe, and hit Enter.
- Click Restart now and check for problems (recommended).
Note: To run the test, you must restart your computer. You can’t use your computer while the test takes place. Make sure first to save your work. When you select “Restart now and check for problems (recommended),” your computer will restart immediately.
3. Run SFC
Running SFC scan is also necessary as this tool checks all the system files and ensures everything is in place. You should also run DISM after this utility to repair any damaged file in your system file folder.
- Use the Windows search by opening the start menu and typing Command Prompt. Right-click on the best result and Run as an administrator.

- Press Enter after entering the line sfc/scannow in the Command Prompt.
- Restart your computer after the procedure.
4. Run DISM
- Once again, launch the Command Prompt as an administrator.
- This time type DISM /Online /Cleanup-Image /restorehealth.
5. Uninstall third-party antivirus
Another method to fix BSOD issues like CACHE MANAGER is to identify the troublesome program and uninstall it. Note that the issue can also be related to a newly installed hardware, which we will discuss in the next method.
Moreover, if the problem starts occurring after installing an application, it is recommended to uninstall it. In some cases, the antivirus is to blame. Thus, you should temporarily uninstall it to resolve this issue.
It is worth noting that outdated antivirus or firewall can also cause various BSOD errors. So, make sure you remove any antivirus software you have installed besides Windows Defender.
It’s been reported by a few users that the CACHE MANAGER problem persisted even after deleting certain antivirus software. It’s mainly because leftover antivirus files and registry entries likely cause this and using specialized uninstaller programs is the only way to remove antivirus software entirely.
You may download and utilize the uninstaller tools hosted by most antivirus firms for free on their websites.
6. Check your hardware
As we mentioned earlier, the newly installed hardware could also be the cause of the error. For example, your motherboard may not be completely compatible with the recently added components.
We advise you to check your RAM if you haven’t installed any new hardware recently. Additionally, check that your hard drive is correctly connected to your computer because it can also result in the CACHE MANAGER BSOD error.
What would the technician do if you sought professional help?
The technician will most likely use special tools and software to pinpoint the source of the problem, but if none of the above fixes worked for you, the technician will reinstall Windows or replace the damaged component in your PC. In either case, you risk losing all of your data. To avoid this, we recommend using Stellar Data Recovery Professional to recover your files before seeking professional assistance.
The software can recover your data even if your PC cannot boot due to a BSOD error.
- Connect the USB drive to another operational PC. It would help if you had a USB of at least 1GB size.
- Launch Stellar Data Recovery Professional after downloading and installing it from the official website.
- In the main window of the Select What to Recover screen, select Waffle Menu.
- Choose Create Recovery Drive.
- In the Create Recovery Drive dialog box, go to the drop-down menu to select the USB drive you want to use as bootable media.
- Now select Create Recovery Drive and click OK.
- A new Activation window appears where you need to enter an activation key. After purchasing the product, enter the Key you received via email into the box and press the Activate button.
- Attach the mentioned USB media to your Windows computer that won’t boot.
- Turn on your computer, then rapidly press the F12 or Bios Key to view any connected bootable USB media.
- Select the bootable data recovery media using the arrow keys, then press Enter to boot the computer.
- You will see the Stellar Data Recovery Professional software interface once the computer has booted from USB media.
- From the Select What to Recover screen, select the files you wish to recover and press Next.
- Click Scan after selecting the desired drive.
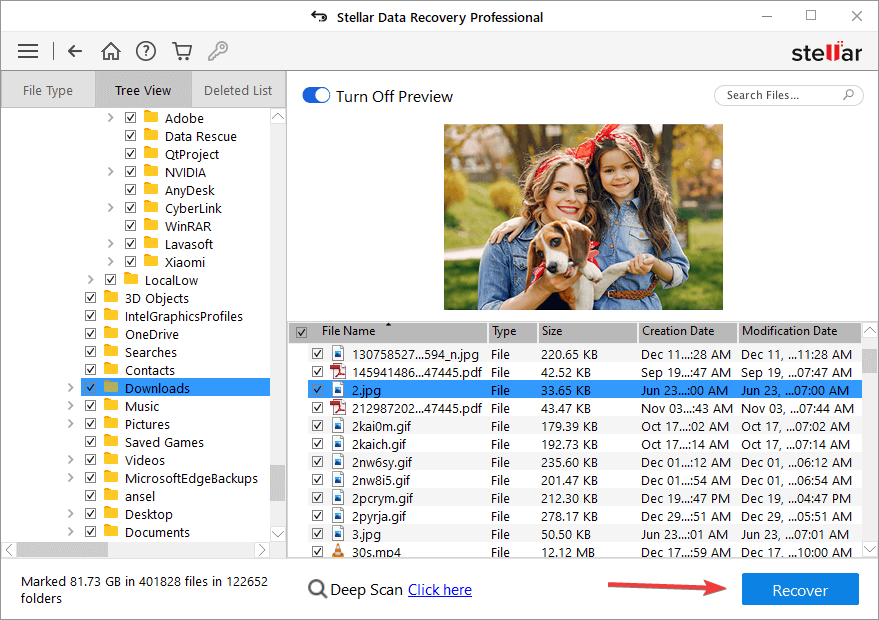
- Click Recover to save the files that you have selected from the preview menu.

No cache issues anymore!
CACHE MANAGER BSOD errors can be frustrating, but you can easily resolve them using some solutions. If the problem is software-related and you are dealing with system file corruption, the above solutions will work.
In the worst-case scenario, you may have to replace your hard drive or see if it works on another computer. But don’t worry; even if your hard drive is damaged, you can use Stellar Data Recovery Professional to recover your data and clone your hard drive and then attempt to replace your faulty storage.
FAQ
What is the cause of the Blue Screen of Death error?
Blue Screen of Death usually indicates something is wrong with the system, and Windows can't solve the issue by itself or operate while the problem is active. The reason behind BSoD can be as simple as an incompatible gadget recently attached to the PC or as complicated as corrupted Windows files.
Can I access BIOS if my PC won't boot?
BIOS can be accessed as soon as you turn the computer on. Before the PC boots into Windows, you should be able to enter BIOS by pressing the BIOS key (often F12). So, you can access BIOS even if your PC can't boot.
Was this article helpful?