How often do you return home after a great shoot on a sunny day but find everything shrouded in a white glow, looking too bright?
Overexposure in photos happens to the best of us!
Before you think you wasted your time, it’s worth knowing that an overexposed photo can be fixed during post-processing using a photo editing software.
In this guide, we will discuss how to fix overexposed photos. You will also learn how to avoid the problem of overexposure altogether to create beautiful photographs.
Understanding Exposure and Over Exposure
Exposure is the amount of light that reaches the film strip or camera’s sensor when a photo is taken. It defines how dark or bright the final photograph will be. The more the camera sensor is exposed to light, the brighter the image will be and vice versa.
When a photo is too dark, it is underexposed. It is caused when not enough light hits the camera sensor. As a result, details will be lost in the darkest areas and shadows of the photo.
When a photo is too bright, it is overexposed. Overexposure is caused when too much light hits your camera sensor. As a result, details will be lost in the photos’ highlights and the brightest parts.
Technically, correct exposure is the image that looks right, neither too light nor too dark. It’s an image that looks as close as we see in real life.
Why do we get Overexposed Images?
An overexposed photo can be caused because of several different things. Either camera is not doing a good job of metering the light correctly, or you’re doing it incorrectly. In addition, if the subject we intend to photograph has uneven lighting, we get overexposed photos.
In this guide, we will discuss how to fix overexposed photos. Moreover, to correct underexposed photos, refer to this blog.
Some Basic Rules to Fix an Overexposed Picture
Light rules in the photography. This is why one needs mastery over it to get the correct exposure. However, at times, you may struggle with overexposed images. Before going forward, keep in mind these basic rules to recover details in the overexposed photo using editing software.
- Move the Exposure slider to let you add or take away brightness.
- Move the White balance slider to adjust the photo’s mid-tones.
- Move the Highlights slider to adjust the highlights or brightest part of the photo.
- Use a graduated Filter to add the dark gradient to some parts of your photo.
How to Fix Overexposed Photos using Lightroom?
Adobe Lightroom is a great photo editing software popular among professional photographers. It is an image enhancer and professional-grade editing tool used for image retouching, improving the color balance and color tone, removing the red-eye effect, cropping, filters, and many more easy edits.
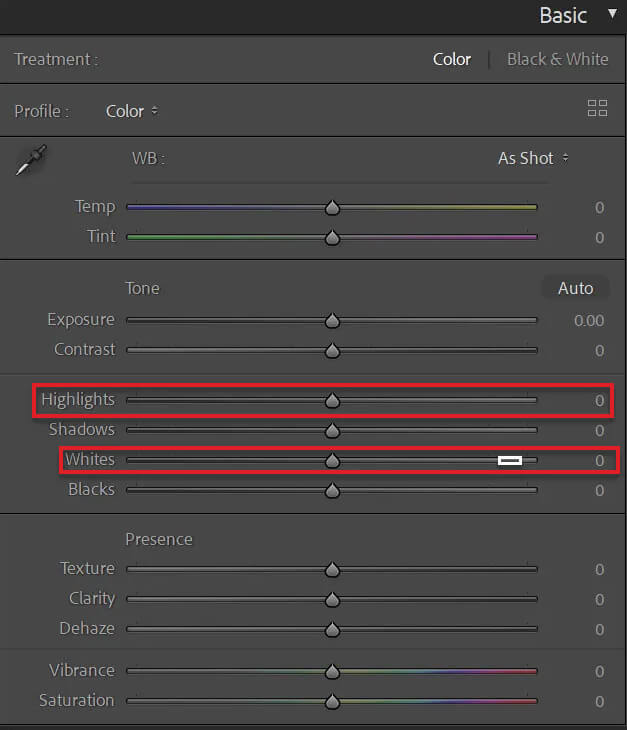
Lightroom is one of the best tools to fix the overexposed photo caused by too much light hitting the camera. To fix overexposed photos in Lightroom, mainly adjust the image’s highlights, exposure, and whites. Then, follow the instruction given below to edit an overexposed photograph:
- Download and install Adobe Lightroom.
- Once done, launch the application and export your overexposed image.
- Use the Histogram to identify those areas of the photo that are too bright.
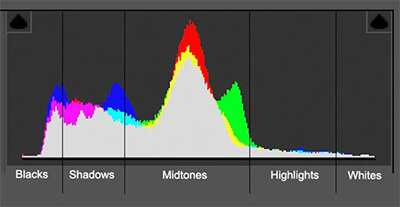
- To identify the overexposed parts of the photo, click on the triangle icon at the upper-right corner.
- Move the Exposure slider to adjust the overall brightness of the image. For example, sliding it left makes the image darker and sliding it right makes the image lighter.
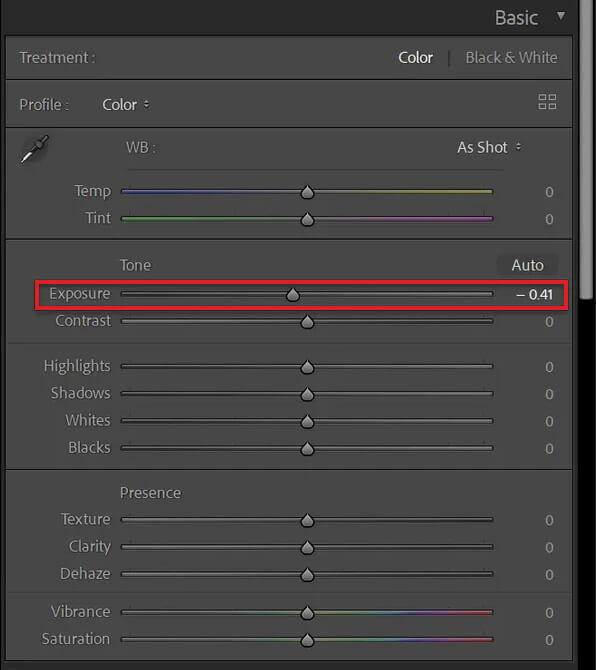
- Next, move the Highlights and Whites slider to adjust the brightness of lighter-toned areas in your photo.
How to Fix Overexposed Picture in Adobe Photoshop?
Adobe Photoshop is a professional photo editing and graphic creation tool offering a wide variety of image editing features. It is used for editing photographs, creating digital art, animation, and graphic design. In addition, this software helps fix the overexposed pictures like a pro using Photoshop Sliders or Adjustment Layer and Blending mode.
Let’s learn how to fix overexposed images in Adobe Photoshop
- Install and set up Adobe Photoshop on your PC.
- Click File and select Open to import the underexposed image.
Use Photoshop Sliders
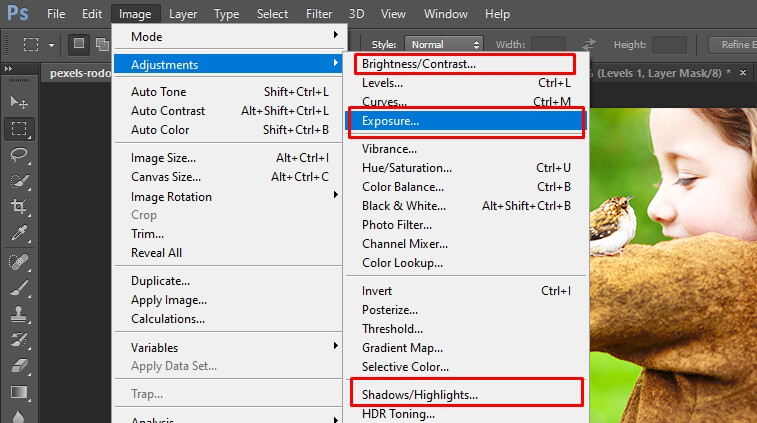
- Go to the Adjustment Layers and choose various sliders like Brightness/Contrast, Exposure, and Highlights/Shadows to get the desired quality of overexposed photos.
Use Adjustment Layer and Blending Mode
- Use simple levels adjustment layer and blending mode to fix an overexposed image.
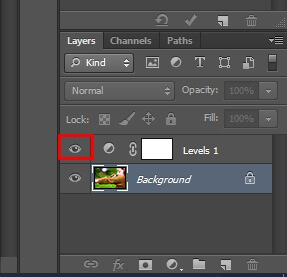
- After opening the image, check the number of layers in the layer panel.
- If there is only one layer, click New Fill or Adjustment Layer.
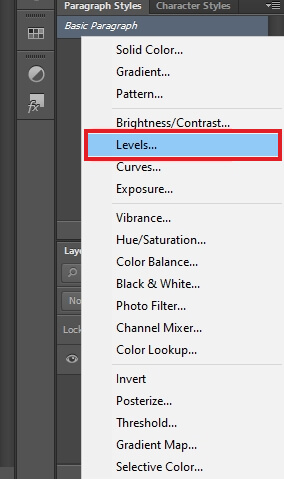
- Then choose Levels from the drop-down menu to create a new adjustment layer.
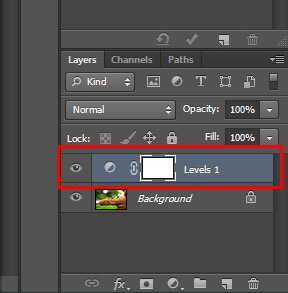
- Now in the blend mode box, choose Multiply from the drop-down menu. This will make the photo darker.
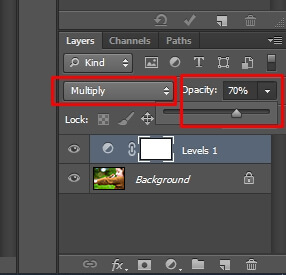
- If the image looks darker, decrease the opacity by clicking on Opacity to bring the brightness to the desired level.

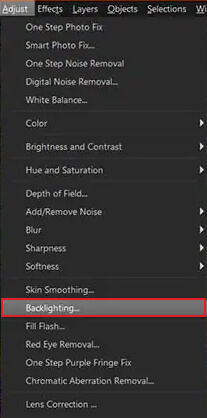
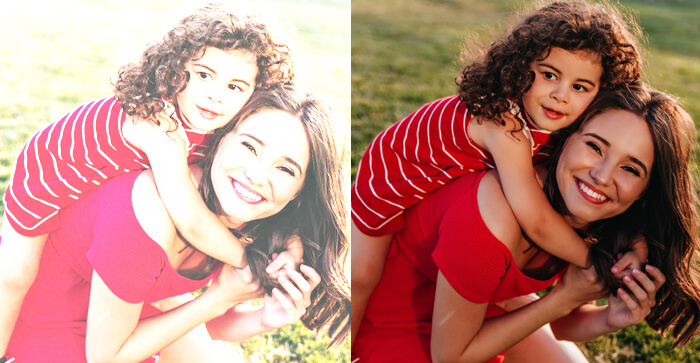
How To Fix Overexposed Images in PaintShop Pro?
PaintShop Pro is an advanced photo-editing tool that uses the power of AI and a customizable toolset to adjust light, color, spot heal, and customize the image’s background. Perform these steps to fix overexposed images:
- Install PaintShop Pro on your PC and complete the setup following the on-screen instructions.
- Launch PaintShop Pro and click Open to browse the overexposed image.
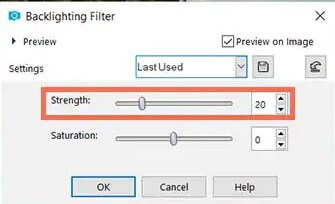
- Click Adjust, then Backlighting.
- Next, set the Strength to darken the lighter areas.
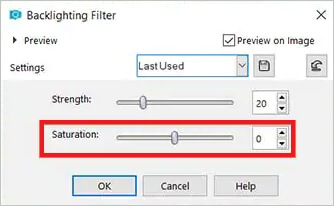
- Move the Saturation slider to determine the overall saturation of the photo.
- Once the underexposed photo is fixed, save it on your system.
All these tools, PaintShop Pro, Photoshop, and Lightroom, are not flawless, as your RAW overexposed photos may get corrupted while importing or saving them on the hard drive.
While using any of the photo editing tools, if your photo gets corrupted, use Stellar Repair for Photo to fix it. This advanced photo repair software can efficiently repair corrupt photos, damaged file headers, and invalid structures stored on a hard drive, USB flash drive, memory card, or other data storage medium.
7 Tips for Avoiding an Overexposed Photos
You are now aware of ways to deal with overexposed images in post-processing. However, there are a few tips that you can use at the time of capturing photos to prevent overexposure.
1. Set a Low ISO – The ISO number determines the sensitivity of your camera’s sensor to light. Ensure to set ISO 100 on a sunny day, ISO 800 shooting indoors, ISO 400 on a cloudy day, and ISO 1600+ in low-light settings.
2. Set the Aperture from medium to high – The Aperture is the hole in the camera lens that allows light to pass onto a sensor. Twist the ring around the lens to set the Aperture to medium or high.
3. Set the Shutter Speed – The shutter speed means how long the camera shutter is open while capturing the photo. The longer the shutter is open, the higher the chance of overexposing the photo.
4. Use Bracketing – It is the practice of taking two extra shots of every photograph: one with a +1 and the other with a -1 exposure value.
5. Always Use RAW Images, Not JPEGs- Make sure to shoot photos in RAW to capture as much detail as possible. Because JPEGs don’t preserve every detail of the photos. Set your file settings to RAW+JPEG and save photos in both file types.
6. Check Your Histogram Regularly – The Histogram represents the distribution of tones in the image. It simply shows dark, light, and mid-tones present in your photo. So, check the camera’s Histogram while shooting to know what is wrong.
7. Use the Light Meter – A light meter measures the amount of light in a scene to help determine the best exposure for an image.
Wrapping Up
Overexposed photos can happen because of several reasons. Sometimes, the camera can get it wrong or due to the photographer’s error of judgment.
Even professional photographers sometimes struggle with getting the correct exposure. Luckily there are photo editing tools like PaintShopPro, Adobe Photoshop, Lightroom, and others to fix overexposed photos during post-processing. However, understanding the exposure triangle of shutter speed, Aperture and ISO can help you get the perfect exposure for your photo.
Tell us about your experience with overexposed photos in the comments. Did you correct them or dump them and click again?
FAQ