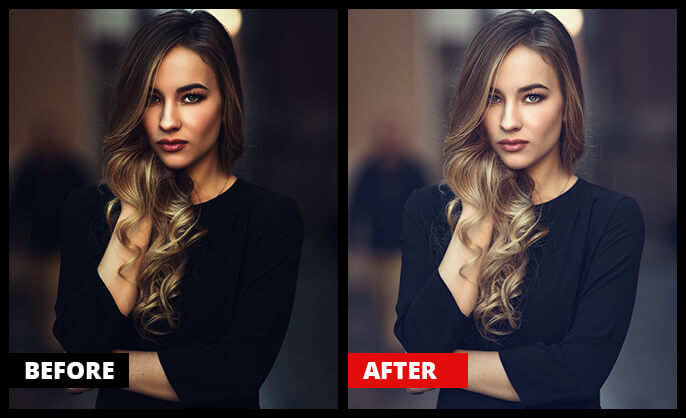
Took a great shot, but it came out dark? This happens when the photo’s subjects are hardly visible, and the scene is ruined. Such problems are bound to happen when you shoot photos in low-light conditions. Fortunately, there’s an option to brighten dark photos using photo editing software like Photoshop and Lightroom.
Read this guide to learn how to make dark photos brighter using photo editing software. You will also know what causes photos to come out dark and how to avoid it while shooting.
Why Are My Photos Dark?
Ideally, a photo should be neither too light nor too dark. A perfect photo has a good balance of shadows, highlights, and the right level of contrast. If your camera does not receive enough light while shooting, the photo will be too dark, and you won’t be able to see the subject clearly. Moreover, the shadows will hide the finer details of the photo.
Also, photos come out dark when the shutter speed is of the camera too fast, or the aperture isn’t open enough.
So, what can you do to fix the dark picture? You can fix it using robust photo editing software like Photoshop and Adobe Lightroom. Here’s how to do it.
How to Brighten a Dark Picture in Photoshop?
Adobe Photoshop offers several different ways to brighten a picture. You can either adjust the exposure, curves, or photo brightness level in Photoshop to brighten a dark photo.
Use an Exposure Adjustment Layer
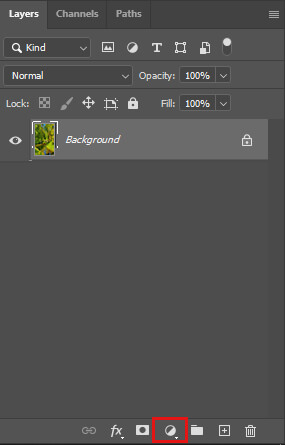
- Open the dark photo in Adobe Photoshop.
- To add an Exposure adjustment layer, click the adjustment layer icon on the bottom.
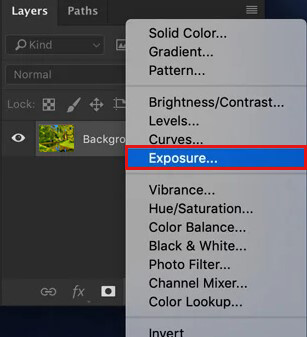
- Select Exposure. A new layer on top of the background layer will be added.
- Use the three sliders: Exposure, Offset, and Gamma Correction in the Exposure window to brighten a dark picture.
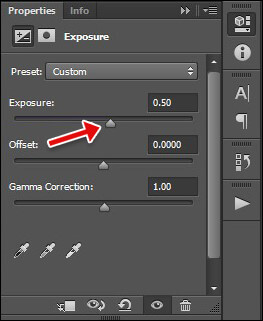
The Exposure slider lightens or darkens the image; the Offset slider adjusts the shadow areas; and the Gamma Correction slider adjusts the image’s mid-tones.
Use the Curves Adjustment Layer
Curves is a great tool to lighten a photo in Adobe Photoshop. Steps on how to use this tool:
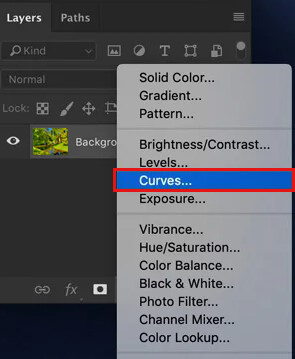
- Click on the ‘Create new fill or adjustment layer’ icon at the bottom. Then choose the Curves option.
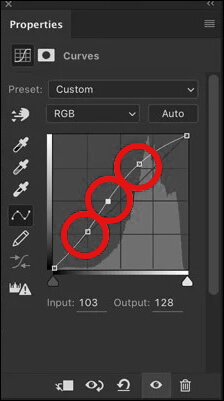
- Curves help to lighten the parts of your photo selectively. For example, the left end of the curve affects the shadows, the right end affects the photo’s highlights, and the middle part affects the mid-tones.
Use the Levels Adjustment Layer
The Level Adjustment Layer is the third tool that can be used for lightening or brightening a photograph and can also be used to control contrast. Follow these steps to learn how to use this tool:
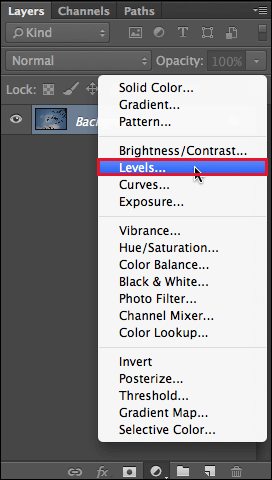
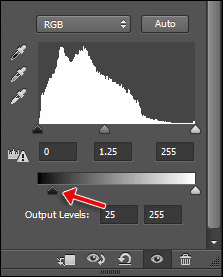
- Click the ‘Create new fill or adjustment layer’ icon. Then choose the Levels option.
- The Histogram shows information about Shadows, Highlights, and Mid–tones in the Level window. Unfortunately, there isn’t any perfect setting to move these sliders as it varies for every photo.
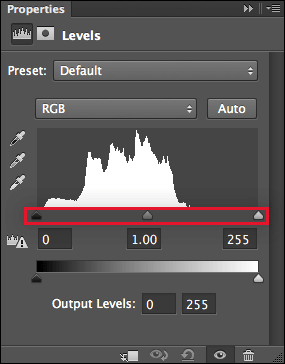
- Now, move the black output slider to the right to get the right amount of lightness.
How to Lighten Dark Photos in Lightroom?
Adobe Lightroom has a lot of options when it comes to brightening a dark photo. These options are – Basic panel sliders, tone curves, local adjustment tools, and luminance sliders in the HSL panel.
Use Basic Panel Slider
Follow these steps to use the basic panel:
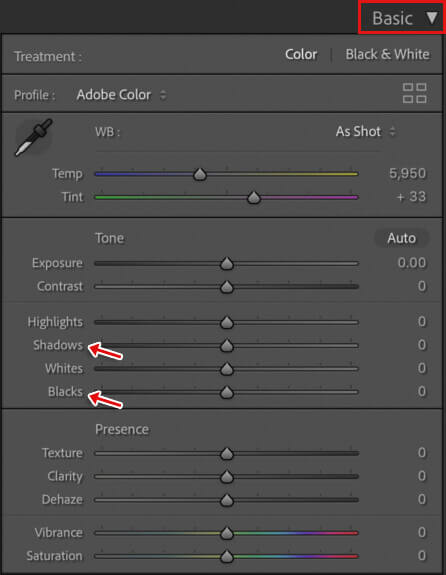
- Open the dark photograph in Adobe Lightroom and click Edit.
- Basic Panel can be found below the Histogram on the right side of the Develop Module.
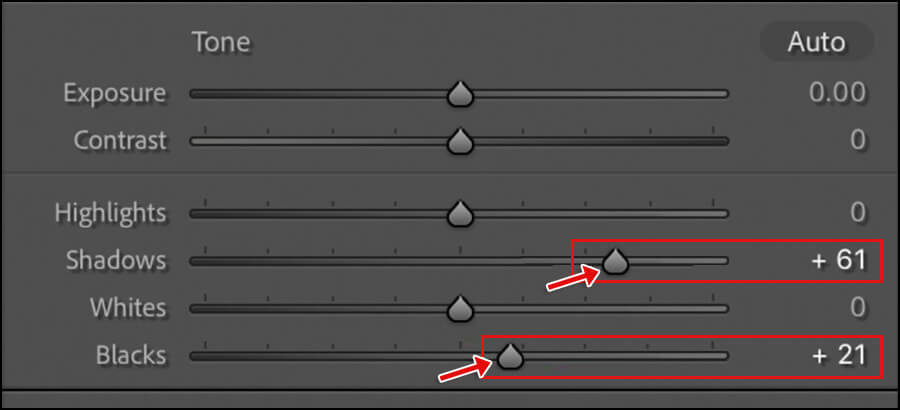
- Next, move the Shadows and Blacks slider to the right to increase the brightness; its setting varies for every image.
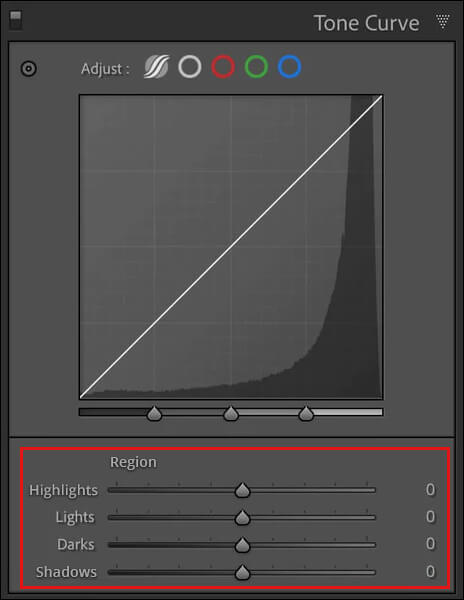
Use Tone Curve to Brighten Dark Photos
The Tone Curve affects the photo’s overall brightness and contrast. You can adjust the curve or use the sliders to make your images darker or brighter. Lightroom’s Tone Curve panel can be found below the Histogram on the right side of the Develop Module.
Use Local Adjustment Tool to Brighten Dark Photos
If a small part of the photo is dark, brighten it by using these three tools:
- Graduated Filter – Brightens a part of the photo from one of the sides
- Radial Filter – Brightens the faces in a photo
- Adjustment Brush – Lightens specific parts of a photo by painting that area

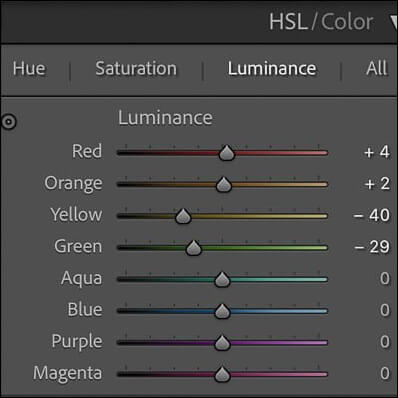
Use HSL Panel to Brighten Dark Photos
HSL Panel in Lightroom stands for Hue, Saturation, and Luminance. The luminance sliders in the HSL panel brightens particular colors in a picture instead of brightening it overall.
Despite being renowned photo editing software, Lightroom and Photoshop are not completely secure when editing images. For example, it can corrupt your RAW file while importing or exporting to the hard drive. In that case, use Stellar Repair for Photo to fix corrupt photos stored on a hard drive, USB flash drive, memory card, or other data storage medium. This photo repair tool can efficiently repair unreadable photos with invalid file structure, corrupt header/ data, unknown or invalid JPEG markers, and missing SOS markers.


How to Brighten Dark Photos on iPhone?
To brighten the dark photos on your iPhone, use the built-in iOS Photos app to adjust the exposure, contrast, brightness, saturation, highlights, shadows, and warmth. However, before editing any dark photo, make sure to keep a copy of the original photo to preserve it. Then follow the following steps:
- Open the dark photo in the iPhone Photos app and tap Edit.
- You can also use the Auto tool to adjust your photo’s brightness and color.

- If you want to edit the photo manually, go to the Exposure tool and brighten the photo by dragging the slider to the right.
- Drag the Shadows slider to the right to adjust the brightness of dark areas in the photo.
- Next, drag the Brightness slider to the right to brighten the dark and medium tones of the photo. The final photo will look like this.
Remember– The steps may vary with every picture.
You can even use the built-in Filters present in the Photos app to brighten your dark picture. For example, try using the Chroma Filter to make dark photos brighter and then adjust the temperature using the Cast tool.
To brighten dark photos in Android, you can use various free photo editing apps such as PickMonkey, Snapseed etc.
Tips to Avoid Taking Dark Photos
- When shooting with Polaroid, ensure that you shoot in lots of natural light.
- When shooting indoors, make sure to use the flash. Also, ensure the subject stands in front of something like a backdrop/wall to reflect the flash for brighter pictures.
- When shooting outdoors, never shoot directly against the sun. Also, move closer to the subject you’re shooting and make sure it lies in the well-lit area of the frame.
- With a professional or semi-professional camera, shoot RAW images and later edit them in any software.
Conclusion
Everyone ends up shooting dark photos from time to time. This darkness can be caused due to shooting in a low-light or dark environment, low contrast conditions, or with camera settings that weren’t quite right. But there are many ways to brighten a dark photo using various editing software and apps. Every photo is different, so try using various options to brighten it until you’re completely satisfied. So the next time you shoot a dark photo, you know what to do!
How to Edit Photos to Look Bright using Lightroom?
To make your photos look bright using Lightroom, follow these tips:
- Increase the Exposure
- Lower the Temperature – degree of warmth
- Adjust the Contrast
- Brighten the shadows
- Increase clarity
- Adjust the vibrancy
How to fix underexposed photos?
Underexposed photos happen due to high contrast or low light conditions. Fortunately, it’s easy to fix underexposed photos using various editing software like Lightroom and Photoshop.
How to Fix Bad Lighting in a Photo?
The quality of light is one of the most important aspects of perfect photography. Because with bad light, your picture will look dark. There can be many reasons that can turn your perfect shot into a badly lit photograph. However, you can easily fix this by using editing tools.
Was this article helpful?