A shared mailbox allows a team or group of people in an organization to send and receive emails from the same mailbox. Users having permissions to the shared mailbox can send as or on behalf of a common email address, like info@mycompany.com or support@mycompany.com. This helps an organization that wants to share the burden of responding to the emails related to clients/customers enquiries.
A shared mailbox has its own mail folders, such as Inbox, Draft and Sent Items, which can be used and accessed by multiple users at once. When a user replies to an email sent to the shared mailbox, it appears that the email is from the shared email address and not from that user.
Whether it’s for customer service, team projects, or any other collective endeavor, adding a shared mailbox to your new Outlook can help ensure seamless communication and coordination among the team. Below, we will see how to add shared mailbox in new Outlook.
Process to Add a Shared Mailbox in New Outlook
When the administrator adds you as a member of the shared mailbox, it automatically appears in your Outlook’s Folder pane. If it is not, then you can follow the below stepwise process to add a shared mailbox in Outlook 365 and Outlook 2013, 2016, 2019, or 2021.
But before you begin, you’ll need the following:
- Administrative rights to the Outlook account or permissions from your administrator.
- Access to the shared mailbox. You can ask your administrator to grant permission to access the shared mailbox you want to add to your Outlook.
To add a shared mailbox in Outlook 365,
- Launch the Outlook 365 application on your computer.
- Then, click File > Info > Account Settings > Account Settings.
- Click on your email account and then click Change.
- Click More Settings.
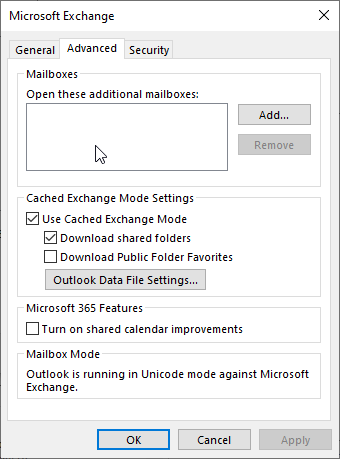
- Click Advanced.


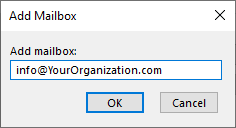
- Enter the email address of the shared mailbox and click OK.
- Then, click Apply > OK.
- Click Next > Done.
- Once done, you can restart Outlook for the changes to take effect.
- The Outlook will synchronize and download the shared mailbox.
To add a shared mailbox in Outlook 2013, 2016, 2019, and 2021
- Close Outlook and make sure no Outlook window is open or process is running.
- Press Windows + R keys and type Control Panel. Then, click OK or press the Enter key. This will open the Control Panel.
- In the Control Panel, click User Accounts > Mail and then click the ‘Email Accounts’ button.
- Then, under the ‘Email’ tab, click New.
- Here you need to enter the email address of the shared mailbox that want to add to your new Outlook and click Next.
- You may see a sign-on screen where you need to enter the account username (shared mailbox) and password and then click Login.
- After a few seconds, if everything is correct, you will see a Congratulations! message. Click Finish.
- Now you can start Outlook to view and access the mail items of the shared mailbox. The mailbox will appear in the left pane.
Note: Remember, you can only send emails from the shared mailbox or access specific folders if the permissions are granted by your IT administrator. In case you encounter any issues or cannot see the shared mailbox or fail to send emails or receive new messages, immediately get in touch with your IT administrator or department.
Once the shared mailbox is added to your new Outlook, you can test the shared mailbox by sending a test email. Here’s how to send an email from a shared mailbox:
- Open Outlook and click New Email.
- In the From field, choose the shared email address.
- In case you don’t see the From field, choose Options > From.
- In case you don’t see your shared email address, select Other email address and then type in the shared email address in the From field. In Send Using, select your email account that has permission to access and send emails on behalf of the shared mailbox.

- Click OK.
- Type your email or message with a clear subject line. Once you finish typing the email, click Send.
Next time, when you send a new message from the shared mailbox, the email address will appear in the From dropdown list.
Conclusion
Adding a shared mailbox to your new Outlook is a pretty simple and straightforward process, given you have the necessary permissions to access the shared mailbox. By following the steps discussed above, you can easily add a shared mailbox to your Outlook 2013, 2016, 2019, 2021, and Outlook 365. However, you must keep in mind that the emails you send or receive in shared mailbox are stored in the same OST file on your local computer. When the OST gets large, you may start experiencing performance issues in Outlook and errors that prevent you from accessing your email account and shared mailbox. In such cases, you can recreate the OST file after creating the file backup. Then, check for any missing emails or other items in the new OST file. If there are missing items, then use an OST to PST converter software, such as Stellar Converter for OST to extract and restore mail items from the backup OST file to PST file. You can also export the extracted items directly to an existing Outlook profile, Microsoft 365 account, or Exchange mailbox.
Was this article helpful?