Formatting a storage media like a USB drive is nothing new. Formatting is a way to enhance a storage device’s compatibility with new generation computers. By default, USB drives and other storage media are formatted with FAT or File Allocation Table. FAT32 is the most commonly used file system, however, it lacks in certain areas like data security, storage support larger than 4 GB, etc.
The above technological constraints gave birth to the demand of NTFS or New Technology File System. It is a newer file system that offers enhanced data security, larger storage memory support, and other benefits. Formatting is sometimes, used as a way to troubleshoot the storage device. It is also done to get rid of performance issues on a USB drive caused by bad or degraded sectors.
Overtime, NTFS has become a widely supported file system type for a majority of Windows compatible external storage devices. But still, there are many storage devices and USB drives that come with FAT32 file system. To make these USB drives compatible with newer hardware, there are methods to format them to NTFS file system. However, before we move onto them, let’s understand what a file system is.
What is a File System?
In any storage device, a file system represents a standardized way of storing files on it. It keeps track of the names of each file stored on memory blocks and their logical position on the drive. Digital file systems are named and designed to replicate the paper-based filing systems and use the same logic for storing and retrieving the files. There are many file systems used, however, some of the common ones are – FAT, NTFS, and ExFAT.
Now that we know what a file system is, let’s look at various methods that we can use on our Windows 11 computers to format our USB drive to NTFS file system.
Warning – Formatting a USB drive removes all the data on it. Hence, it is advisable to take complete backup of all your data present on the USB onto another storage drive before proceeding with the USB formatting methods mentioned ahead.
This is the most commonly used method to format a USB or any other storage device. It is an easy way to format your USB drive to NTFS file system on Windows 11. Here are the steps –
- Connect the USB drive that to your Windows 11 computer you wish to format.
- Open the File Explorer by pressing WIN + E.
- Click on This PC in the left pane and locate your USB drive.
- Select the USB drive and right-click on it.
- Click on Format.
- Select the File system to NTFS from the drop-down menu and check the Quick Format option under Format options section.
- Click on Start.
- Click OK to proceed with formatting.
- Once the formatting is done, the data will be wiped off from the USB drive.
- Close the wizard.
Note – If you proceed with formatting your USB drive to NTFS file system without selecting the Quick Format option, the system will perform Full Format. This will not only erase the data from the device but will also overwrite the empty spaces with zeros to make the erased data irrecoverable. While performing this, the system rebuilds the file system, volume label, cluster size, and scan for bad sectors on the formatted USB drive. Hence, this process is time-taking.
The Diskpart command is used in the command prompt to manage computer’s various drives, partitions, volumes and more. You can use this command on your Windows 11 PC to format your FAT formatted USB drive to NTFS file system. Simply follow the below mentioned steps –
- Press WIN + R and type CMD.
- Press CTRL + SHIFT + ENTER to open CMD with administrator privileges.
- Type diskpart and hit Enter to execute the command.
- Type list disk and press Enter to list all the drives present on your Windows 11 PC.
- Identify your USB from the displayed list of system drives.
- Use the sel disk NUM to select the USB drive and press Enter. Replace NUM with Disk ### displayed in the first column.
- Once it displays the selected drive, type clean and hit Enter.
- This will erase all the data present on it.
- Now type create partition primary and press Enter. This will successfully create the partition.
- Now type active and press Enter to mark the new partition as active.
- Once this is done, type format fs ntfs label “NAME” quick to give a name to your USB drive and format it with the specified file system. Replace NAME with the name that you wish to give to your USB drive.
- Now, use type assign letter=Z to assign a letter to your USB drive and press Enter. Replace Z with the letter of your choice.
- Finally, close diskpart by typing exit.
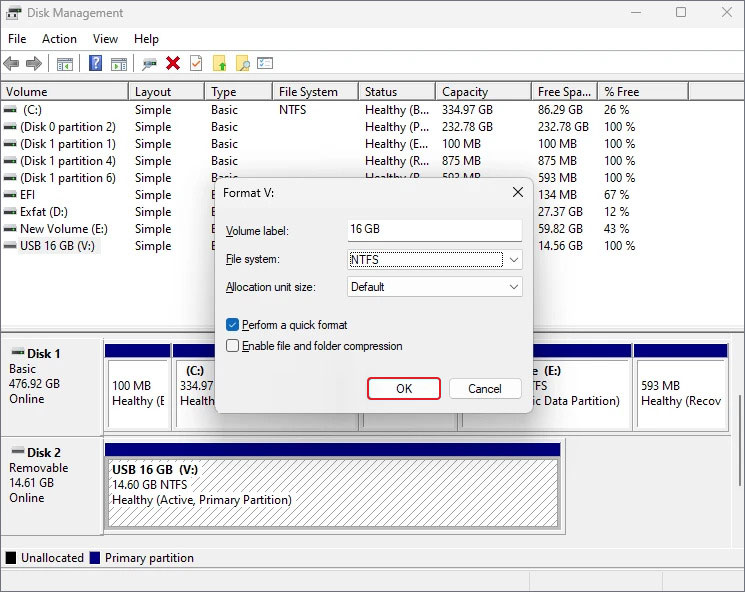
Disk management is an integral part of Windows 11 and other Windows OS. It allows users to manage storage drives, partitions and volumes. This system utility can be used to format a USB drive to NTFS file system on Windows 11 computers. Follow the steps below to use this method –
- Press WIN + R, type diskmgmt.msc, and press Enter.
- The bottom section lists all the storage drives present on the computer. Locate your USB drive.
- Select the USB drive and right-click on it.
- Select Format.
- Click YES to proceed with the action.
- A dialog box will appear. Enter the Volume label, select the File system, and check the Perform a quick format option.

Microsoft PowerShell is a modern and robust command line tool used for executing commands on Windows. This can be used on any Windows 11 computer for formatting USB drive to NTFS file system. Let’s see how it is used in this case –
- Press WIN + R and type powershell.
- Press CTRL + SHIFT + ENTER to launch it with administrator privileges.
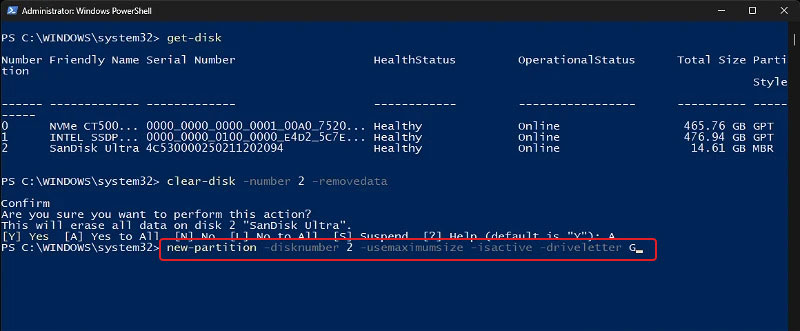
- Type get-disk and press Enter to list all the present drives.
- Locate your USB drive from the listed drives and note its number available in the first column.
- Type clear-disk -number NUM -RemoveData to clear the data off the USB drive. Replace NUM with the disk number noted in the previous step.

- Type A to confirm your choice and proceed with the operation. This will erase all the data present on the USB drive.
- Now, type new-partition -disknumber NUM -usemaximumsize -isactive -driveletter LETTER and hit Enter. Replace NUM with disk number and LETTER with any letter that wish to assign to it.

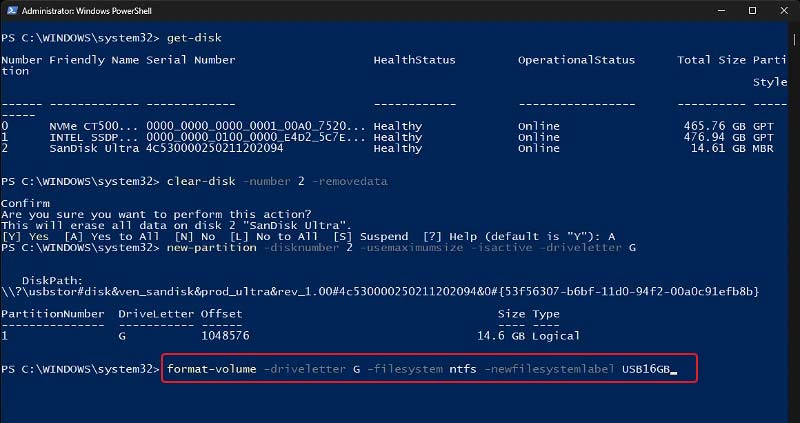
Once this is done, your USB drive is ready to be formatted.
- Type format-volume -driveletter LETTER -filesystem ntfs -newfilesystemlabel NAME and hit Enter. Replace LETTER with the letter you wish to assign to it and NAME with the name you wish to give your USB drive.

- Once you have successfully formatted your USB drive to NTFS file system, type exit and close the PowerShell.
RUFUS or Reliable USB Formatting Utility is an open-source freeware software built for formatting USB drives and creating bootable media drives or ISO files. It is mostly used for creating installation media, flashing BIOS, and for running low-level OS. You can click here to download it onto your computer and learn how to use it for formatting USB drive to NTFS file system on Windows 11.
We carry critical files and data on our USB drives as their compact form factor and wide compatibility makes them easy to carry and use. While we are careful in handling such drives, there are cases when we accidentally format our USB drives, causing us to lose our critical data. In such a case, a professional data recovery tool like Stellar Data Recovery Professional comes handy.
Stellar Data Recovery Professional is a purposefully built software designed for users of all experience levels. It makes recovering data from any storage media like HDD, SSD, USB flash drive, etc. easier. It can recover any data lost in various data loss scenarios like formatting, accidental deletion, corruption, malware attack, and more. This software also provides a feature to create a bootable media for performing data recovery from crashed Windows computers.
Final Words
We never really think about formatting our newly purchased USB drive to NTFS and most of them come formatted straight out of the box. However, there are some USB drives that require formatting before they can be used. While formatting is usually associated with data erasure, it is sometimes used for improving the performance of an old USB stick with degrading or bad sectors.
In this post, we discussed about formatting along with some elaborately explained methods to format our USB drives to NTFS file system with ease. Let us know in the comments section, which method helped you format your USB drive to NTFS easily.
Was this article helpful?