“Recently, I forgot my iPhone Passcode and now find myself locked out of the device. It’s quite distressing because I have my personal files, essential contacts, and important data stored on it. I desperately need to regain access to my iPhone as soon as possible.
Can someone help me find a quick solution to bypass the passcode on an iPhone?
–iPhone user
Locking your iPhone is crucial to protecting your privacy and confidentiality. An unlocked iPhone is vulnerable to data theft and misuse, including unauthorized access to emails or banking accounts.
Setting up a passcode protects your device from unauthorized access and ensures enhanced data security. You must enter the Passcode to unlock your iPhone when you try to re-access it.
But unlocking your iPhone can be daunting if you forget your iPhone passcode, enter the wrong passcode multiple times, or buy a second-hand iPhone that’s locked with a passcode.
In this blog, we will explore how to unlock an iPhone without a passcode.
Unlock Your iPhone Without a Passcode
If you have forgotten the iPhone passcode or see the message ‘iPhone is disabled, try again in X minute,’ the only way to unlock it is by factory resetting the device and removing the Passcode simultaneously.
Factory resetting the iPhone will wipe all the device data and the Passcode, making the device look new. You can now restore data from a backup and set a new passcode for your device.
The only shortcoming with this solution is that you must have a recent backup of your iPhone data to restore it after resetting the device. Without a backup, you will need to start the iPhone from scratch.
How to Reset iPhone without Passcode?
There are four ways to reset your iPhone: previously synched Mac or PC, iCloud, Recovery Mode, and a professional iPhone Toolkit software.
1. Use the Previously Synchronized Mac or PC to Wipe an iPhone
If you have previously synced your iPhone with your Mac or Windows, you can use the recent backup to restore your iPhone and reset its Passcode.
On Mac
Here’s how to erase your iPhone using a Mac
- Connect your iPhone to a Mac using a Lightning or Type-C cable.
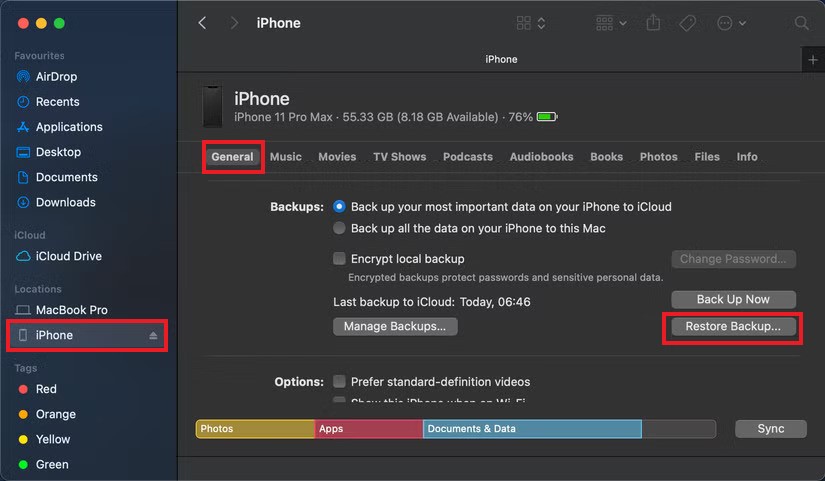
- Open Finder and select your device from the Locations menu on the left sidebar.
- Next, select the General tab under your device name.
- Scroll down, go to Backups, and select the Restore Backup option.
- Choose the backup you want to restore from the backups saved on the device locally or on iCloud.
- Next, enter your Mac password and click Restore. Doing so will restore your iPhone data from the most recent backup and remove the device password. Now, you can set up a new passcode.
On Windows
Here’s how to erase your iPhone using iTunes:
- Please turn off your iPhone and connect it to a Windows computer you previously synced using a Lightning cable.
- Open iTunes, tap Summary and click Restore iPhone in the right pane. The restoration process will start, and iOS will be reinstalled from scratch.
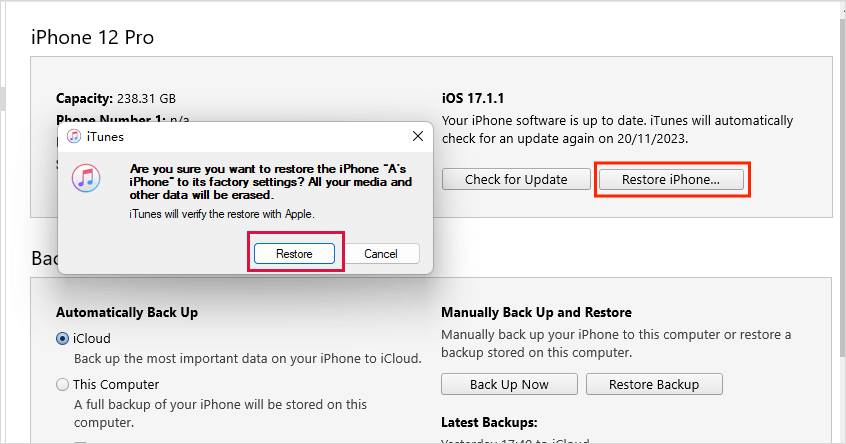
- Once complete, the iOS setup screen will appear. Select the Restore from iTunes backup option and choose the latest backup to restore from. This removes your iPhone passcode, allowing you to set up a new one.
2. Erase your iPhone via iCloud
If you forgot your iPhone passcode, use the iCloud website to erase your device.
Note: This method will only work if your iPhone’s ‘Find My’ feature is enabled and it is connected to Wi-Fi or cellular data.
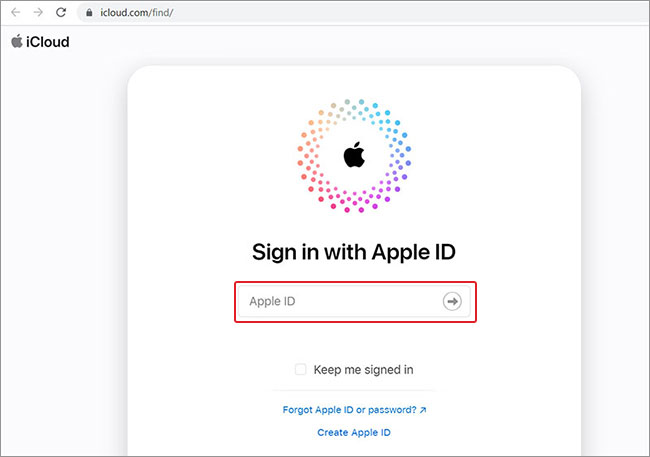
- Open iCloud.com/find in your Windows web browser and Find My app on Mac. Log in using your Apple ID.
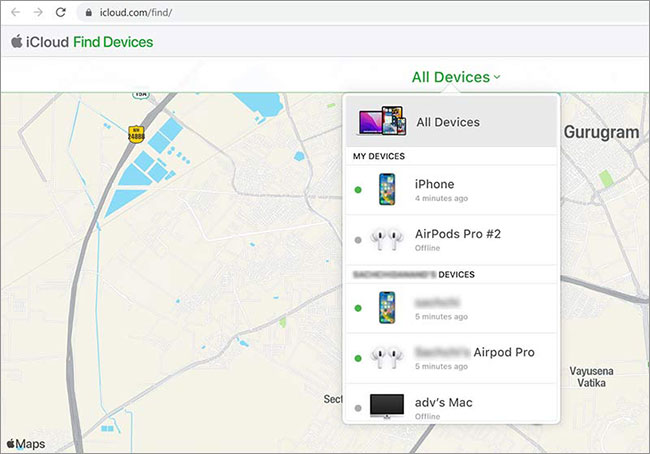
- Select All Devices on the top and select the iPhone you want to erase.
Note: A green dot against the iPhone means it’s online, whereas a grey dot represents the device is offline.
- In the Info window, click on the Erase iPhone option.
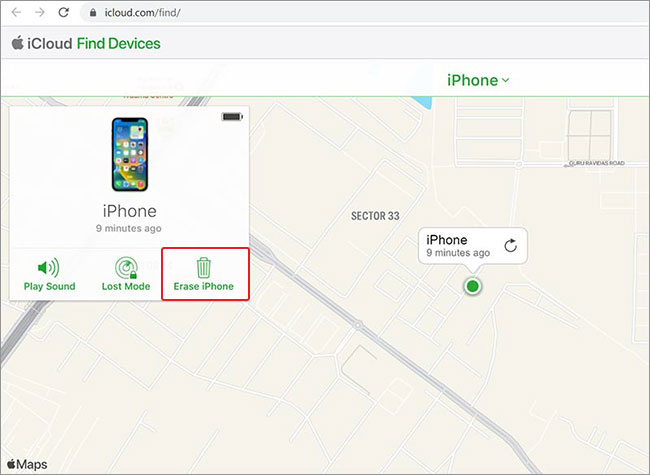
- Again, click Erase to confirm.
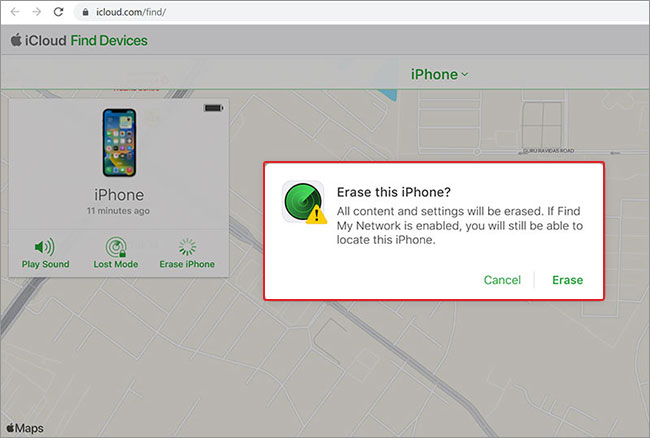
- Enter your Apple ID and password to verify your identity. Once you’ve done this, your iPhone will be erased clean, and you can set it up again using the same Apple ID and new Password.
3. Reset your iPhone using Recovery Mode
If you have never synced your iPhone with Mac or Windows, you can erase your iPhone using the Recovery Mode only. This will erase your iPhone data permanently and set it up as new. Here’s how to erase your iPhone using Recovery Mode:
- Turn off your iPhone. This process will depend on the kind of iPhone you have.
| iPhone Model | How to Turn iPhone off? |
| All models of iPhone 14, iPhone 13, iPhone 12, iPhone 11, iPhone X, iPhone 8, and iPhone SE (2nd generation). | Press and hold the iPhone’s Lock and Volume down buttons until the power slider appears, then swipe it. |
| All models of iPhone 7, iPhone 6, and iPhone SE (1st generation), | Press and hold the Lock button of the iPhone until the power slider appears, and then swipe to turn it off. |
- Connect your iPhone to your Mac or PC via a Lightning or Type-C cable and ensure iTunes or Finder runs on the system.
- Then, put your iPhone into recovery mode. To do this:
| iPhone Model | To Enter Recovery Mode |
| All models of iPhone 16, 15, 14, 13, 12, 11, X, 8, and iPhone SE (2nd and 3rd generation). | Press and hold the side button until the ‘Connect to computer’ screen appears on your iPhone |
| iPhone 7 and iPhone 7 Plus | Press and hold the Power and Volume Down buttons. Then, release the Power button and continue pressing the Volume Down button until the iPhone is detected. |
| All models iPhone 6, 5, 4, SE (1st generation) | Hold the Home button until a pop-up appears indicating that your iPhone has been detected in recovery mode. |
- Once your iPhone is in recovery mode, you will see a pop-up saying ‘there is a problem with the iPhone’ appears on your Mac or Windows system, here click Restore.
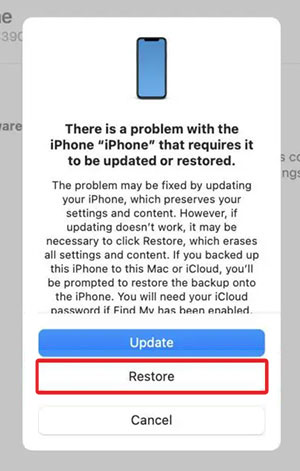
This will restore your iPhone to its factory settings. Then, you can restore the data from the backup or start fresh.
4. Use Stellar Toolkit for iPhone
Sometimes, the manual methods mentioned above to reset your iPhone don’t work. You may fail to bring your device to Recovery Mode, or Find My iPhone is not enabled on your iPhone, making it difficult for you to erase it.
This is why you should use the remove Apple ID feature of professional software like Stellar Toolkit for iPhone to fix the forgotten iPhone passcode issue. This software can remove Apple ID, recover data, erase data, and repair various problems, such as the Black Screen of Death, White Screen of Death, iPhone crashing, iTunes errors, and more. The software is compatible with the latest iOS 18, iPhone 16, iPad Pro, and below version series.
The software is compatible with the latest iOS 18, iPhone 16, iPad Pro, and below version series.


Steps: How do you remove an Apple ID using Stellar Toolkit for iPhone?
- Download and install the Stellar Toolkit for iPhone on your computer.
- Launch the software and select the “Remove Apple ID” option.

- Click Next on the Remove Apple ID screen.
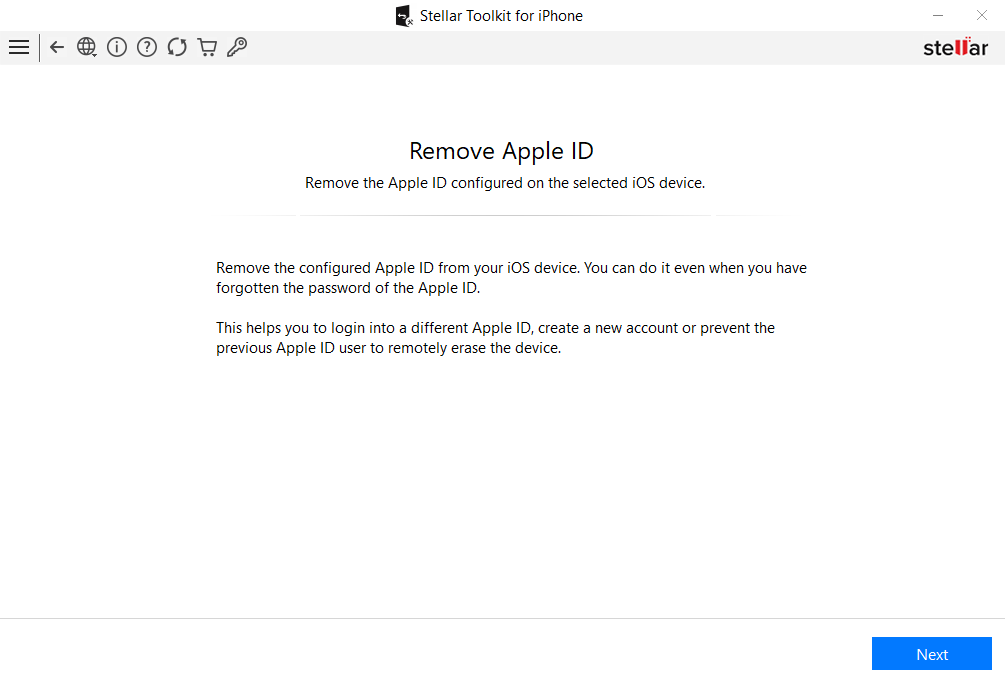
- On the “Click Device to Select” screen, click on the iPhone icon.
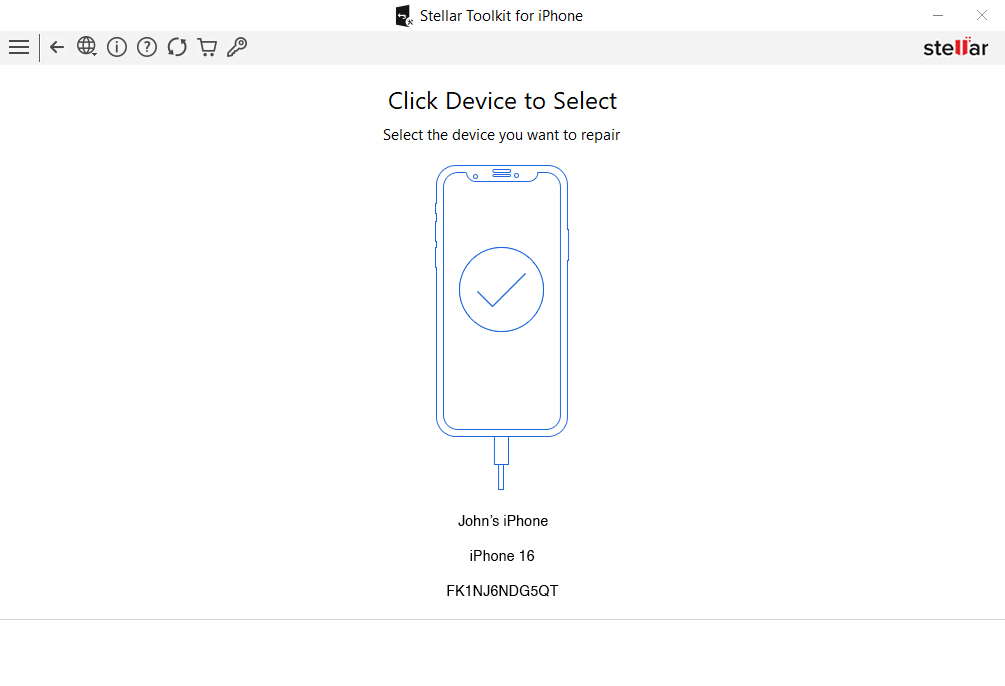
- In the “Download the Matching Firmware Package” screen, click the “Download” button to download the firmware file to repair your iOS device.
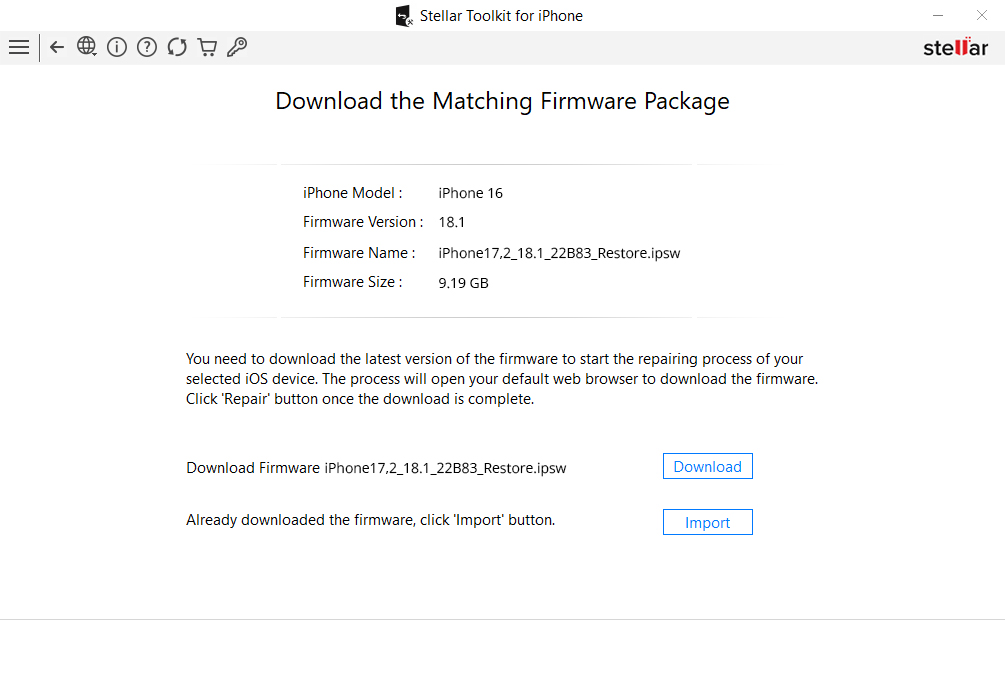
- Now, click “Import” to move the firmware file you downloaded. After the firmware file is imported, click the “Repair” button.
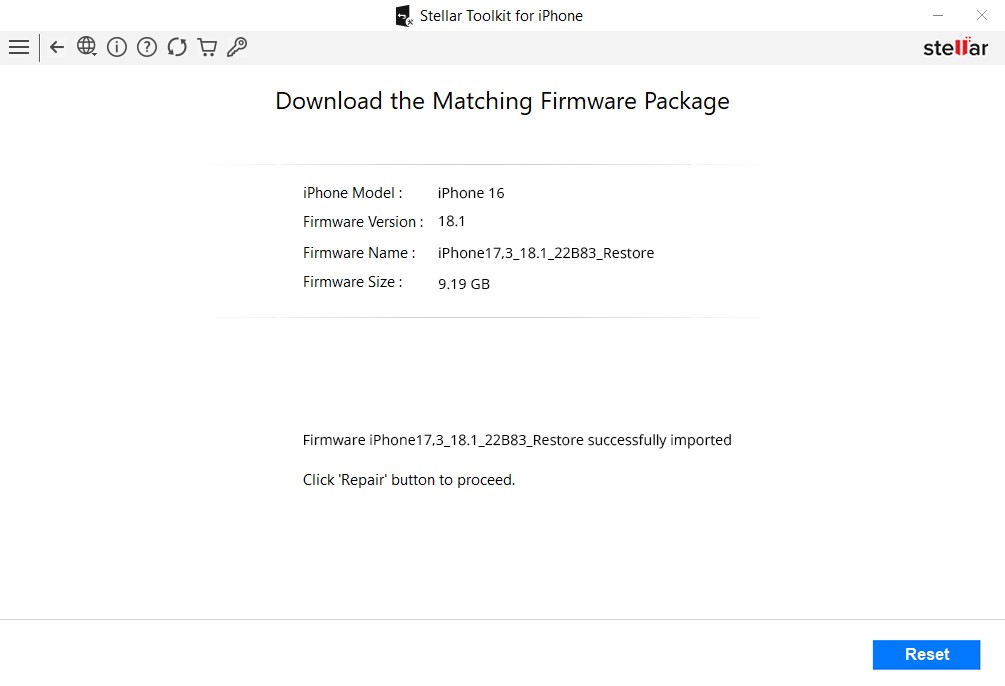
- The “Apple ID being removed from the iOS device. Please wait…” screen will display the removal progress.
- Once the process is complete, a “Process to remove Apple ID is completed” message will appear. Click “OK” to finish the process.
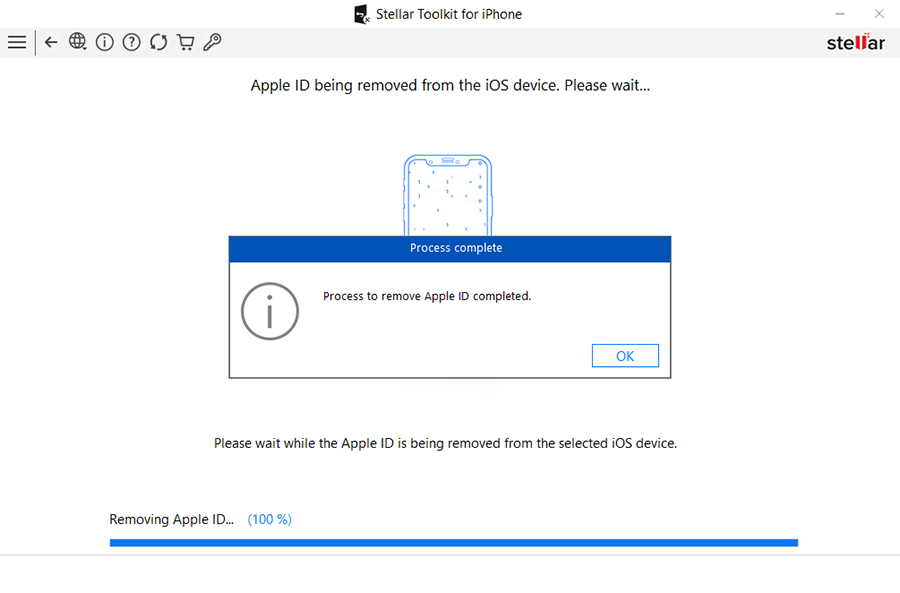
This will remove your Apple ID from your device and delete all the device data and the passcode. After that, set up your iPhone again with the same Apple ID and restore your data using an iCloud or iTunes backup.
Wrapping Up
Your iPhone manages a big part of your day-to-day life. No wonder forgetting its Passcode can be maddening. And once you receive the ‘iPhone Disabled‘ message, you cannot do much.
You need to reset your device to bypass the Passcode to unlock your iPhone, which will erase your data. Then, you’ll have to set it up again and restore the data from the backup.
To avoid this situation from happening again, make a habit of noting your iPhone passcode somewhere else.
As an extra safety precaution, regularly back up your device in case you ever need to factory reset it again. However, keep three copies of your device back up and store them separately in the Cloud, on your computer, and on an external device for added security.
How to change an iPhone passcode?
Follow the below steps to change your iPhone passcode:
• On your iPhone, go to Settings > Face ID and Passcode.
• Then, enter your Passcode.
• Scroll down and select the Change Passcode option.
• Enter your current Passcode first, then enter the new Passcode twice.
What does 'iPhone disabled, connect to iTunes' mean?
It simply means you have exceeded the maximum number of unsuccessful login attempts on your iPhone, and iOS has disabled it for security purposes. To unlock your iPhone, connect it to a Mac or the Apple Devices app (for Windows) and wipe it. You can either restore it from a backup or start it as a new one.
How do I make my iPhone Passcode a different length?
To change the length of your iPhone passcode:
• Go to Settings > Face ID and Passcode, and enter your Passcode.
• Scroll down, select Change Passcode, and enter your Passcode again.
• Here, tap on the Passcode Option at the bottom and select the type of passcode you want to set: 4-digit, 6-digit, custom numeric code, or custom alphanumeric code.
Was this article helpful?