Xhunter1.sys is a third-party driver file used by the XIGNCODE3 System Guard anti-cheat engine. Some gamers have reported xhunter1.sys blue screen errors in various support forums when attempting to play specific games, like PUBG.
We are here to help you to fix this issue once and for all so you can return to smooth gaming and unlimited fun. So, stick with us as we review some of the most effective solutions to the xhunter1 sys problem.
What are the variations of Xhunter1.sys BSOD error?
The xhunter1.sys file is mentioned in the following two often referenced BSOD error messages:
- PAGE_FAULT_IN_NONPAGED_AREA
- DRIVER_IRQL_NOT_LESS_OR_EQUAL
Many players have complained that using Android emulators like Tencent Gaming Buddy to play (or install) PUBG Lite (now discontinued) and PUBG Mobile can cause xhunter1.sys blue screen errors.
How do I fix Xhunter1.sys blue screen errors in Windows 10/11?
1. Disable Automatically managing paging file size
- First, open Windows 10/11’s search feature by clicking the magnifying glass taskbar button.
- In the search box, enter System and click on the best result.
- To access the System Properties panel, choose Advanced system settings next.
- You can open a Performance Options window by selecting Settings on the Advanced menu.
- Then choose the Performance Options’ Advanced tab.
- The Virtual Memory window will appear when you click the Change button.
- To deselect the option to automatically control paging file size for all drives, uncheck the box next to it.
- Choose the radio button for No paging file.
- To confirm, click the Set button and choose Yes.
- To close the window, click the OK button.
- After removing Automatic manage paging, restart your PC.
2. Disable antivirus software
Antivirus occasionally interferes with anti-cheaters and disrupts the System.
You must deactivate any third-party antivirus software you may have installed. To achieve this, use the context menu by right-clicking the antivirus tool’s system tray icon and choosing “Disable/Shut Down.”
Choose to turn it off for a while, and then try playing the game where the BSOD problem occurs.
- To open Windows Security, search Windows security in the search box.
- Then, select the Virus & threat protection button from the sidebar of Windows Security.
- To access the options, select Manage settings.
- To turn off the antivirus program, toggle off Real-time protection.
3. Update Windows 10/11
Maintaining Windows implies that the majority of system file problems you may resolve are your computer encounters.
Installing security upgrades is essential to shield your computers from harmful attacks. Installing software updates is crucial in the long run to access new features and be safe in case security flaws are found in out-of-date programs. Likewise, you might need to update windows to tackle the Xhunter1 sys problem.
- Select the Settings option from the Start menu.
- You can access the Windows Update tab by choosing Update & Security.
- When a Windows feature update becomes available, select Download and Install.
- If you cannot upgrade your version of Windows, click the Check for updates option to install any available patch updates.
4. Run memory Diagnostics
Time to put your RAM to the test. To do this, you need to use an application called Memory Diagnostics. This utility operates by writing data to each RAM sector of your computer and retrieving it out one sector at a time. The tool will read a different value if it notices a RAM issue. You will be informed after the process if there is a problem with your RAM. You must restart your computer to run the test. During the RAM test, you are not permitted to use your computer. So make sure to save your work.
- In the Run box (Windows icon and R), put in mdsched.exe and press Enter.
- Click Restart Now and check for problems (recommended).
5. Use an SFC scan
Windows’ SFC system program scans for corrupted and missing data. Windows uses SFC to perform selective system file checks. However, it’s essential to utilize DISM after this utility.
- Type in the command prompt in the Start menu’s search box, right-click the first result and choose Run as administrator.
- After typing SFC /scannow into the command prompt window, press Enter.
- Restart the computer after the procedure is finished.
6. Run DISM
Deployment Image Servicing and Management is the abbreviation for DISM, a Windows software with various functionality. In this situation, the DISM Restorehealth command ensures that all files have their integrity checked. Proceed to the subsequent actions.
- In the Start menu, type Command Prompt, then right-click the top result and choose Run as administrator.
- Enter the command DISM /online /cleanup-image /restorehealth and then press Enter.
- Depending on your System’s state, the procedure could take up to 20 minutes. If the procedure ever seems to stall, be patient and wait for it to finish.
What to do if I can’t access my settings due to BSOD?
It isn’t much you can do in this situation other than recover your files and take your PC to a specialist to get help with the problem.
But how can you recover your files if your PC won’t boot up or displays BSOD as soon as Windows starts?
Even if your PC doesn’t boot up, the Stellar Data Recovery Professional software can help you regain access to your files. With the assistance of this tool, you can make a bootable drive that you can use to run programs without a complete Windows boot.
All you need to do is as follows:
- Connect the USB drive to another operational PC. It would help if you had a 1GB USB.
- Launch Stellar Data Recovery Professional after downloading and installing it from the official website.
- In the main window of the Select What to Recover screen, select Waffle Menu.
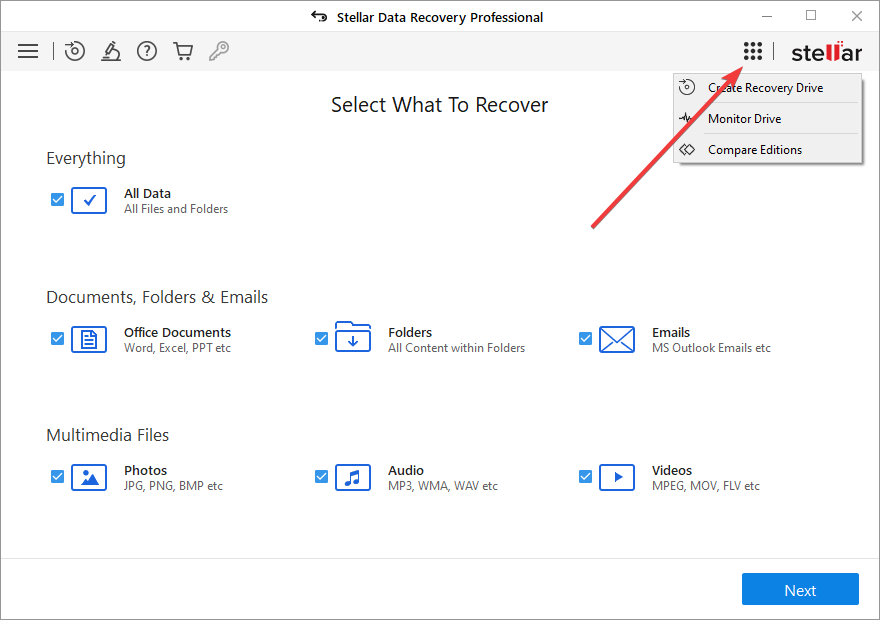
- Choose Create Recovery Drive.
- Use the menu to select the USB drive you want the bootable media in from the Create Recovery Drive dialog box.
- Next is to select Create Recovery Drive and OK.
- A new Activation window appears where you need to enter an activation key. After purchasing the product, enter the Key you received via email into the box and press the Activate button.
- Attach the mentioned USB media to your Windows computer that won’t boot.
- Turn on your computer, then rapidly press the F12 or Bios Key to view any connected bootable USB media.
- Select the bootable data recovery media using the arrow keys; then press Enter to boot the computer.
- Once the computer boots from the USB media, you will see the Stellar Data Recovery Professional software interface on the screen.
- From the Select What to Recover screen, select the files you wish to recover and press Next.
- Click Scan after selecting the desired drive.
- Click Recover to save the files you have selected from the preview menu.
Uninterrupted gaming is the dream of every gamer!
You should be able to resolve the BSOD error and run the games without any problems using the solutions mentioned above.
However, a fresh Windows installation will be the last resort if the issue still exists after trying all of the fixes.
Stellar Data Recovery Professional software can conduct a deep scan to discover and recover your files lost due to OS installation, even after a clean reinstall of Windows.
FAQ
Was this article helpful?