“When I attempted to play a video clip on Google Chrome recently, I received an error that said, “This video file cannot be played”. Is there a problem with the video file or my browser? Do I require a media player extension?”
It is a query posted on an online forum by a user who couldn’t play video files in Google’s Chrome web browser on his system. But not just Chrome; such an error can also occur in Mozilla, Safari, and any other browser. In addition, when streaming content through platforms like Netflix, YouTube, or Amazon Prime, you can face the “video file cannot be played” error. Before discussing the solutions to fix this error, let’s look at the reasons that may cause it.
You can face the “video can’t be played” error because of the following reasons:
- First, the video you’re trying to watch is corrupted.
- The video player on your device is malfunctioning.
- You’re using an outdated or corrupt web browser.
- Server errors are caused at the backend of the service providers.
- The browser lacks the necessary extensions or add-on player.
- The file isn’t uploaded properly or has suffered damage during the process.
- You may be attempting to view a restricted video in your location.
- A VPN or a third-party firewall could have banned the video.
- Finally, the media player does not support the video file type.
How to Fix “This video file cannot be played” Error?
When trying to play a video, if you see a message that says “this video cannot be played”, “this video is unavailable in your country,” or “this video is inaccessible on this device,” here’s what you should do.
1. Refresh the website and reopen your browser
The first thing to do is refresh the website and reopen your browser. If the problem persists, try exiting your web browser and re-launch it. Now try to play the same video again to see if the warning still appears.
2. Use a Virtual Private Network (VPN)
Using a VPN is the best way to access video files unavailable in your region. Such software eliminates the barrier created by your IP address and allows you to view videos that aren’t accessible in your area. It shields your device’s IP address while assigning you a new one from another country.
3. Disable Hardware Acceleration Settings
Most machines have Hardware Acceleration functions that use a Graphics Processing Unit (GPU) to render videos on your device. It lowers the percentage of Central Processing Unit (CPU) used by your browser. Although it is generally useful, it may create issues such as the “video cannot be played”. Turning this function off might be a good way to eliminate the error.
Here’s how to disable the Hardware Acceleration features:
- First, go to your Google Chrome web browser’s settings by clicking on the three dots icon in the top-right corner and then navigate to the Settings option.
 Image 1 – Open browser preferences and click on Settings
- Scroll down and expand the Advanced options. After that, find the System section. In it, toggle off the Use hardware acceleration when available option.
 Image 2 – Disable the hardware acceleration option
 4. Clear the Cache
A cache is a component in computing that saves data to serve new requests for that data more quickly. If your browser or computer’s cache has become damaged, your device may display the “video cannot be played” error.
You can resolve the problem by clearing the cache as follows:
- Go to your Google Chrome web browser’s settings by clicking on the three dots icon in the top-right corner. Scroll down to find the Privacy and Security section. In it, click on the Clear Browsing Data option.
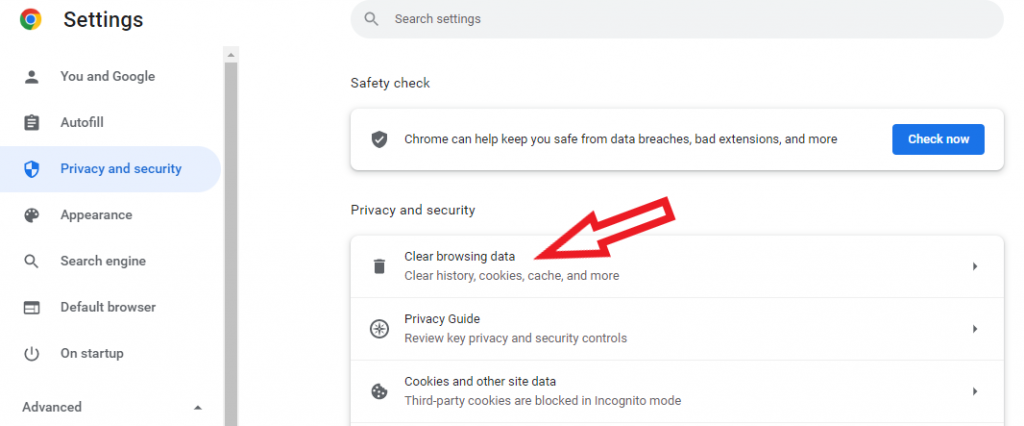 Image 3 – Navigate to the Clear Browsing Data option in your browser’s settings
- In the pop-up that opens, from the drop-down adjacent to the Time range, select the All-time option. Next, make sure all other checkboxes are selected. Next, click on the Clear Data button at the bottom right.
 Image 4 – Select the appropriate options and click on the Clear Data button
5. Change the video quality
In some circumstances, changing the selected video quality may result in the “this video cannot be played in Chrome” error. For example, if your internet speed isn’t good enough for a high-definition (HD) movie or your hardware isn’t compatible, you won’t be able to play the video file. Thus, changing the video quality to a lower resolution is recommended.
This is how you can do it:
- Go to your web browser and play the video file causing the issue.
- Click on the gear icon in the bottom right corner of the video and select Quality.
- Change the video quality to a lower level, maybe 360p or 480p, and see if the problem is resolved.
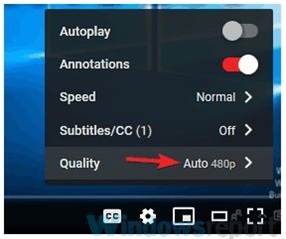 Image 5 – Change the video quality
 Often, users install web browser extensions to augment their web surfing experience. For instance, you might use extensions to check word count, internet speed, emoticons, etc. While most extensions work fine, sometimes, a couple of them may cause errors while trying to stream videos online.
You can resolve this by disabling all extensions in your web browser. Follow these steps:
- Click on the three dots icon in your Google Chrome web browser’s top-right corner. From the dropdown that appears, click on More tools -> Extensions.
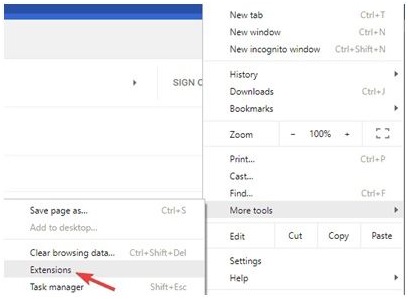 Image 6 – Navigate to More tools and then Extensions in your web browser
- In the tab that opens, you’ll see a list of all the extensions you’ve already installed. To disable an extension, toggle off the switch next to its name. Repeat the process to disable all the extensions.
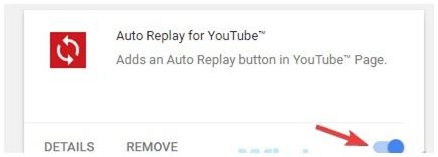 Image 7 – Remove unwanted extensions
- After deactivating all the extensions, restart your browser and check if the problem persists. To identify the problematic extension, try activating the extensions one at a time and look for issues. Once you’ve identified the faulty extension, replace it with an alternative one.
7. Reset your web browser to default settings
Your web browser’s settings or configuration may also affect the video’s visibility. Try resetting it to its default settings.
Note: Resetting it this way will delete all your previously installed extensions, bookmarks, history, and other data. You can use the sync feature to prevent these settings from being lost or you can take a backup.
To restore your browser’s default settings, follow these simple steps:
- Open Google Chrome’s settings by clicking on the three dots icon in the top-right corner. Then navigate to Settings -> Advanced.
- Locate and press the Reset button.
 Image 8 – Reset browser default settings
 The media player you are using should support the file types. If the default media player does not support the file format, your video files won’t play, and you will get an “Incompatible Video Codec Error‘.
9. Download the Video to Your Device
You can also try downloading a video copy to your computer and watching it using a media player.
What to do if none of these fixes work?
If you have tried everything mentioned above but still have not overcome the “this video cannot be played” error, it indicates an issue with the video itself. In such a case, you can switch to another source for watching the video or download it on your system and then try watching it.
If, after downloading it too, it doesn’t play, we recommend using a professional video repair tool, such as Stellar Repair for Video, to fix the errors within the file. Equipped with an intuitive interface and broad compatibility, this software can fix severely corrupted or damaged videos in just a few clicks. This is how you can repair a video using Stellar Repair for Video.
- Download the software from Stellar’s official website and install it.
- Launch the software. On the home screen, click the Add File button to add the video to be repaired. You may add multiple files here.
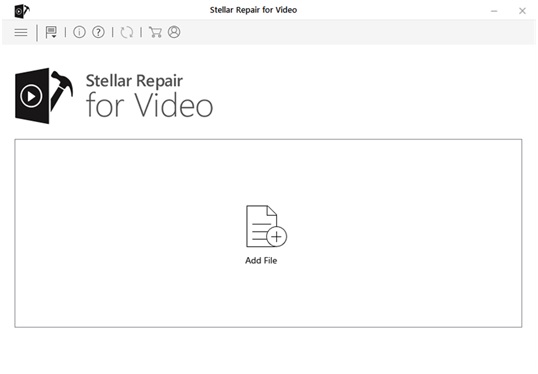 Image 9 – Add files to be repaired
- Once the video is added, the repair process will begin. It could take a few minutes, depending on the CPU power.
- After the repair process finishes, you will see a window listing all the repaired videos. Click on any video to preview it before saving it to the desired location.
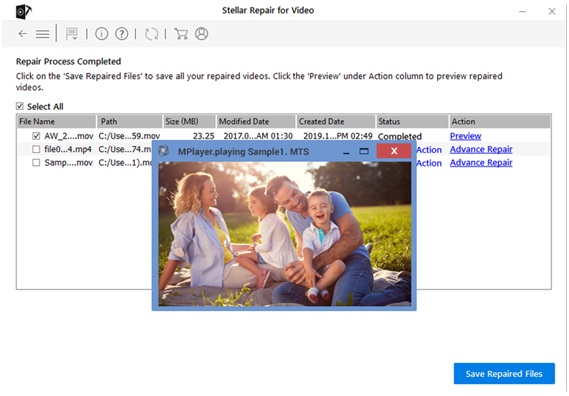 Image 10 – Save repaired files to the desired location
 Conclusion
The error “This video file cannot be played” may occur when watching geographically restricted content online or trying to access videos that haven’t been uploaded correctly. By implementing the methods outlined above, you can easily solve such errors.