Pixelation is an annoying problem often reported with low-resolution images. Due to inaccurate resizing or compression, the quality visibly deteriorates, making the picture unusable.
It’s worth knowing that photo editing software can fix pixelation in photos during post-processing.
This guide will discuss why photos become pixelated and how to fix pixelated images using Photoshop or any other photo editing software.
What is Pixelation?
Pixels are the building blocks of digital images. They usually blend seamlessly to provide a smooth and clear image, but when they don’t, each individual pixel becomes visible to the naked eye. That’s pixelation.
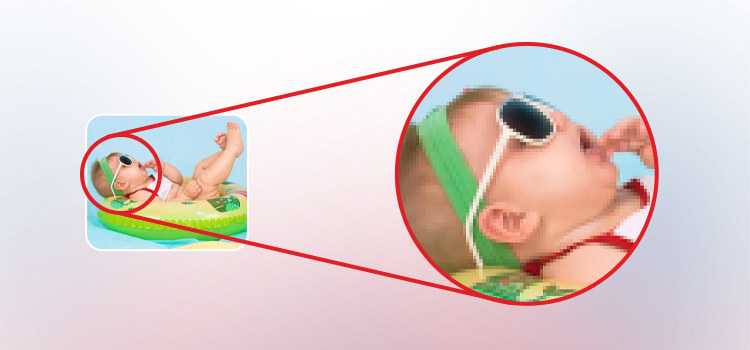
When an image is stretched out or scaled above its optimal resolution, each pixel becomes visible, making it appear blocky or blurry. A pixelated image lacks clarity and sharpness, making it look unclear, unprofessional, and unattractive.
Understanding Image Resolution: Why It Affects Pixelation?
Resolution determines the fine details of a photo and is measured as pixels per inch. Pixel dimensions are directly related to the resolution of your photo. The more pixels there are, the better the resolution.
That’s why a higher-resolution image doesn’t get pixelated or blurred. It produces better quality after publishing or printing. But if the image resolution is low, your photos will appear blurry, unclear, hazy, or pixelated when zooming or printing.
Why Do My Photos Become Pixelated?
Your photos may be pixelated for many reasons. They could be due to low-resolution images, improper file conversion, or inappropriate resizing.
Before you initiate fixing a pixelated image, consider these common problems that could be the reason for pixelation in photos.
Images are often compressed to reduce their size for faster downloading and storage. However, over-compressing an image can significantly lose details and visible artifacts, resulting in pixelated images, especially in formats like JPEG.
When low-resolution images (e.g., 72 DPI) are enlarged or viewed at a larger size, they appear pixelated.
Scaling up an image beyond its original dimension stretches its pixels, making it look pixelated or blocky.
Pixelation also occurs due to digital artifacts created during editing. These artifacts include blocky areas or irregularities that reduce the clarity of the image. Moreover, over-editing a photo in software can ruin the quality of the image, making it look pixelated.
Converting an image from a high-quality format like PNG to a lossy format like JPEG can result in a pixelated image due to the compression involved.
- Incorrect Camera Settings
Wrong camera settings, such as high ISO or low resolution while shooting, can result in pixelated or unclear photos.
Corruption in the image affects its data structure, including pixels, metadata, bit depth or resolution, etc., leading to missing or distorted information that can make the image look unclear or pixelated.
How to Fix Pixelated Pictures?
You can use Adobe Photoshop, Paint.Net, and other photo editing tools to fix pixelated photos during post-processing. Image editing enthusiasts, photographers, and graphic designers use these tools to edit digital photos. Let’s see some methods to fix pixelated images first:
Method 1: Fix low-resolution image pixelation in Photoshop
Adjusting the resolution and pixel settings of a low-resolution image in Photoshop is one of the best ways to fix blur and pixelation in low-quality pictures, especially when you want to print them in a large size.
Steps to reduce pixelation in low-resolution pictures:
- Open the pixelated image in Photoshop.
- In the top menu bar, go to the Image > Image size. Change the resolution in the Image Size box by 300 or more, as required.
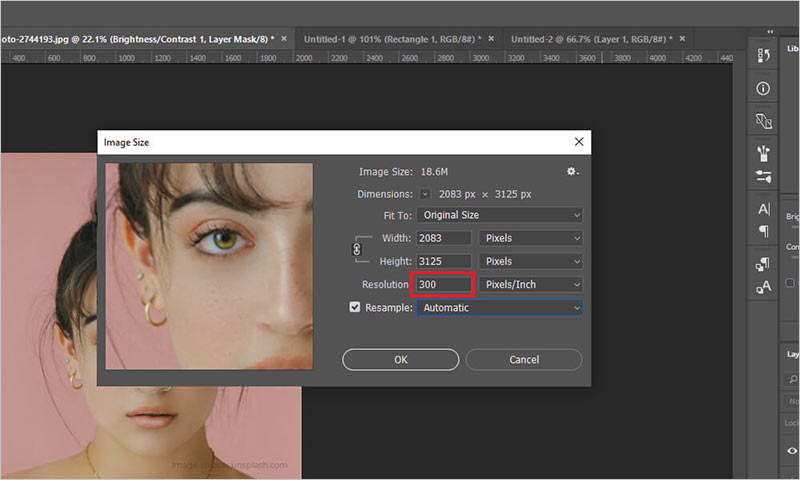
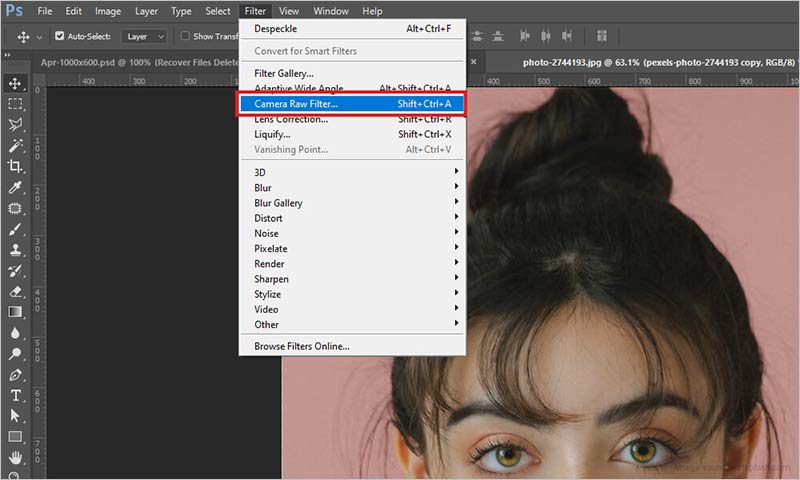
- Go to the Filter menu and select Camera Raw Filter from the drop-down.
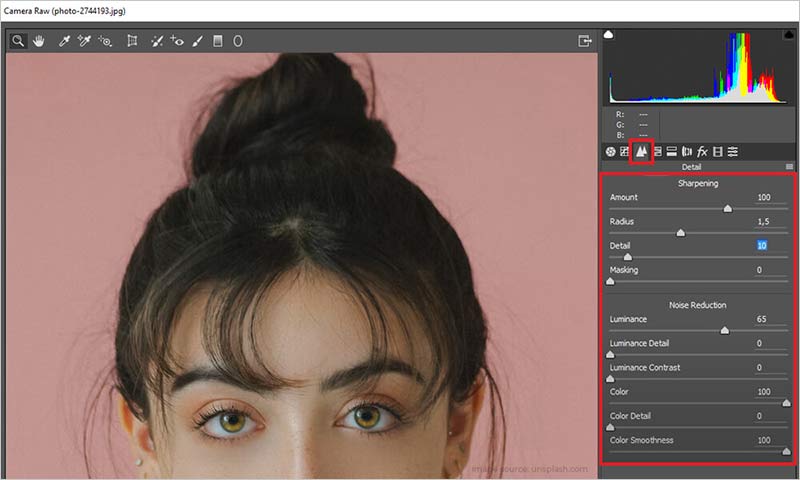
- Go to the Detail box in the Camera Raw window and adjust the ‘Sharpening’ and ‘Noise Reduction’ sliders until the pixelation clears.
- Again, from the top menu bar, go to Image > Adjustments > Hue/Saturation.
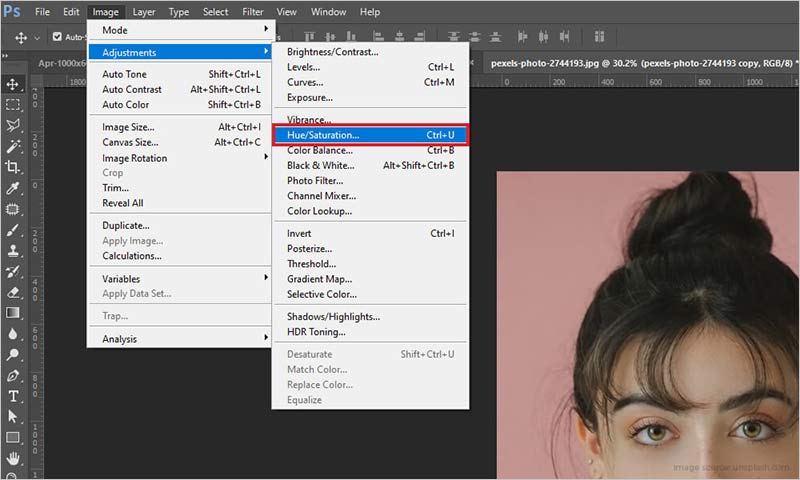
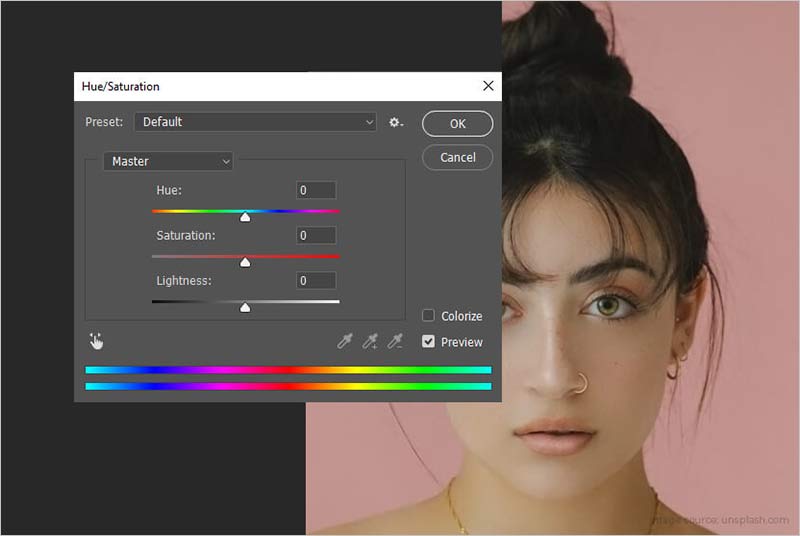
- In the Hue/Saturation box, adjust the color of your image as required.
- Click on File and select Save from the drop-down.
Method 2: Use Blur and Sharpen filters in Photoshop to fix pixelation
Adobe Photoshop provides different filters to sharpen and remove blur in images. You can try Gaussian Blur, followed by a Sharpen filter, to fix photo pixelation. Adjust the image pixel settings to an acceptable level and reduce pixelation or blur in your pictures.
Steps to remove pixelation in pictures using Photoshop’s Filter option:
- Open your pixelated photo in Photoshop.
- On the top bar, click Filter > Blur > Gaussian Blur.
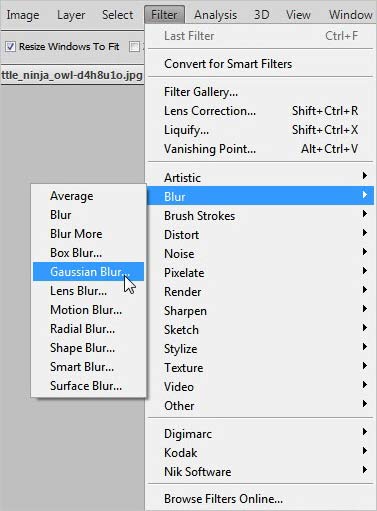
- In the Gaussian Blur window, adjust the slider to an acceptable level. Click OK.
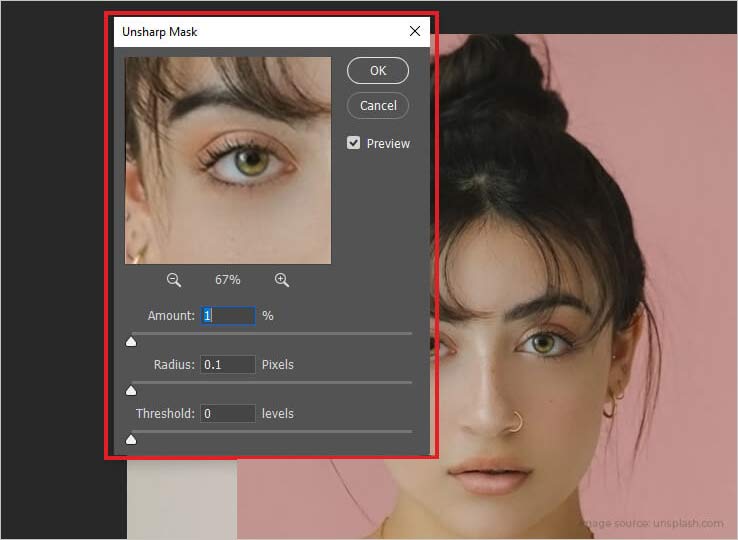
- Again, select Filter > Sharpen > Unsharp Mask.
- In the Unsharp Mask window, adjust the slider to an acceptable level. Click OK.
- Click on File and select Save from the drop-down.
You may want to read: Fix Photoshop error ‘problem parsing the jpeg data’
Method 3: Create a soft layer over the pixelated image using Photoshop
Another way to fix pixelated images is to mask the distortions by creating a soft layer over them. Photoshop offers blending options, which can reduce pixelation. You can also further reduce noise, set brightness and contrast to enhance colors, and minimize pixelation in your photos.
Steps to create soft layer to reduce pixelation using Photoshop:
- Open your pixelated photo in Photoshop.
- Right-click on the image layer and select the Duplicate layer.
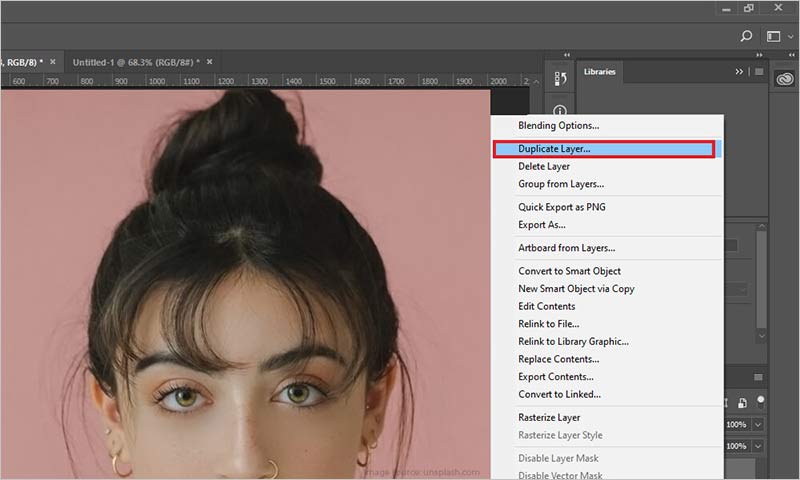
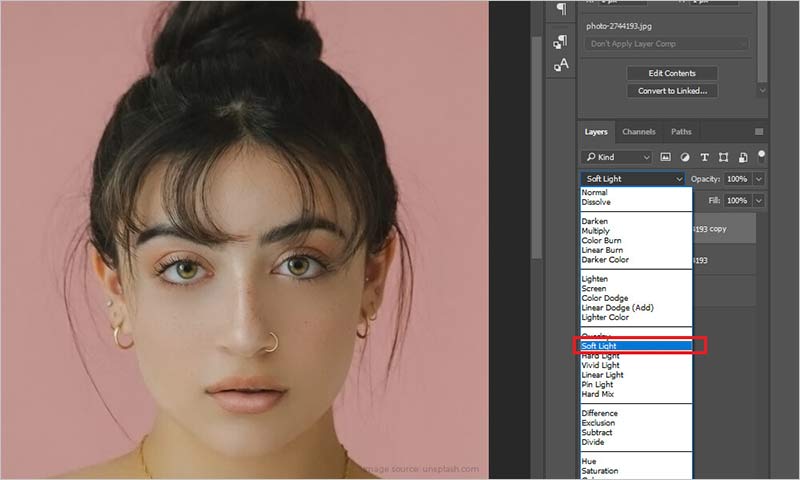
- Click Blending Options and select Soft Light from the drop-down.
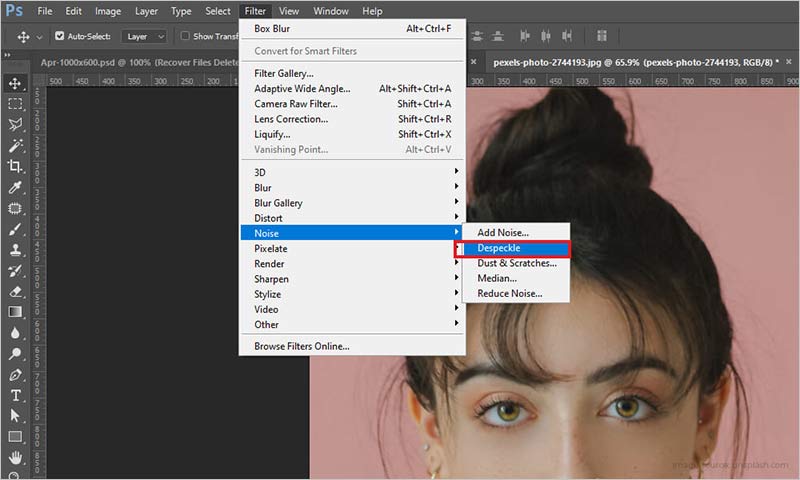
- On the top menu bar, click Filters > Noise > Despeckle. You may have to repeat the process until the pixelation clears. The filter covers the pixels around and smoothens the photo.
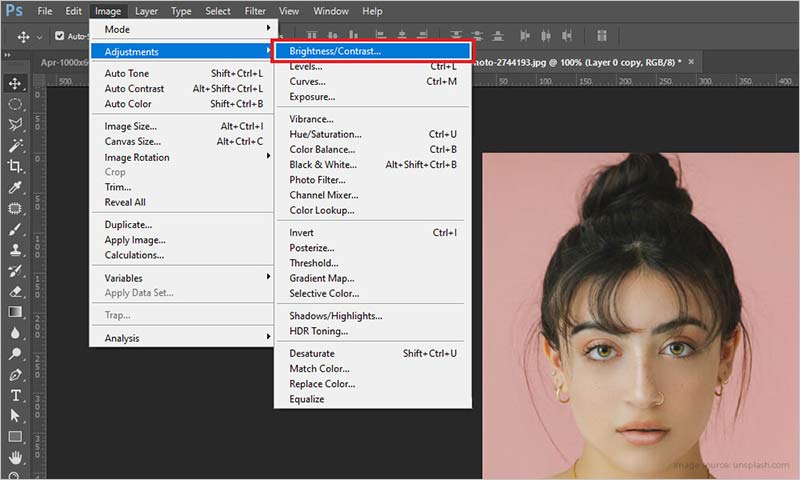
- In menu bar, click on Image. From the drop-down, select Adjustments. Select Brightness/Contrast. Adjust the same as per your requirement.
- Go to File on the top menu bar and Save your image.
Note: You can also directly access the Despeckle option from Filters to fix image pixelation without creating a duplicate new layer. This is a quicker way to fix image pixelation.
Method 4: Fix pixelated photos in Paint.NET on a PC
Paint.Net is a simpler alternative to Photoshop. It is a free photo editing tool for Windows. You can easily depixelate images in Paint.NET in a few steps. It’s straightforward and quite user-friendly.
Steps to unpixelate a photo in Paint.NET:
- Open your pixelated photo in Paint.NET.
- From the top menu bar, click and follow Effects > Blur > Gaussian Blur.
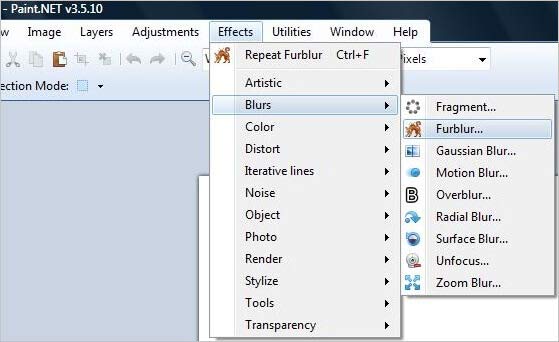
- Adjust the slider to reduce pixelation in the Gaussian Blur box, and click OK.
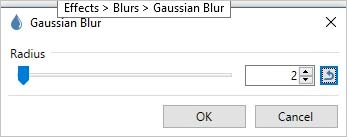
- Again select Effects > Photo > Sharpen.
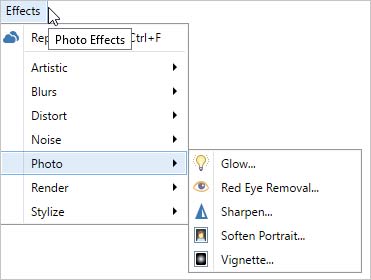
- In the Sharpen box, adjust the slider to a minimum pixelation level in the photo.
- Click OK and save the photo.
Method 5: Fix pixelated pictures online for free
Besides Adobe Photoshop and Paint.Net, several photo editing software can help you fix pixelated pictures. Some apps to try on are GIMP Photo Editor and Paintshop Pro. Affinity Photo, etc.
Moreover, you can also depixelate images online. Several free online tools can sharpen, reduce blurriness, and remove photo pixelation.
You do not need to download these online software programs. Simply open the program in your browser, add the pixelated photo, and follow the on-screen instructions to depixelate the image. Some good online programs for fixing pixelated photos are Pixenate, Pixlr, IMGonline, Lunapic, and Fotor.
Method 7: Fix Pixelated photos on Android and iPhone
All these methods shared above can improve image pixel quality on a computer, but how to fix pixelated photos on a phone?
Many free applications can sharpen pixelated photos on Android and iPhone. These are mostly photo editing apps with image-sharpening features. You can download any secure tool from the Google Play Store or Apple Store. Some apps to try on mobile phones are Adobe Photoshop Express, Resize-Photo, Pixlr, and Sharpen Image.
What should you do if the photos stored on your system appear pixelated?
If the photos stored on your Windows or Mac appear pixelated due to corruption in the storage drive or memory card, etc., caused by sudden interruptions during transfer, conversion can also cause pixelation.
In such cases, use an advanced photo repair software – Stellar Repair for Photo to fix such images. Download the software on your system and follow the 3-step process, i.e., Add File, Repair, and Preview & Save to fix pixelated images.


The software can batch repair multiple pixelated photos in different file formats, such as JPEG/ JPG, TIFF, HEIC, CR2, CR3, and others.
How to get a high-quality print from a low-resolution image?
Getting high-quality prints from low-resolution pictures can be tricky. But you can easily make a pixelated picture clear and sharp for printing. Adobe recommends changing print dimensions or resolution without changing pixel dimensions.
Steps – How to fox low resolution to take high-quality print:
- Open your image in Photoshop.
- In the menu bar, select Image > Image Size.
- Deselect Resample to lock the photo’s current ratio of width and height.
- Adjust Resolution by changing values.
- Adjust Document size by changing height and width values as required.
Photoshop will automatically change the resolution and document size to match.
Tips to Prevent Image Pixelation
1. Correct Image Capture Techniques
- Use the highest resolution setting on your digital camera to capture images with maximum detail.
- Keep the camera’s ISO setting low to reduce noise and grain. The ISO number determines the sensitivity of the camera’s sensor to light.
- Use a fast shutter speed to minimize motion blur while shooting moving objects.
- Shoot in a well-lit environment to avoid noise and grain.
- Use a higher resolution of 300 DPI to print images with optimal quality.
2. Correct Sharing and Storage Methods
- Use lossless formats like PNG or TIFF for high-quality images for editing or printing.
- For web images, use lossy formats like JPEG to reduce file size.
- Avoid excessive compression of image as it degrades image quality.
- Maintain regular backup of your image to an external hard drive or cloud.
- Use Cloud services to share your images so they don’t lose quality.
Wrapping Up
There is nothing better than a high-quality photo to avoid pixelation. However, if you face a problem, fix pixelated images using photo editing programs, like Photoshop and Paint.NET. Photoshop also helps to obtain high-quality prints from low-resolution pictures.
You can also sharpen pixelated photos using free online tools. Besides, you can try different photo editing apps on the Google Play Store and Apple Store to fix pixelation in photos on Android and iPhone.
Hopefully, this blog will help you fix pixelated pictures!
You may like to read:
How to Fix Photoshop Not Saving Back to Lightroom
How to Fix Damaged Photos in Photoshop
Is blurred the same as pixelated?
No, photos get blurry when your camera is out of focus, or the image is enlarged following certain upscaling algorithms. Pixelation occurs when low-resolution pictures are enlarged without following any basic algorithm.
How to increase photo resolution?
To increase the resolution of the image, you can use photo editing software like Photoshop or GIMP and adjust its DPI or image size.
Was this article helpful?