Summary: This article shows how to fix the error when your Mac has a circle with a line through it on boot in 3 steps. It explores the root of the problem and offers a way to protect your Mac data with Stellar Data Recovery software.

![Fix Your Mac Boot to a Circle with a Line Through it [A Complete Guide]](https://www.stellarinfo.com/public/frontEnd/images/product/free-download-mac-blue-button.png)
Imagine you booting your Mac as usual for the casual working day, and all of a sudden, you see a Prohibited Symbol on your screen. This error brings a little anxiety, at least. Exhale; you have a great chance to fix it.
Why does a “Zero with a Line Through it” Error Occur?
So what does a circle with a line through it mean? The most likely version for the prohibitory symbol on Mac is that it has found an operating system that is incompatible with your device. Basically, your startup disk includes a Mac operating system, but it’s not a macOS that your machine can operate.
A MacBook Pro “0 with a line through” error indicates that your current operating system can not access the essential files on the start-up disk. As a result, you won’t be able to boot your Mac fully, and you won’t have an entry on your device. So how can you resolve this issue?
Steps to Fix the Mac Booting to Prohibited Symbol Issue
We offer 3 effective resolving methods to fix the circle with slash issue. We’ve categorized these solutions from the easiest to the more difficult ones.
I. Repair the Disk with Disk Utility
One of the reasons for the prohibitory symbol on your Mac could lie in the boot error or system software update failure. If this is the case, you’ll be able to fix this quickly.
Follow these steps to Repair the Disk using Disk Utility:
- Hold the Power button for 10 seconds until your Mac turns off.
- Press the Power button again, and immediately after that, press and hold Command + R. You should see macOS Recovery Mode.
- From the Recovery Mode menu, look for Disk Utility and select your hard drive.

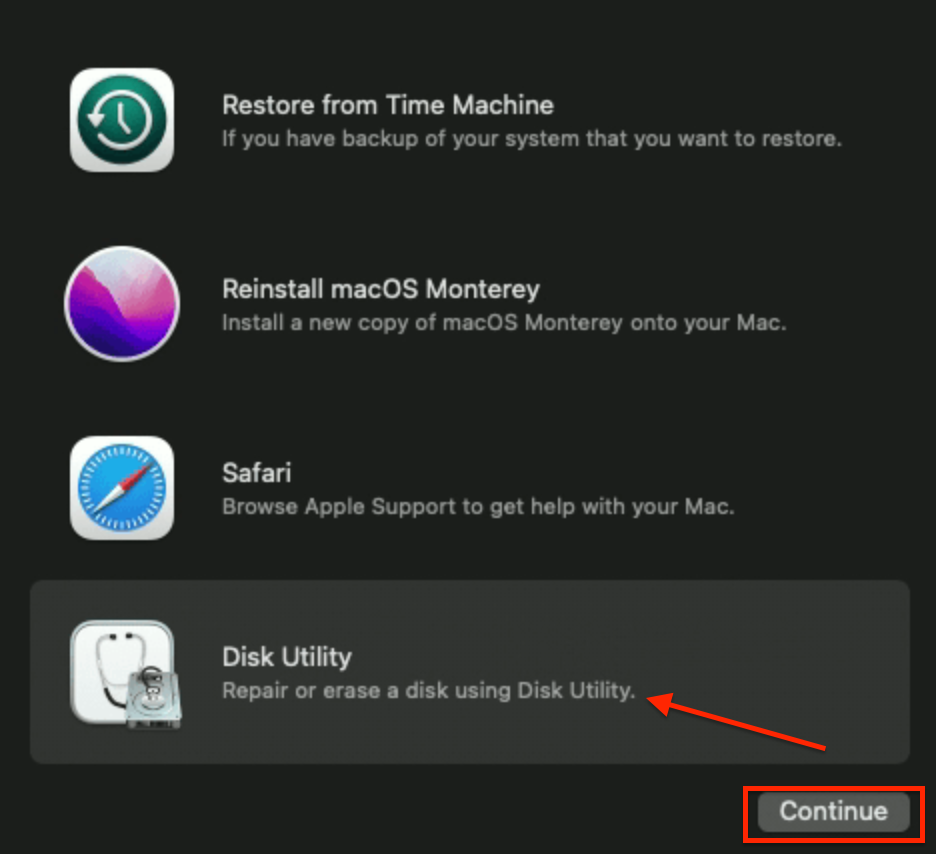


- Look for First Aid, then click Run.


- When finished, quit Disk Utility.
If the Disk Repair method hasn’t worked for you, the next step will be to boot your Mac into Recovery Mode.
II. Boot Mac into Recovery Mode
Follow the instructions below to boot your Mac into Recovery mode:
- Press and hold your Power button for 10 seconds until it shuts down.
- Press the Power button again, and immediately after that, press the Command+R combination.
- Release keys when you see the Apple logo. You should see the macOS Utilities, which means your Mac successfully booted into Recovery mode.


Pro Tip: As an option, you can use key combinations Option+ Command+R (or Shift+Option+Command+R) to boot your Mac into Recovery Mode.
III. Reinstall macOS
If previous methods have not been helpful, it means that the incompatibility of the macOS causes the problem. The reason for that could be the latest upgrade version failure. You can fix this problem by reinstalling a macOS that supports your Mac model.
Before proceeding with macOS reinstall, make sure that your data are safe. We recommend using specifically designed software to ensure your data are protected.
Stellar Data Recovery uses the best recovery tools with highly customized searches. After scanning the storage media, the Stellar software shows a detailed Preview of all recoverable data. This way, you’ll clearly see all the files you can restore from your device before choosing and saving them.
Follow these steps to download, install, and run the app:
- Open the Stellar Data Recovery software and select what files you want to restore.

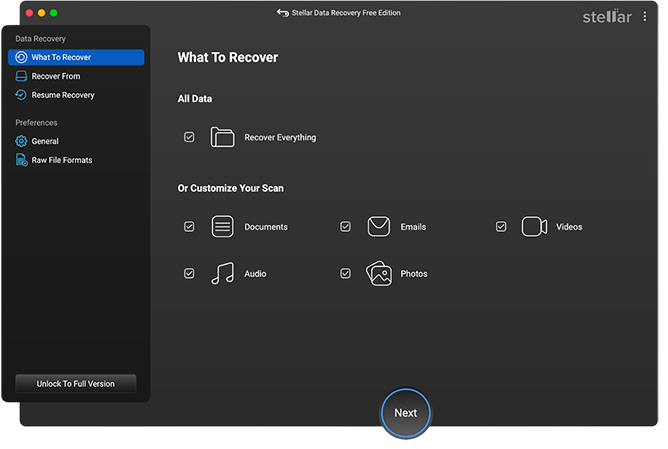
- If you want to recover specific data, you can use a customized scan. Just turn off the Recover Everything toggle, and choose the files you want to bring back. Then click Next below.
- Select the drive from which you want to restore your data, and click on the Scan option.

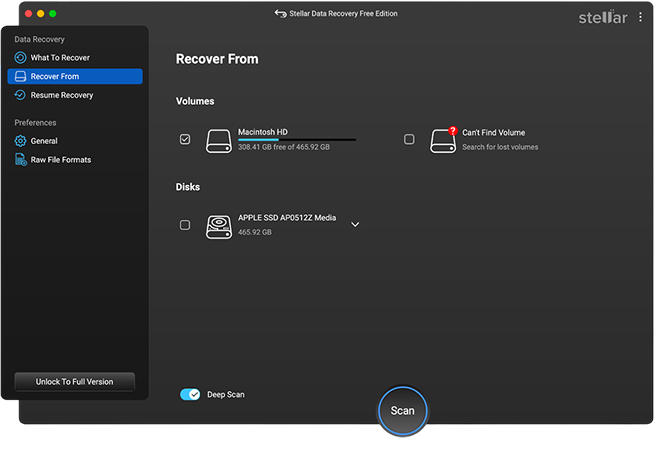
- The scan process starts automatically. You can easily monitor it.
- After the recovery process is finished, the apps will list all restored data on the left.
- You can see specific files/pictures/videos on the right by double-clicking on them. Just put the checkmark on the files you want to bring back, and click on the Recover button.
- Provide the destination to save the data. You can select another drive or an external storage device.
When you finish with the files backup, you can proceed with macOS reinstall.
Follow these steps to Reinstall macOS:
- Press the Power button and hold it for 10 seconds until the Mac turns off.
- Press the Power button again, then press and hold the Power button (for Apple Silicon) or Command+R (for Intel Mac). You should see the macOS Recovery Mode.
- From the Recovery Mode menu, select Reinstall macOS and follow the steps on the screen.
In case you repaired the disk, tried the Recovery Mode, and reinstalled macOS, and the issue remains, you may need to contact the official Apple Support Team.
Wrapping Up
To sum up, we considered three ways of fixing the MacBook circle with a line issue. Fixing this problem can be challenging; nevertheless, we are sure you’ll cope! You can repair the disk with Disk Utility, try booting your Mac in Recovery Mode, or reinstall the macOS. Remember to back up your files before proceeding with any changes.
Related reading:

