Filmora has gained popularity among video creators and videographers because of its user-friendly interface, extensive features, and affordability. Moreover, exporting video from Filmora to popular platforms like YouTube, Vimeo, and smartphones via the built-in presets is a cakewalk. These presets automatically set the required export setting for the chosen platform, saving you from manually adjusting those settings.
Filmora even lets you preview your video in the Filmora Preview Window before exporting to ensure smooth playback.
“I had a great day capturing sheer beauty of the Sierra Nevada Mountains range, in California with my GoPro camera. Later, I imported the video into Filmora software for editing and invested six hours to make a perfect film. But to my disappointment, while exporting, I found a lag in the video.
Can someone tell why this lag occurred? How to fix this lag in Filmora?”
What Causes Filmora Videos to Lag?
The above scenario is only one of many scenarios where users witnessed a Filmora video lagging issue after export. But what leads to it?
There can be several reasons, such as processing large video files, your system lacks free space, or incorrect output settings. Often, outdated device drivers, lack of computer memory, background processes, or video corruption can be the reason why your Filmora videos lag.
How to Fix Video Lag Issue After Filmora Export?
There are several ways to fix video lag after exporting from Filmora. In this blog, we’ll walk you through the methods to resolve the issue of ‘Filmora X lagging while editing or exporting’ and to ensure your videos are playing smoothly.
1. Activate the GPU Acceleration
GPU Acceleration reduces the time required to render high-resolution footage, such as 2K and 4K videos. Moreover, enabling Filmora’s hardware acceleration mode can reduce video lagging issues to a minimum. Here’s how to enable GPU Acceleration in Filmora:
- Create a new project in Filmora and go to File > Preferences.
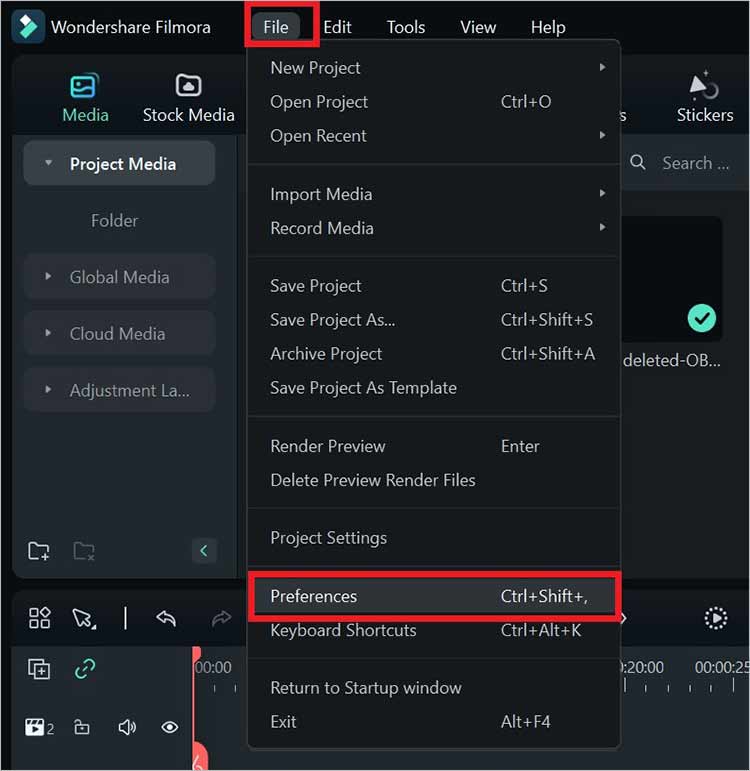
- Navigate to the Performance tab and then tick the checkbox next to the ‘Enable Hardware Acceleration for video rendering and playback’ and ‘Enable Hardware Acceleration for video decoding’ settings.
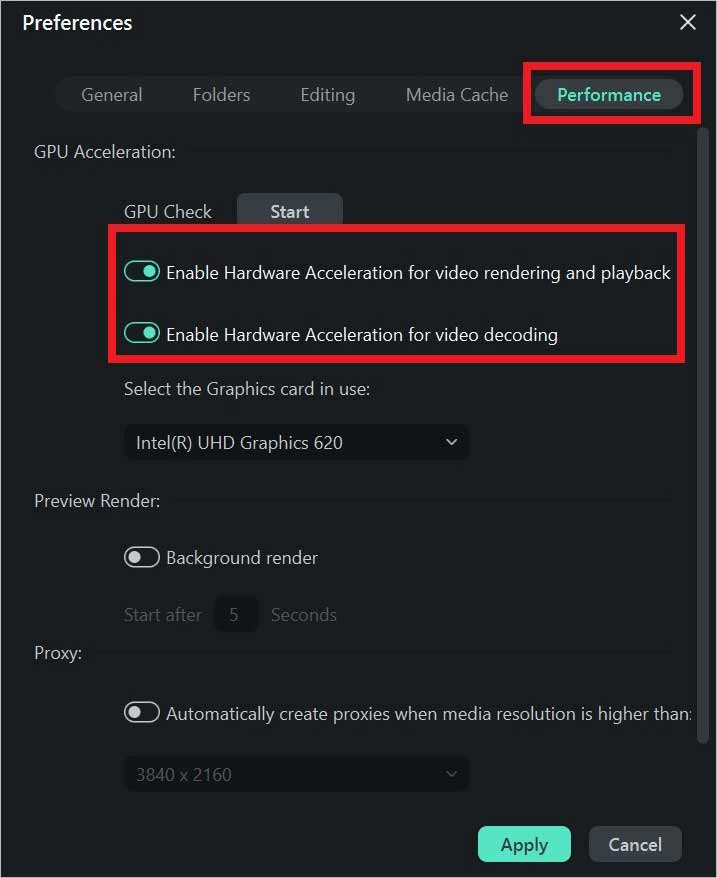
- Click Apply for Filmora to complete the process of GPU Acceleration.
2. Create Render Previews
Adding visual effects and transition to a video might be responsible for lagging during the playback. However, using Filmora’s Render Preview option to create previews of frames in a video can resolve lagging issues and ensure smooth playback and exporting. You have the option to automatically or manually create the Preview Render.
To Render Preview manually:
- Click the Render Preview icon on the right side of the toolbar in Filmora.
- Or you can click File and click on the Render Preview option.
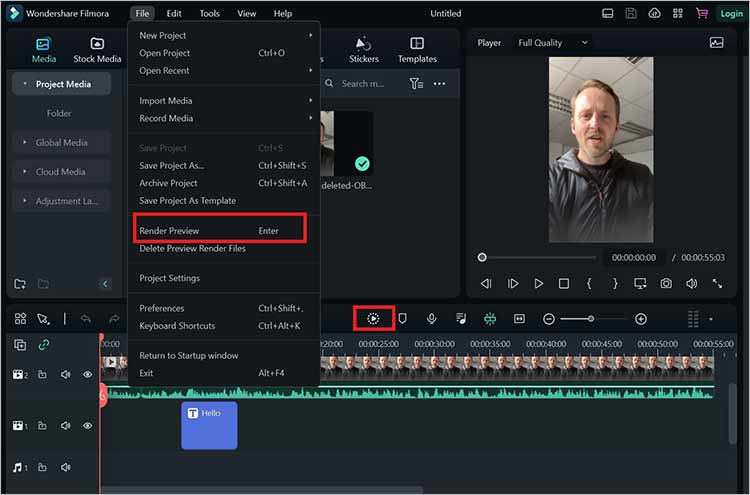
By default, Filmora creates the render preview automatically after five seconds when no other action is performed in the video. You can change the time after which Preview Render is created and the location where it is stored. Here’s how to do it:
- In the new project in Filmora, go to File > Preferences > Performance.
- Toggle on the Background Render option and select the time after which you want the automatic Preview Render to be created.
- Click Apply.
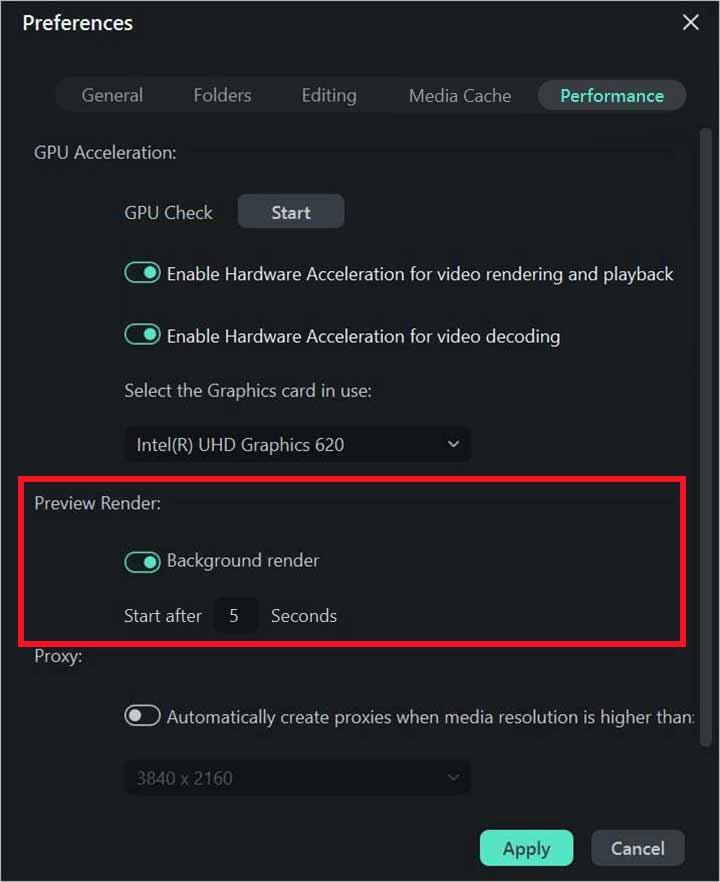
Moreover, after every 5 seconds, the Preview Render is created, it will fill up the default space in your system, which can lead to lagging or stuttering of the video. This is why you need to Delete Preview Render Files occasionally. Let’s check how to do it:
- In a new project in Filmora, go to File > Delete Preview Render Files.
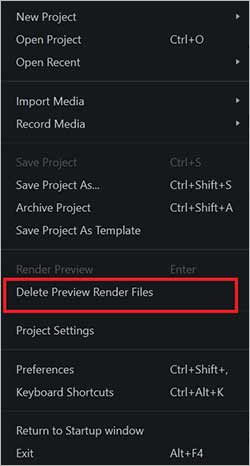
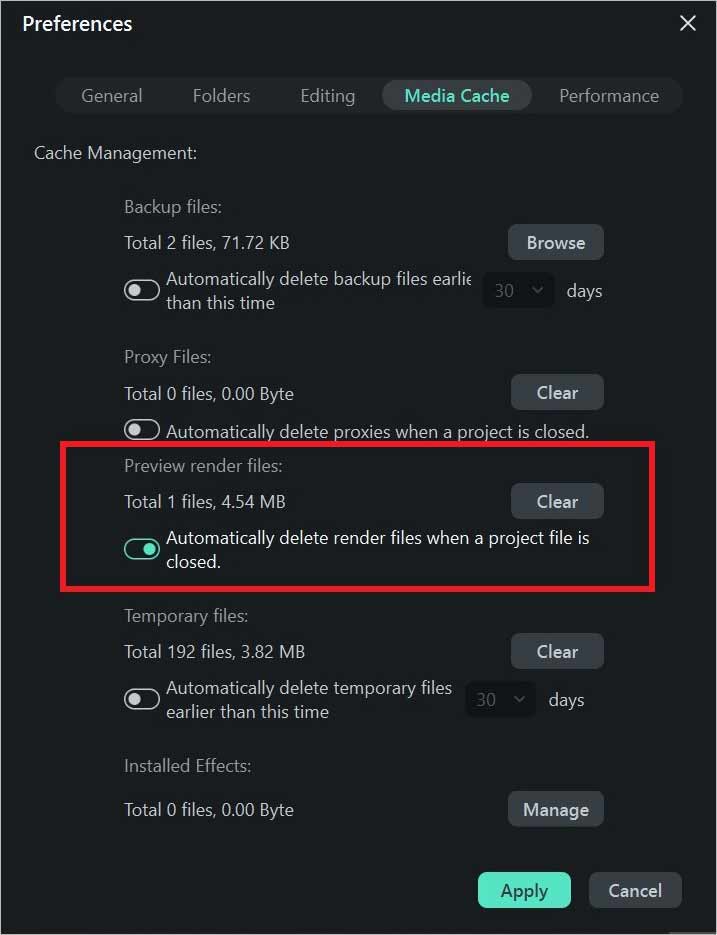
You can even delete the Preview Render Files automatically; go to File > Preferences > Media Cache. Next, turn on the toggle next to ‘Automatically delete render files when a project file is closed.’
3. Generate Proxy Files
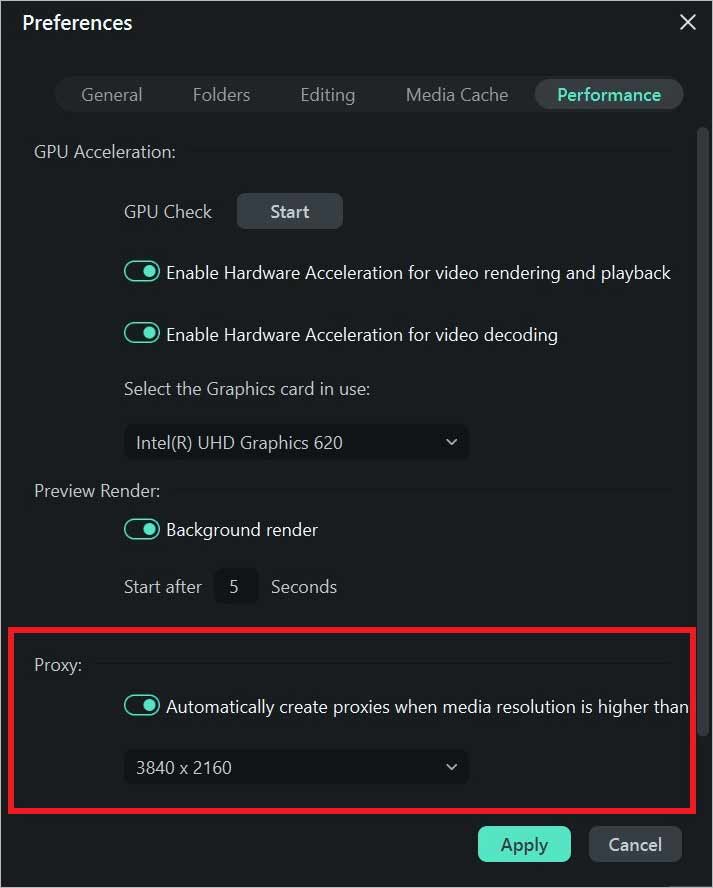
Creating proxy files in Filmora can keep lagging to a minimum while working on high-resolution video files. This feature allows you to create lower-resolution proxy files of your video for editing, subsequently speeding up the export process. Once you’ve finished editing your video, Filmora will automatically export your video in original high-resolution quality. Here’s how to enable Proxy files:
- In the new project in Filmora, go to File > Preferences > Performance.
- Turn on the toggle next to the ‘Automatically create proxies when the media resolution’ option and click Apply.
4. Check System Requirements
Before diving into troubleshooting methods, ensure your computer meets the minimum system requirements to run Filmora-exported high-quality videos, such as 4K or 8K.
5. Install the Latest Version of Filmora
Software updates may often include fixes for bugs or any performance improvements. Update the latest version of Filmora on your PC, as it might resolve any video lag issues caused due to known bugs in earlier versions.
6. Update Graphics Drivers
Outdated graphics card drivers often lead to Filmora video stuttering between clips or lagging issues. Visit the official website of your GPU manufacturer, such as NVIDIA, AMD, or others, to download the latest version of graphics drivers.
7. Check the Video Quality of the Source File
Sometimes, video lag issues during the export process in Filmora occur when you’ve imported low-quality videos or videos with a different frame rate. If so, import high-quality source videos with the same frame rate as your Filmora project.
8. Close Unnecessary Programs
If you encounter a video lag issue, it can be due to multiple programs running in the background. Close any unnecessary programs running on your system while exporting videos from Filmora to free up system resources.
What to do if nothing works?
If all the above methods fail to fix the Filmora video lagging issue, your video file may be corrupted. Video files can get corrupted due to incorrect editing, forced conversion to another format, file header corruption or incomplete transfer, etc. Moreover, if you upload a corrupt video file in Filmora or your edited file can get corrupted while exporting due to viruses or malware, you can also see a lag in videos. In such a scenario, use professional video repair software, such as Stellar Repair for Video to fix corrupted videos of any file format like MP3, MOV, FLV, etc.
Stellar Repair for Video can repair corrupt, broken, or unplayable videos. It can even fix stuttering, flickering, video lagging, or other video problems. This video repair tool can resolve corruption in the header, video frames, video slider, etc.
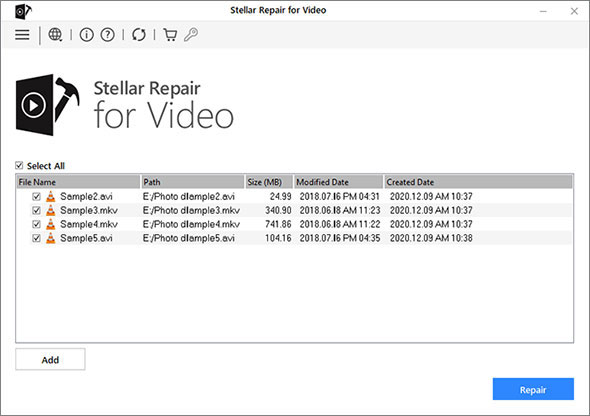
- Download, install, and launch Stellar Repair for Video.
- Click Add File and browse to add corrupt videos.
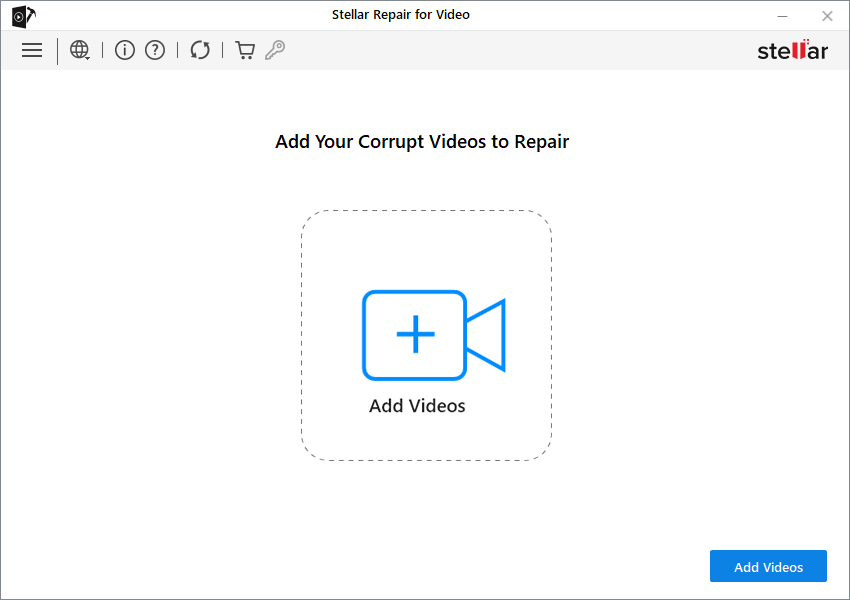
- Click Repair to start the repairing process.
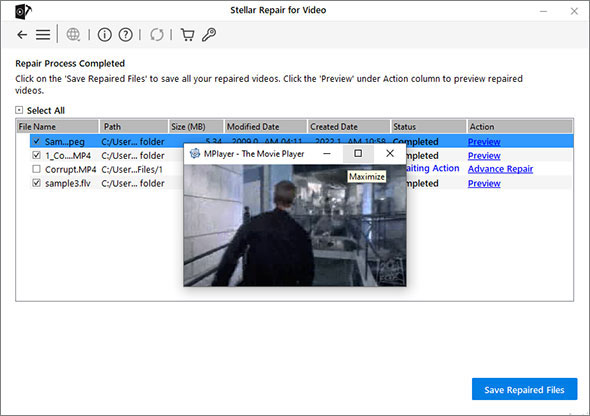
- Once the video is repaired, click Save Repaired File to save the videos at any desired location. You can even Preview the repaired videos before saving them.
Conclusion
It can be quite annoying when your Filmora video lags after exporting. But the best thing about Filmora is that it can fix glitches on its own. You can enable GPU acceleration, create a render preview, or generate proxy files to fix the Filmora video lagging issue after export.
However, if you install the latest version of Filmora and the graphic driver for your system, close unnecessary applications, and check the video quality of the source file to fix a lag issue in Filmora videos.
Moreover, if nothing works, there are chances of video corruption. You can use Stellar Repair for Video to fix corruption issues in Filmora videos.
Can Filmora run on 4GB RAM?
The minimum RAM requirement for Filmora 12 is 4GB, but it is recommended to have at least 8GB of RAM for a smooth video editing experience.
How to import YouTube videos to Filmora?
To import videos to Filmora, you need to follow these steps:
- In Filmora, go to File > Import Media.
- Next, choose to upload your video using one of the options: Import Media Files, Import a Media Folder, Import from a Camera or a Phone, or Import with Auto Beat Sync.
Was this article helpful?