Exchange users at times face problems or errors when sending and receiving emails. Recently, some users have reported facing issue when sending emails from on-premises Exchange Server to Exchange Online (Microsoft 365) and vice-versa in a hybrid environment. When they try to send an email, a non-delivery report (NDR) is received with the error code – 550 5.1.10 RESOLVER.ADR.RecipientNotFound, Let’s take a look at one of the users’ query:

There could be various reasons for this error code. In this post, we will look into the causes of this error and discuss the ways to fix the issue.
Reasons for the Error 550 5.1.10 RESOLVER.ADR.RecipientNotFound
The error message indicates that the recipient is not found. This might happen due to the following reasons:
- The email address of the recipient doesn’t exist or is incorrect.
- The user was created on the Microsoft 365 and there is no reference for the user on the on-premises Exchange Server.
- The on-premises Exchange Server still contains the old records (GAL is not updated). This means that the mailbox’s SMTP address is also not updated.
Methods to Fix the Error 550 5.1.10 in Exchange Server
Below, we will discuss the solutions that you can use to resolve the error 550 5.1.10 in Exchange Server.
Method 1: Verify Recipient’s Email Address and Resend the Message
It may be possible that you have entered the recipient’s email address incorrectly. So, check the recipient’s email address and make sure that the email address is correct and has no spaces or special characters. Then, try to resend the email using the steps given below:
- Open the bounced email and click on the Send Again button under the Report tab.

Note: If your original message had an attachment larger than 10 MB, the Send Again option might not be available or might not work. Instead, resend the message from your Sent Items folder.
- In the email’s new copy, select the recipient’s email address in the To box and then press the Delete key.
- In the To box, type the entire recipient email address. Ensure to spell the email address correctly.

Method 2: Check for Broken Forwarding Rules or Settings
Another thing to do is to check if any rules are configured for the mailbox. If there are any, disable them. For this,
- Open the Exchange Admin Center (EAC).
- Click on mail flow.

- Untick all rules entries under rules section in the left pane.

- Try to send the message again.
You should also confirm that the accepted domain or the main domain configured is set to Authoritative. For this, click on accepted domains under mail flow and confirm accordingly.
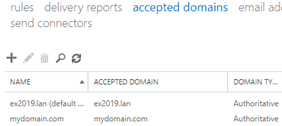
You must also check that the domain is not set as Internal Relay or External Relay.

Method 3: Check the Event Log
If the problem persists, you can check the log of events on the server. It may happen that a cumulative update is installed that has corrupted the configuration of the server, a third-party application or update is installed, antivirus rules or firewall rules are changed, etc. The event logs can help you to find the issue.
Method 4: Check the MX Records of External Domain
There could be issues with the DNS hosting that would prevent emails to be delivered. You can check the MX records of external domain of your Exchange Server. A way to test is to log into the DNS hosting account and verify that the MX record is truly pointing to the Exchange Server. Usually, there would be an A Record with the name – mail.mydomain.com pointing to the external IP address of the Exchange Server and the MX record with the lowest priority pointing to the A record.
Method 5: Create a Remote Mailbox and Synchronize the Directory
You can create a remote mailbox on the on-premises Exchange Server and synchronize the directory. Follow these steps:
Step 1: Create an on-premises object for the cloud mailbox
- Open the Exchange Management Shell and run the New-RemoteMailbox cmdlet.
- Once the object is created, ensure that it has the same name, user principal name (UPN), and alias as the cloud mailbox.
Step 2: Set the ExchangeGuid property on the new on-premises object
- Use remote PowerShell to connect to the ExchangeOnline.
- Retrieve the value of ExchangeGuid of the cloud mailbox by running the Get-Mailbox <MailboxName>| FL ExchangeGuid cmdlet.
- Open the Exchange Management Shell on the on-premises Exchange Server.
- Now, update the on-premises object with the retrieved ExchangeGuid by using the Set-RemoteMailbox <MailboxName> -ExchangeGuid <GUID> cmdlet.
Step 3: Verify Synchronization
- Wait for directory synchronization to complete.
- Make sure that the Microsoft 365 user object is displayed as Synced with Active Directory.
To Conclude
You may face the Error 550 5.1.10 RESOLVER.ADR.RecipientNotFound while trying to send emails from Microsoft 365 to Exchange Server or vice-versa in a hybrid setup. To resolve this error, you can follow the methods mentioned in this post.
However, if you want to perform a smooth migration of mailboxes from an on-premises Exchange Server to Microsoft 365, you can use Stellar Migrator for Exchange. This software allows you to migrate mailboxes, public folders, archives, and other items from an on-premises Exchange Server to Microsoft 365. It simplifies the complex and time-consuming process of mailbox migration, ensuring zero data loss and minimal downtime. The software also supports migration between different versions of Exchange Server and from one Microsoft 365 (Office 365) account to another.
Was this article helpful?