Disk Management, a Windows built-in utility, allows you to create, shrink, extend, or delete the hard drive partition. You can also use this utility to format the drive, initialize it, or check the drive status (Offline/Online).
However, while trying to access this utility, you may sometimes receive the ‘Disk Management Could Not Start Virtual Disk Service’ error. The error prevents you from accessing Disk Management and performing subsequent operations. You may receive this error in other variations, such as,
‘Unable to connect the Virtual Disk Service’
‘Virtual Disk service will not start’
‘Windows Disk management not starting’
The error usually pops up while working in a remote connection environment but is not restricted to it. The error may also occur in the local environment and connection when initializing a new hard drive.
Alternatively, if you try to run the DiskPart utility to format, list, or create a drive partition, you may receive the error- ‘DiskPart encountered an error starting the COM services.’ Additionally, while running DiskPart as administrator, the error differs, stating ‘Virtual Disk Management could not start the Virtual Disk Service (VDS) on ...’
The primary reasons behind the ‘Disk Management Could Not Start Virtual Disk Service’ error are disabled VDS Service, corrupted system files and Windows images, and blocked access from security programs on the system. Fortunately, the error is fixable.
Read on to learn how to fix Disk Management Could Not Start Virtual Disk Service error.
How to Fix Virtual Disk Service Error?
Try the following methods to solve the Disk Management Could Not Start Virtual Disk Service error.
#1 Set Virtual Disk Service (VDS) to Manual or Automatic Mode
You must first check and ensure whether your Virtual Disk Service is running. If it’s disabled, you need to enable and run it. Setting VDS to Manual mode has solved the issue for many users. However, for some, it was the Automatic mode. You can check the VDS Startup type before proceeding and set VDS to Manual or Automatic mode following the given steps:
- Press Windows + R to open the Run dialog box, type services.msc, and hit Enter.

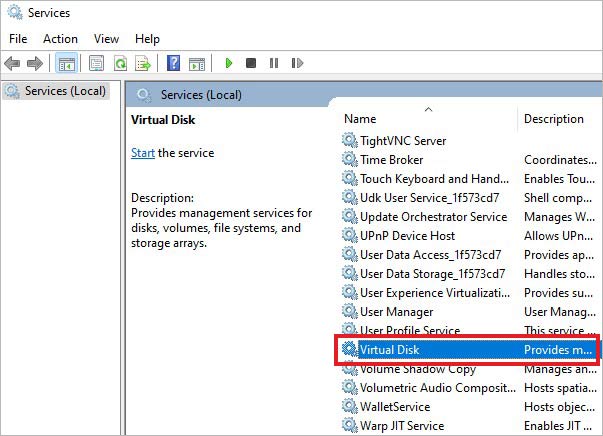
- On the Services window, locate Virtual Disk.
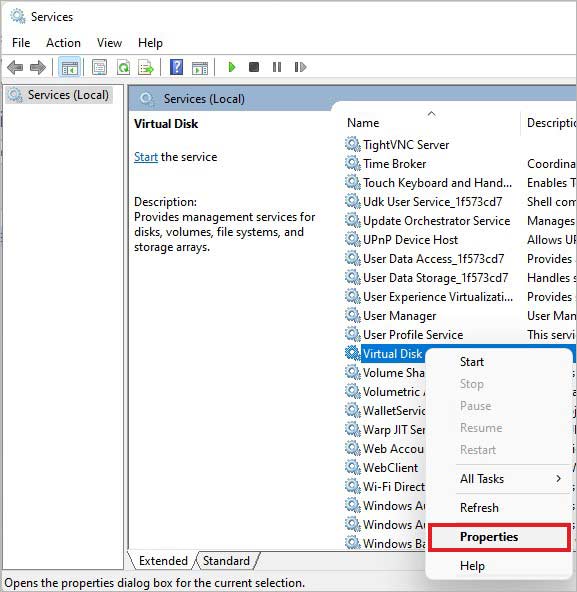
- Next, right-click on Virtual Disk and select Properties.
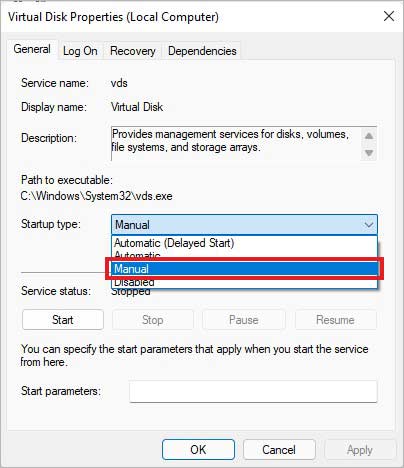
- On the following prompt, set the Startup type to Manual. (You can switch to Automatic mode if you receive this error while VDS is in Manual mode.)
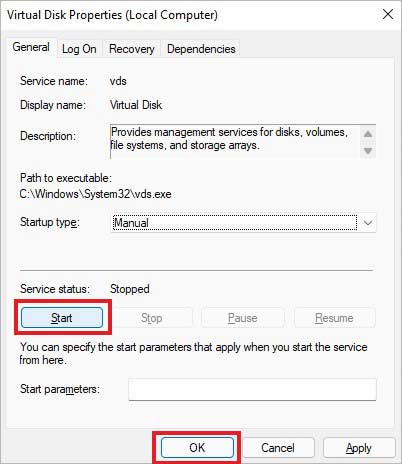
- Click Start under Service status and click OK.
- Finally, close the window and see if it solves the Virtual Disk Service Error.
#2 Run System File Checker
System files are crucial for the operating system to function correctly. Damaged or corrupted system files may also cause the ‘Disk Management Virtual Disk Service’ error. You can check the integrity of the system files using the System File Checker (SFC) tool. The tool scans & replaces corrupt & damaged system files with the correct ones. You can read this guide to learn how to run System File Checker (SFC) on Windows.
| Caution: Corrupted system files can sometimes be responsible for system crashes or malfunctioning, eventually risking the device and its data. Ensure that you have a backup of your data to prevent any possible data loss. If there is no backup, keep a Windows data recovery software ready to retrieve files quickly. |
#3 Run DISM Command
If SFC doesn’t fix the problem, you can try running the DISM command, which repairs and prepares the corrupted or damaged Windows images, including those used for Windows RE, PE, and Setup. It can also service a Virtual Hard Disk (.vhd or .vhdx).
- Run Command Prompt as administrator, type the following command, and hit Enter.
DISM /Online /Cleanup-Image /RestoreHealth
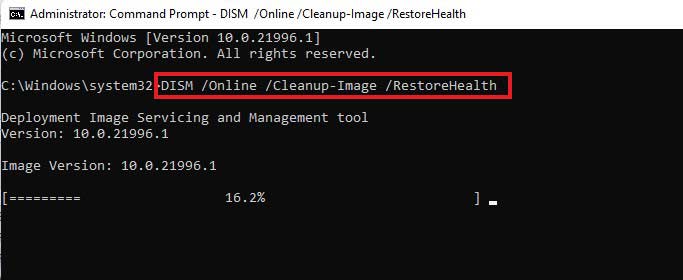
Let the process complete and see if it fixes the error.
#4 Allow Remote Volume Management through Windows Defender Firewall
Sometimes, Windows Defender can block remote access to the Disk Management and Virtual Disk, which may result in a Disk Management Could Not Start Virtual Disk Service error. You must ensure that your security program allows volume access and management on local and remote systems. You can enable remote volume management by following the given steps:
- Open Settings by pressing Windows + I and then go to Update & Security > Windows Security > Firewall & network protection.
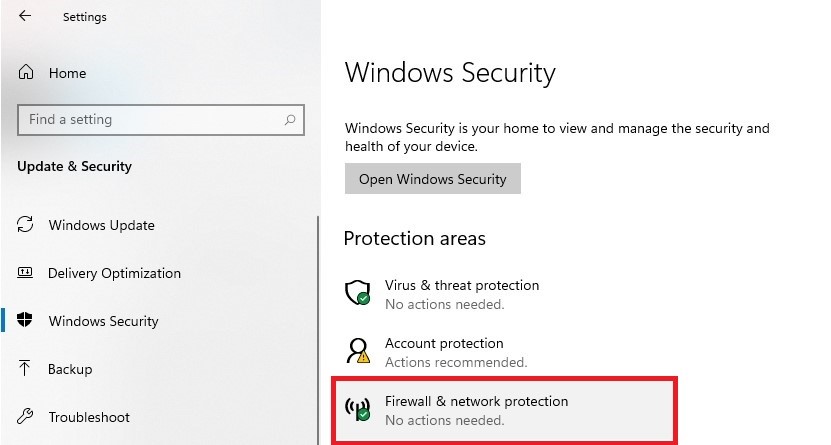
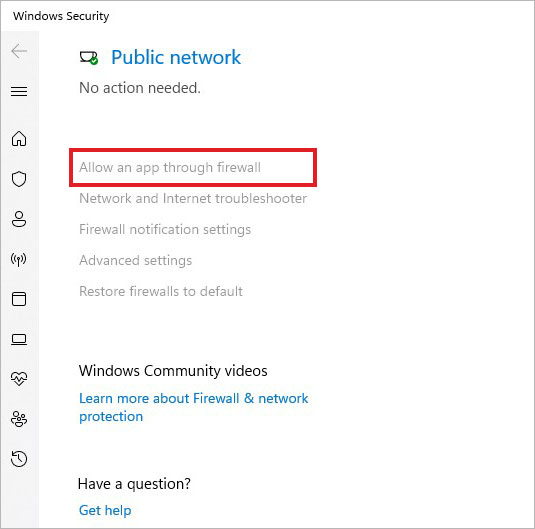
- Next, click ‘Allow an app through firewall.’
After this, you’ll reach the Control Panel. You’ll see Allowed apps there. Click Change settings and edit the access to VDS.
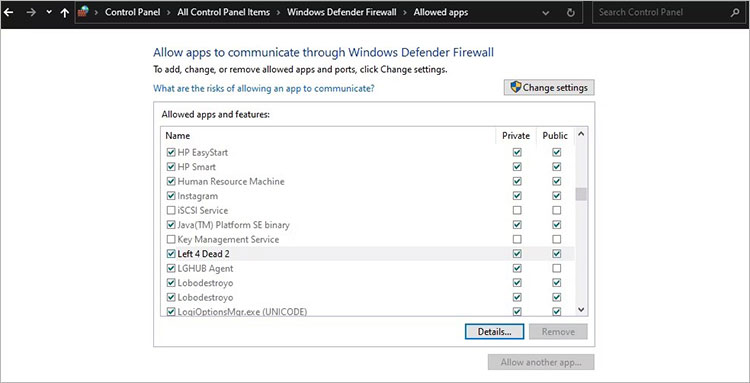
Remember: Make changes only on a Private network, not the Public network, as it can make your system vulnerable to many threats and lead to data leak and other threats.
Once done, close the window and see if it fixed the error.
Fix the Disk Management Could Not Start Virtual Disk Service Error for Good!
The methods discussed in this blog may help you sort the Disk Management Virtual Disk Service Error and allow you to manage your drives through Disk Management. Apart from the discussed solutions, you can also check if any third-party security programs running on your system are blocking your access to the VDS services and DISK Management. Try the solutions and let us know in the comment section below which method helped you!
People Also Ask:
How do I fix disk management stuck on connecting to the VDS?
You can fix the disk management stuck on connecting to VDS error by following the solutions discussed in this blog, including:
- Temporarily turn off the third-party antivirus tools
- Manually enable the Virtual Disk Service
- Run DISM and SFC Scans
Should I initialize disk MBR or GPT?
Choosing between MBR or GPT depends on the size of your hard drive. If you have a hard drive of 2 TB or smaller size, go with MBR when you initialize for the first time. If you want to use a hard drive but not boot from it, and the size of the drive is larger than 2TB, proceed with GPT (GUID).
Why is my disk failing?
Your hard drive may fall for any reason, including human errors, firmware corruption, hardware failure, media damage, and heat or water damage.
Was this article helpful?