Storage drives, especially hard drives, are prone to errors. Over time, with continuous usage, they start showing signs of degradation and failure. This usually happens due to USN journal corruption, bad sectors, hardware failure, or age.
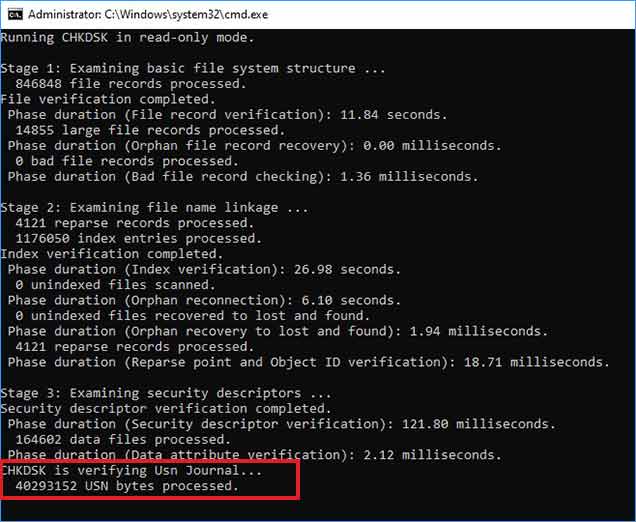
To fix such errors, we use the CHKDSK command. But in some extreme cases where drive failure is imminent, running CHKDSK takes longer and the process even gets stuck when the CHKDSK is verifying USN journal step.

Let’s read further and learn why the CHKDSK command gets stuck at verifying USN journal step and what can be done to fix it.
What is a USN Journal?
As the name suggests, a USN Journal is like a log book that every volume of a drive has. It creates and maintains logs of each and every change done to a volume. The USN Journal stands for – Update Sequence Number Journal or simply Change Journal.
It is a baked-in feature of the Windows NT file system, primarily used by file history to maintain data backup without any repetition of files. A USN journal comes in handy as it easily helps file history to determine the changed files, avoid repetition, and only include changed or new files.
Why is CHKDSK Stuck at USN Journal Verification Step?
CHKDSK command has five stages that it works through to fix a storage drive and resolve errors. USN journal verification comes at stage 3, which verifies the health of files, their integrity, and marks a bad sector that it comes across.

CHKDSK stuck at CHKDSK is verifying USN journal stage indicates read errors on a hard drive that can lead to an increase in bad sectors and data losses. This can also happen due to other reasons like –
- HDD failure
- Corrupt USN journal
- Corrupt system files
- Buggy Window update
Methods to Fix a Computer Stuck at CHKDSK is Verifying USN Journal Step
Notes –
- As CHKDSK repairs bad sectors, broken file systems, and corrupted MFTs, there are chances of data loss after using the CHKDSK command. Hence, you should take a backup of your data before using the CHKDSK command.
- If you observe that CHKDSK is stuck at the verifying USN journal step and is taking a lot of time, instead of canceling it, let it run overnight. You might wake up to an error-free computer.
- While using the CHKDSK command, if you notice problems or the process stuck at the verifying USN journal step, it could be due to bad sectors or a failing hard drive. In such situations, to prevent unwanted data loss, take a complete backup of your files immediately and then proceed with the methods mentioned below.
Method 1: Reboot your PC
If you observe that CHKDSK is stuck at the verifying USN journal step, try rebooting your PC. Doing this allows the computer to refresh its memory and squash any minor bugs causing problems. Once your computer restarts, check again to see if the problem persists.
Method 2: Run the CHKDSK Command in Safe Mode
If you think an application could be interfering with the system files causing CHKDSK to get stuck at verifying USN Journal step, try running CHKDSK in safe mode. Doing this will help you resolve conflicts and fix the CHKDSK command stuck at verifying USN journal step.
Follow the steps mentioned below to boot your computer in safe mode –
- Shut down your computer and turn it on. Press the power button to shut it down again when you see the Windows logo on your screen. Do this until you see the Automatic Repair screen.
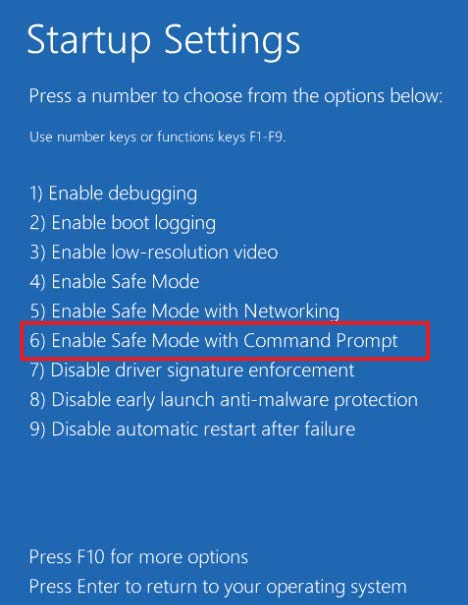
- Once there, click on Advanced options > Troubleshoot > Advanced options > Startup Settings > Restart.
- It will restart the computer and bring up the Startup Setting screen. Press F5 or F6 to boot into safe mode.

- Once your computer boots in Safe mode, launch CMD as administrator and rerun the CHKDSK command.
This should help you fix CHKDSK stuck at CHKDSK is verifying USN journal stage. It will also help you resolve any logical errors with your storage device.
Method 3: Disable CHKDSK at Reboot
If your computer crashes or unexpectedly shuts down while updating Windows, there are chances of errors. To fix such errors, Windows performs the CHKDSK operation during a reboot. However, if there is a fault with the HDD, CHKDSK can get stuck at the verifying USN journal stage.
This can make the data inaccessible. To avoid automatic execution of the CHKDSK command during boot, you can use the CHKNTFS command to disable the CHKDSK command during boot. To do this –
- Launch Command Prompt as an administrator.
- Type the following command – chkntfs /x C: and press Enter.

The CHKNTFS command will disable the automatic disk-checking sequence.
Method 4: Re-create the USN Journal
If the USN Journal is corrupted or damaged, then this could be the reason behind your PC stuck at CHKDSK is verifying USN journal step. You can fix this issue by recreating the USN journal and performing CHKDSK again.
Note – This method requires you to delete the old USN journal. As a USN journal is a vital component, you should only delete it if CHKDSK is unable to get past verifying it.
Follow the steps below to recreate the USN journal –
- Press WINDOWS + R and type CMD.
- Press CTRL + SHIFT + ENTER to launch it as administrator.
- Type the following command – drive: fsutil Usn deletejournal /d c: Press Enter.

- Now, execute the following command – drive: fsutil Usn createjournal m=1000 a=100 c:
- Close everything and Restart your computer to check if this has fixed the CHKDSK stuck at verifying USN journal.
Method 5: Check for Bad Sectors
If the CHKDSK is taking too long to get past the CHKDSK is verifying USN Journal step, you should stop using the storage device right away. Don’t perform any read/write operations on it. Rather use a drive health monitor tool like CrystalDiskInfo, which is a freeware, to get all the details like S.M.A.R.T. status, number of reallocated sectors, and more.
This software is a great way to learn about the health of your storage drive. In a worst-case scenario where the drive has too many reallocated sectors, you can replace your old drive with a new and healthy one.
Notes –
- If the CrystalDiskInfo results contain a non-zero value in the Reallocated Sectors, replace the storage drive as soon as you can. However, before doing that, use a powerful Windows data recovery software like Stellar Data Recovery to retrieve all your data from it.
- Once your data is back, it is up to you to discard the failing storage drive or keep it. But whatever your choice is, make sure to securely erase data from it.
Check your Disks with Ease
CHKDSK or Check disk getting stuck anywhere during its process points to an alarming situation related to the storage drive’s health. Such scenarios, though rare, can help you avoid possible data loss scenarios. Nevertheless, if you observe CHKDSK stuck at CHKDSK is verifying USN journal step, don’t neglect it and use the methods explained above to resolve the issue at hand.
A closing tip from our end: always maintain data backups, as they are lifesavers and can help you in tough situations like these.
Related Reads
How to scan and fix broken hard drives using CHKDSK?
Was this article helpful?