I was only watching some video games on my system. My system suddenly became utterly unstable. I tried to reboot my system to overcome this issue. Instead of working fine, my system throws a blue screen, mentioning amdkmdag sys in the complete error message. Can anybody tell me how do I fix it?
If you’re stuck with a blue screen that appears with amdkmdag sys code, fret not. The error can be fixed with proven workarounds shared in this blog. However, before proceeding further, let’s understand what this error means, its possible causes, and its fixes!
What is AMDKMDAG SYS Error?
It is a Blue Screen of Death (BSoD) category error primarily caused by a corrupted, outdated or incompatible AMD graphic driver. However, sometimes damaged or missing system files, buggy gaming applications, or faulty hardware may also be responsible for this issue.
Due to this error, your system may experience issues like system freezing, screen flickering, boot-loop, frequent crashes, etc. The error could show up with different messages, such as:
Note: The Video_TDR_Failure error message additionally falls into AMD’s TDR (Timeout Detection and Recovery) errors that may occur due to problematic graphic card drivers, registry issues, and unstable overclocking or overheating. When does an AMDKMDAG SYS BSoD Error occur?
The error may occur under different circumstances like playing video games, watching YouTube videos, launching third-party applications, or during a simple system startup.
Irrespective of the situation and reason, the error can cause multiple issues for your system, putting its data at stake. Therefore, ensure that you have a backup of your important data on the computer. If no backup is available, keep professional data recovery software handy to recover data from a BSoD-affected Windows PC or laptop.
Further, follow the troubleshooting methods discussed below to fix the AMDKMDAG SYS Blue screen error!
How to Fix AMDKMDAG Sys Error?
Before you proceed with the following methods, try if you can boot your PC in Safe Mode and then try out shared methods in order!
#1 Run System File Checker
The amdkmdag.sys is an AMD driver-related system file that, if goes missing, becomes damaged, or corrupted, and cause this blue screen error. Try running the System File Checker (SFC) tool in that case. SFC is a Windows built-in utility that replaces the damaged versions of system files with the correct ones. You can follow the given steps to run this tool.
- Open Command Prompt from Search and run it as administrator.

- First, run DISM /Online /Cleanup-Image /RestoreHealth command and press Enter.
- Once the process is complete, run the sfc/scannow command and hit Enter.
- Wait for a while and let the scan end.
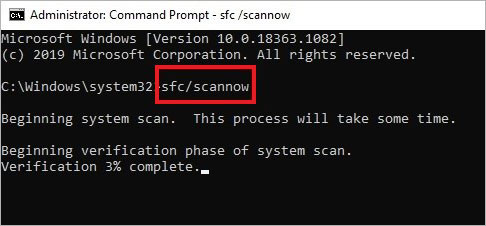
- Once done, the utility will show the results on your screen.
- See if there are any other instructions to follow.
- If all’s done, type exit and close the CMD window.
- Reboot your system to see if the Amdkmdag sys BSoD is solved.
#2 Rollback Driver
A few versions of AMD Radeon™ Adrenalin driver versions are causing this blue screen issue, such as 23.2. 1, 23.2.2, and 23.4.1 versions.
Many users fixed the problem by rolling back to earlier installed AMD driver versions, such as 20.5.1, 22.11.2, 22.5.1, 20.4.2 or similar versions. You can also try rolling back the driver to the previous version with the following steps:
- Open Device Manager from Start Menu and expand the Display adapters category.
- Right-click on the AMD Radeon driver and click Properties.
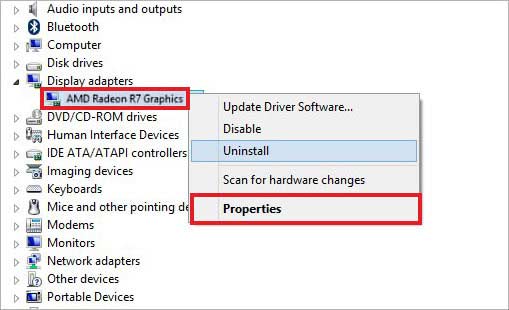
- Now, click the Roll back driver option in the Driver tab.
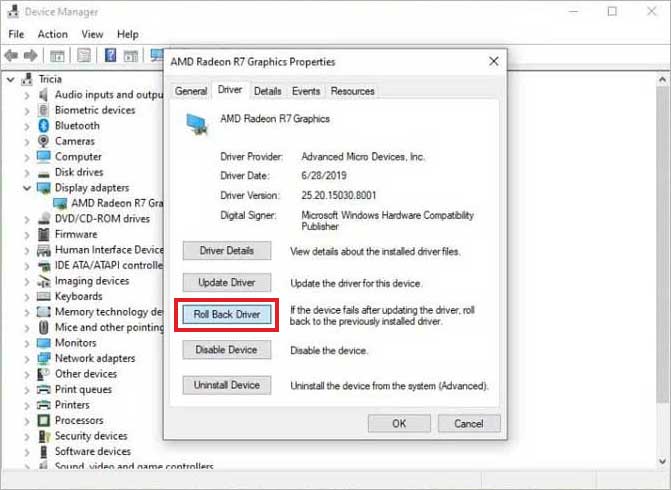
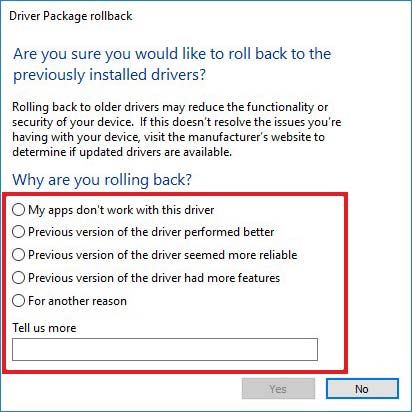
- Provide a reason to roll back your driver and proceed.
- Once done, close the window, reboot the system, and see if the amdkmdag sys blue screen error is fixed.
#3 Use DDU to Uninstall Problematic Drivers
If rolling back the AMD driver version doesn’t help you resolve the problem, cleanly remove it using Display Driver Uninstaller (DDU). This tool is preferred over Windows native driver uninstaller since this free driver removal tool can permanently delete AMD and NVIDIA graphic card drivers and packages with registry keys, folders, files, driver traces, and more.
- Now, boot your PC in Safe Mode. Once your system is in Safe Mode, launch DDU.
- Select the type of device and brand of your GPU.
- Finally, click the Clean and restart option in the top-left corner.
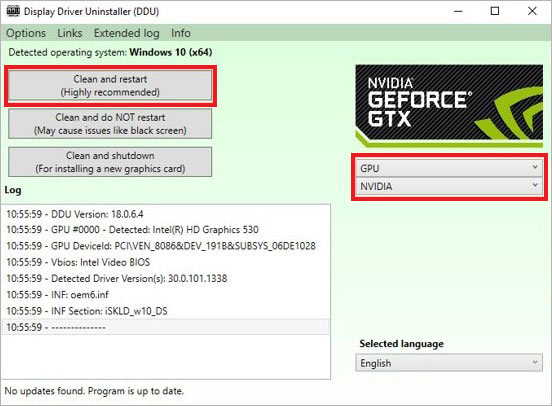
- Your problematic GPU driver will be uninstalled. On uninstallation, restart your system.
Freshly install the GPU driver after checking the compatibility from the official website of the driver’s manufacturer.
For your reference:
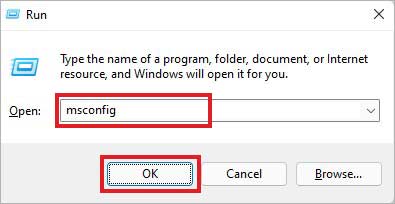
Clean boot starts Windows with only a few required drivers, programs, applications, and services. It helps you narrow down the cause behind the error so that you can troubleshoot accordingly.
- Press Windows + R, type msconfig in the Run dialog box, and click OK.
- Go to the Services tab, select Hide all Microsoft Services, and then click Disable all > Apply.
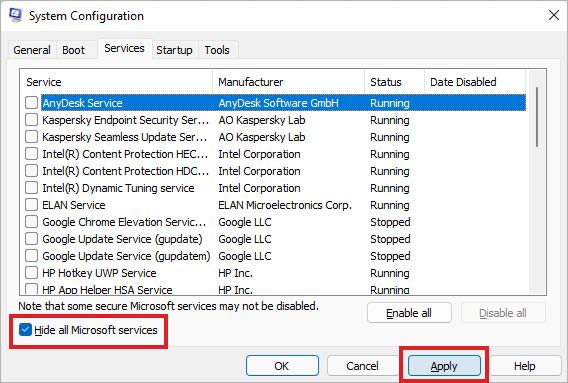
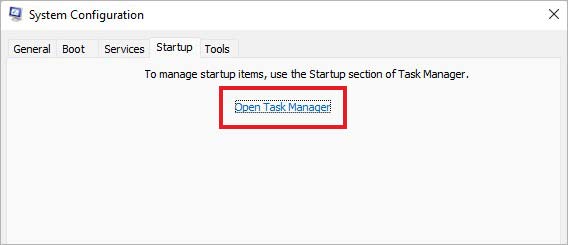
- Now, go to the Startup tab and click Open Task Manager.
- Select the program you recently installed and started experiencing this error and click Disable.
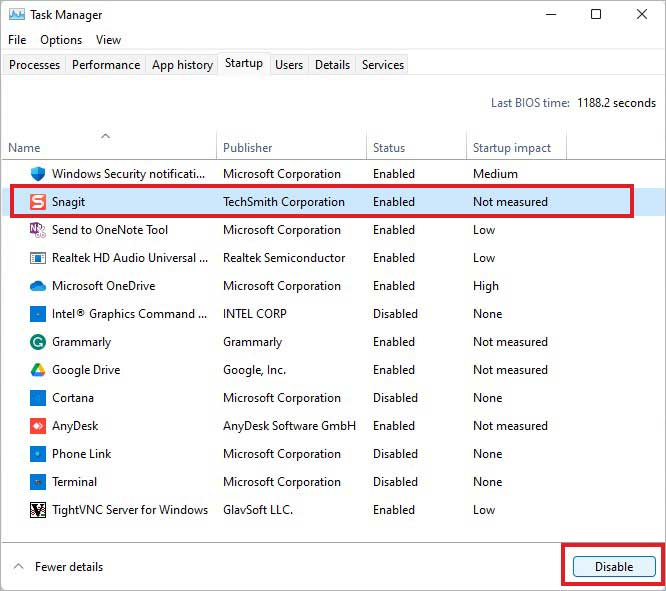
- Once done, you can close the window and reboot your system to see if the amdkmdag sys blue screen is solved.
#5 Remove Problematic Application/Program
If turning off the problematic application or program doesn’t fix the problem, uninstall it through Settings or Control Panel in Safe Mode. Follow the given steps:
Remove the Application through Settings
- Press Windows + I to open Settings.
- Go to Apps > Apps & features.
- Select the problematic application and click Uninstall > Uninstall.
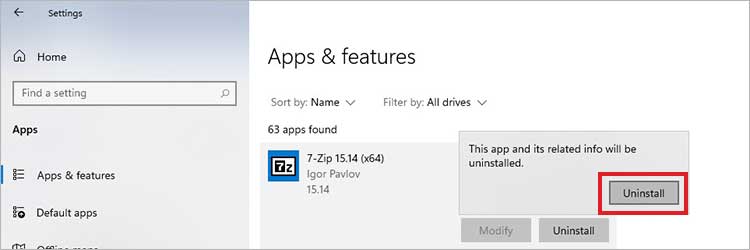
- Click Yes, if prompted, and proceed with the uninstallation process.
Remove Application from Control Panel
- Press Windows + S to open Search, type control panel, and click Open.
- Now, locate the Program and Features.
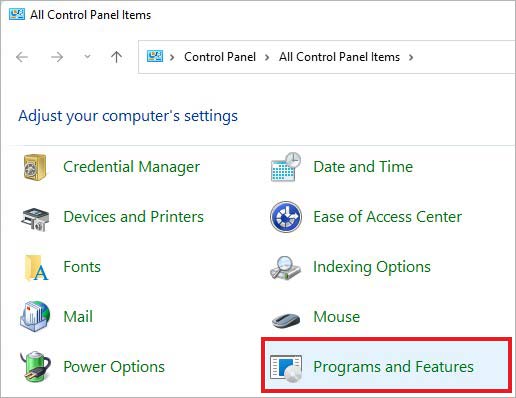
- Select the application and then click Uninstall.
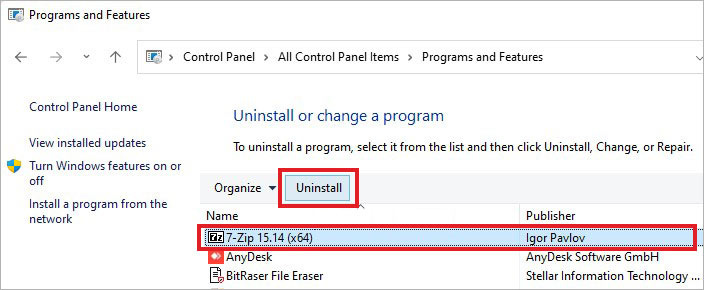
- Follow further instructions (if any) to complete the process.
- Once done, restart the system and see if the amdkmdag sys BSoD is solved.
#6 Check for Faulty Hardware
System hardware, such as CPU, hard drive, graphic card, etc., could get damaged or faulty over time. Additionally, if you made some hardware changes to your system recently without checking their compatibility, they may cause issues like the amdkmdag.sys blue screen errors and lead your system to malfunction or crash. You can check for faulty hardware with the following steps:
Check for issues with your CPU: See if the processor is installed correctly per the manufacturer’s instructions. You can test the CPU by connecting it to different systems to ensure it functions well.
Look for Graphics card errors: Ensure that the Power Supply Unit (PSU) cables are connected to the Graphic card and meet their requirements. Reseat the graphic card into the PCIe slot to see if things work out.
Test RAM: Use Windows memory diagnostic tool to test your RAM in Windows for issues (if any). Alternatively, you can use MemTest86 to test your system RAM.
Run CHKDSK Command: Your hard drive may be faulty and throwing the BSoD error. To confirm the same, run Command Prompt as administrator, run chkdsk /f /r D: command, and hit Enter.
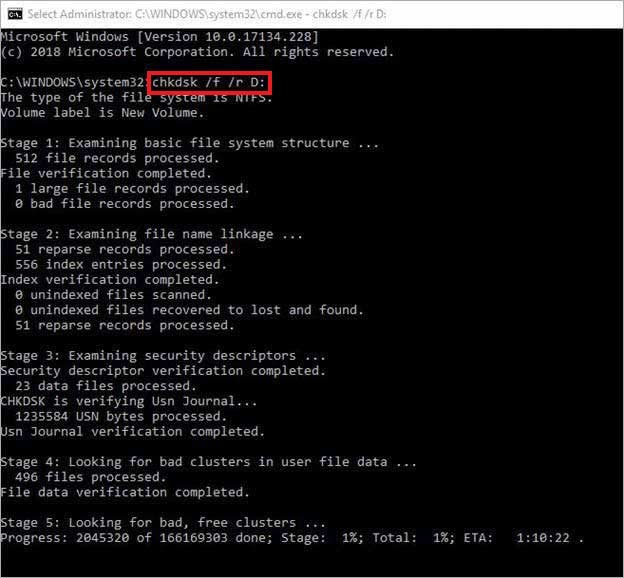 Caution: CHKDSK command with f and r attribute finds and repairs the hard drive issues. However, it marks the drive’s bad sectors and prevents Windows from storing data from those sectors, eventually causing data loss. Hence, backing up your data is always recommended. However, if no or incomplete backup is available and you’ve lost data after running the CHKDSK command, worry not! You can still recover lost data using professional data recovery software.
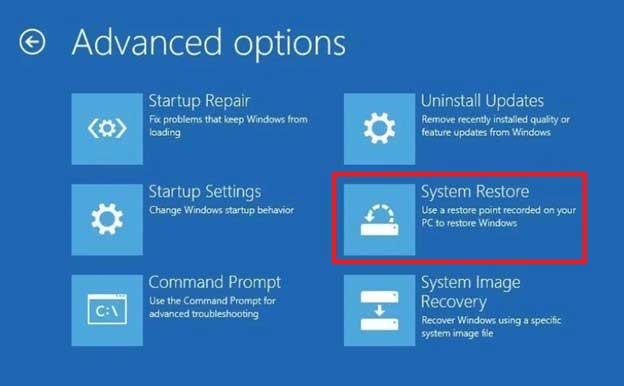
If, after all, you’re not able to fix this BSoD error, perform System Restore in Windows Recovery Environment with the following steps:
- Turn off your system with the Power button (if it’s turned on).
- Reboot it. When you see the Windows or your device brand logo on your system, turn it off again.
- Repeat these steps thrice and enter Windows RE (Recovery Environment).
- There, click Advanced options > Troubleshoot.

- On the following prompt, click Advanced options > System Restore.
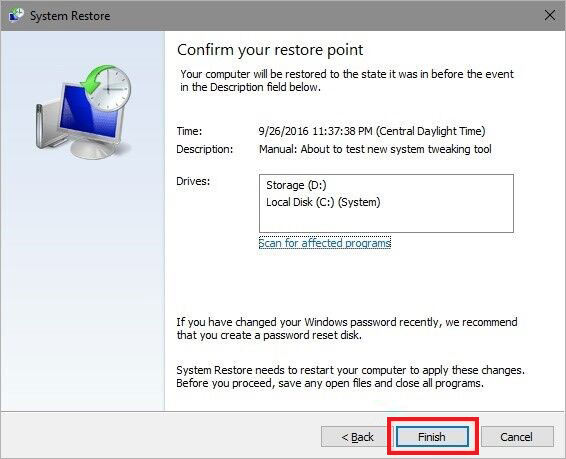
- Click Next to proceed and then choose a restore point.
- Click Scan for affected programs.
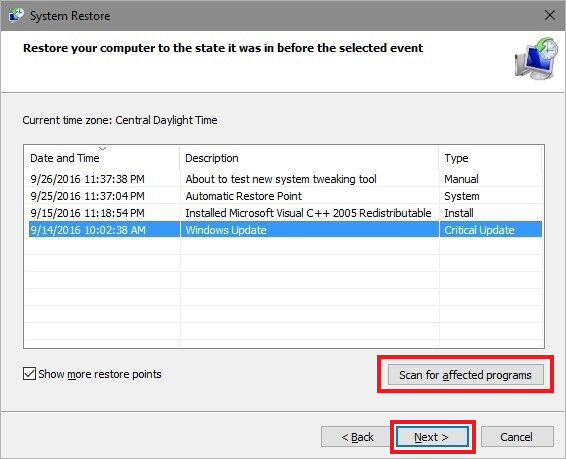
- The utility will check and show you the list of programs affected during the process.
- Once done, click Close and then click Next.
- Finally, click Finish to complete the process.
- When done, reboot your system normally and see if the system boots error-free.
The blue screen of death errors like AMDKMDAG.SYS can occur for several reasons but can be fixed with the methods discussed in this blog. Some users reported that they could even resolve the error by setting the Time Zone in their system. You can also try it and let us know which method worked out for you.
FAQ
What is failed NTFS.SYS error?
Failed NTFS.SYS is a BSOD error caused by a corrupt NT file system, bad sectors on the hard drive, incompatible drivers, non-paged pool memory, malware attack, or even damaged system files. This error may appear with a stop-code System_Service_Exception.
Was this article helpful?