Microsoft ensures enhanced user experience by introducing new features, improved security, and performance with regular security patches and updates/upgrades. However, the installation process is not always as smooth as it may seem.
One common hurdle is 0xC1900101 – 0x20004 error, which reads as:
“0xc1900101 – 0x20004. The installation failed in the SAFE_OS phase with an error during INSTALL_RECOVERY_ENVIRONMENT operation.”
The error usually occurs while installing the latest Windows update or upgrading to a higher Windows version, probably due to an incompatible driver or hardware. You may experience unexpected system freeze, reboots, or even a blue screen of death due to this error.
Whether you’re a home user or a professional facing this error, understanding the causes behind it and fixing it is crucial. This article will share some methods to resolve this error on your Windows computer.
Recover Data with Stellar Data Recovery Professional
The error 0xC1900101 – 0x20004 commonly causes BSoDs and frequent system reboots on your computer. If not fixed timely, it can severely damage your system hardware and cause permanent data loss. Therefore, it’s recommended to first recover your data from the affected system using professional data recovery software, such as Stellar Data Recovery Professional.
This software helps you restore all kinds of data in case of deletion, drive formatting, corruption, etc. The software also lets you create a bootable media using its ‘Create Recovery Drive’ option. You can use this bootable media to boot into an unbootable, crashed or BSoD-affected system and recover your data.
Troubleshooting the 0xC1900101 – 0x20004 Install Error – Some Tips to Begin With
Once you have successfully recovered your data, you must perform some initial checks before you begin troubleshooting the error:
- Visit your system manufacturer’s site and check if any of the latest BIOS/UEFI updates are available to install.
- Disconnect all external drives, including HDDs, SSDs, USB drives, and other peripheral devices.
- Also, check if all your hardware drivers are updated.
Once these checks are completed, follow the methods below to fix the 0xC1900101 0x20004 error.
How to Fix the 0xC1900101 – 0x20004 Install Error?
Method 1: Boot your PC in Safe Mode
As the error occurs during installation and eventually results in a blue screen, it’s advised to try booting your PC in safe mode. In Safe Mode, Windows starts with a minimum set of drivers, files, services, and programs, which may help you narrow down the actual cause of the error. Refer to this guide to boot your PC into Safe Mode.
Method 2: Perform Disk Cleanup
Usually, the update or upgrade installation files are stored in C:// Windows and need enough storage to download the installation files. However, if the drive lacks the storage space, you may get the ‘Windows needs more space’ message and eventually face the 0xC1900101 0x20004 error. Therefore, check the available space on the hard drive and perform a disk cleanup. Follow the given steps to do so:
- Open File Explorer by pressing Windows + E, and go to This PC.
- Right-click on the C: drive and select Properties.
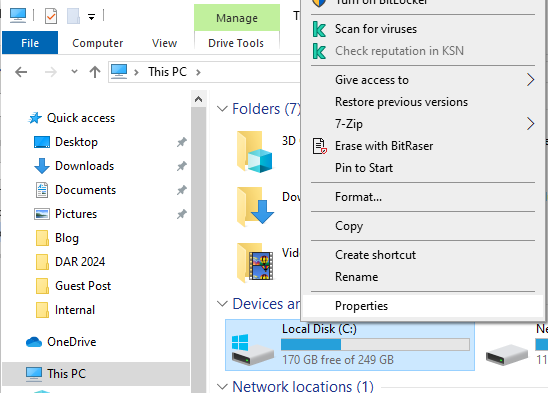
- Check Free Space to check if there’s enough space available for downloading installation files.
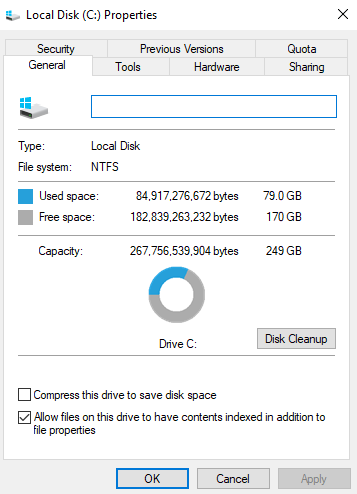
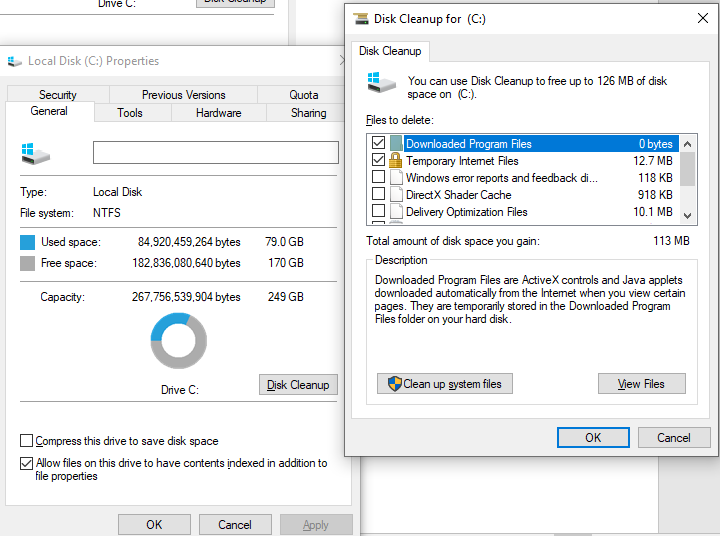
- If there’s not much space available on the drive, select the Disk Cleanup option.
- In the Disk Cleanup dialog box, select the temporary files and other unnecessary files, and click OK.
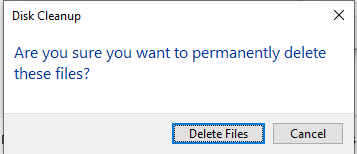
- In the next prompt, click Delete files to confirm permanent file deletion.
- Once done, close the window. Now check the space available and proceed to download the update.
Method 3: Check the Hard Disk for Issues
If the hard drive has bad sectors or is corrupted, you may experience the 0xc1900101 0x20004 error. Try running the CHKDSK command using the Command Prompt utility to check for bad sectors.
Running the CHKDSK command with /f and /r attributes fixes many issues with the hard drive, locates the bad sectors, and recovers the readable information. To run the CHKDSK command, follow the steps given below:
- Open Command Prompt from Windows Search and run it as an administrator.
- Then, type CHKDSK /f /r D: and hit Enter to initiate the scanning.
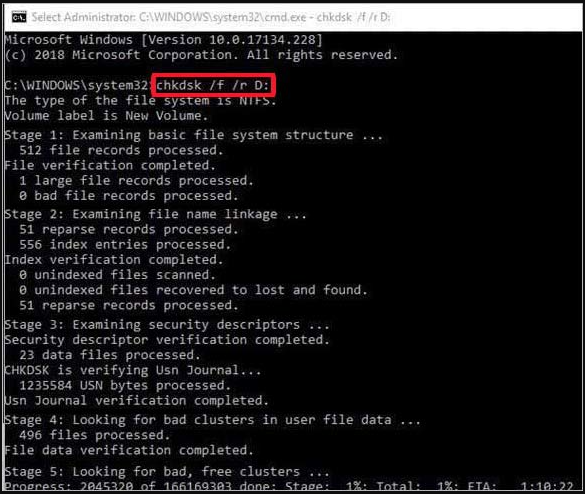
- Let the process complete, and check the scan results. Finally, close the cmd window and reboot your system to see if the issue is resolved.
You can refer to this guide to learn more about CHKDSK and how to scan a hard drive with it.
Method 4: Update or Re-Install Drivers
Outdated drivers on your system may cause issues and result in this installation error. You can try updating or reinstalling the drivers using the following steps and then check if the issue gets fixed.
- Open Start menu by pressing Windows + X and then select Device Manager from the available options.
- Next, go to the Disk Drives category and expand it.
- Right-click on the hard drive and click Update driver.

- On the following prompt, click ‘Select automatically for drivers’ option.
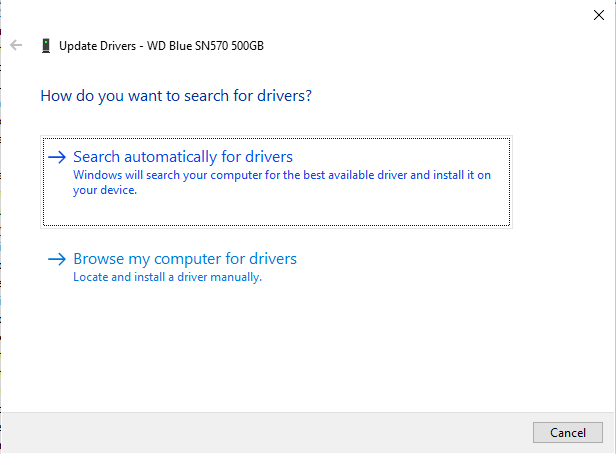
- If Windows finds the latest driver software for your hard drive, download it.
If updating the driver doesn’t help, you can try uninstalling the driver by following Device Manager > Disk Drives > Hard Drive (Name of the drive) > Uninstall Device > Uninstall > Yes. Then freshly reinstall the driver for your hard drive by visiting the official site of the drive manufacturer.
Method 5: Disable the WLAN chip
In some users’ case, disabling network adapters solved the installation error. You can also try disabling the WLAN chip and see if it works for you. Follow the steps mentioned below to do the same:
- Open Device Manager and expand the Network adapters category.
- Right-click on the WAN Miniport (Network Monitor) and click Disable device.
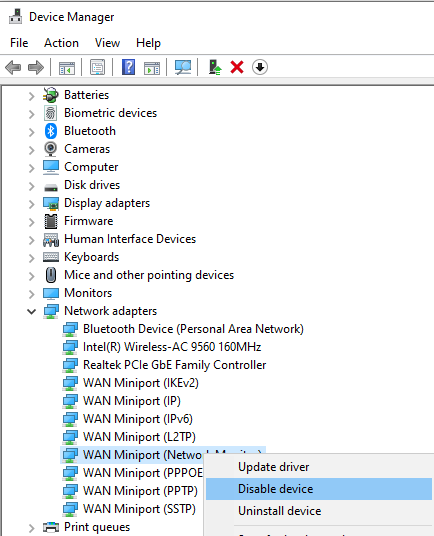
- Click Yes on the following prompt.
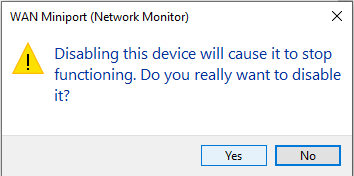
Close the window and reboot your system to see if the problem is resolved.
Method 6: Run SFC Scan
Corrupted, damaged, or missing system files can also cause blue screen errors, such as 0xc1900101 – 0x20004 installation error. You can try running the System File Checker (SFC) scan to find the damaged and corrupted system files and replace them with their correct versions, thus resolving the issue. You can follow the given steps to run the SFC:
- Run Command Prompt as administrator.
- In the elevated window, type sfc/scannow, and hit Enter.
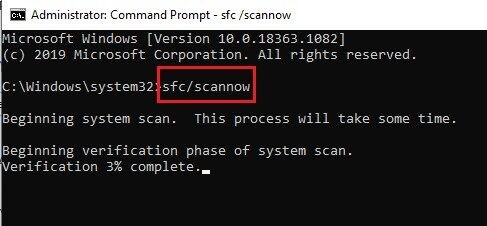
- Let the scan finish. Once done, check for the scan results. Finally, close the window, reboot your system, and see if the issue is sorted.
Learn more: How to Run System File Checker (SFC) in Windows
Method 7. Reset BIOS
If none of the above methods works for you, try resetting BIOS. This step will restore the default settings and solve the error. To do so, follow the steps given below:
- If the system is on, turn it off. Then hold down the Shift key while restarting the system.
- Thereafter, follow Troubleshoot > Advanced Options > UEFI Firmware Settings > Restart.
- While the system restarts, press the BIOS key, usually F2, F10, DEL, or ESC.
- After entering the BIOS/UEFI setup menu, look for the “Load Setup Defaults” or “Load Default Options.”
- Now, confirm the reset and exit the BIOS menu.
- Reboot the system normally and see if the issue is solved.
Wrapping Up
Apart from the discussed methods, some users stated that they successfully downloaded the update after booting into their system using USB installation media (built with the Media Creation tool). Some users with student accounts could install the upgrades after acquiring the key from Microsoft DreamSpark and opting for a clean install, but not formatting the drive partitions.
Moreover, ensure that your system meets the necessary requirements for the installation to make it effortless. In case you lose access to your data due to a blue screen error, or while performing the troubleshooting methods, use professional data recovery software.
Was this article helpful?