Outlook is a popular email client, which is available for both Windows and Mac. In Outlook for Windows, the mailbox data is stored locally in a PST or OST file, depending on your email account (IMAP, MAPI, or POP3). In Outlook or Mac, the mailbox data isn’t stored in one particular file, but rather, each mailbox item is stored separately. So, you can’t directly view OLM file on Mac outlook, and there is no default OLM file location in Mac Outlook either. You can, however, export the mailbox data to OLM manually.
By default, your Outlook mailbox data is stored in the following locations, depending on the Outlook version you are using:
- Outlook 2011 for Mac: /Users/‹username›/Documents/Microsoft User Data/Office 2011 Identities/Main Identity
- Outlook 2016 for Mac: Users/‹username›/Library/Group Containers/UBF8T346G9.Office/Outlook/Outlook 15 Profiles/Main Profile
- Outlook 2019 for Mac: Users/‹username›/Library/Group Containers/UBF8T346G9.Office/Outlook/Outlook 15 Profiles/Main Profile
What to do if Outlook Folder is Hidden?
In Outlook for Mac, the Outlook 15 Profiles folder is hidden by default. You can unhide the Library folder to access the Outlook 15 Profiles folder. Follow these steps:
- Launch Finder and go to Home.
- Select View, and then select Show View Options.
- Check that the Show Library folder is selected and close View Options.
Once you have followed these steps, you can access Outlook 15 Profiles folder. Subsequently, you can access your mailbox files.
How to Open OLM File on Mac
As mentioned above, there is no default or pre-existing Outlook for Mac OLM file location. However, you can create the OLM file manually by following these steps:
- Open Tools and click Export.
- In the Export to Archive File (.olm) window that opens, select the items you want to export to OLM. Then click Continue.
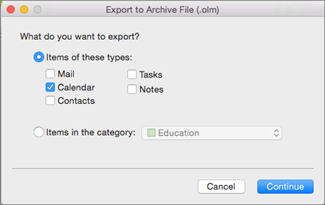 Export to Archive File (.olm) window
- In the Save Archive File (.olm) as window, select the folder where you want to save the OLM file. Then click Save.
Note: Outlook will notify you once the items are exported to OLM.
Once you have created the OLM file, you can open it by using Outlook’s Import wizard. Follow these steps:
For Mac Outlook 2019, 2016
- Launch Outlook, and under Tools tab, click Import.
- In the Import window that opens, select Outlook for Mac archive file (.olm) and then click the Continue button.
- Enter the Outlook for Mac OLM file location and click Import.
For Mac Outlook 2011
- Launch Outlook, and under the File tab, select Import.
- In the Import window that opens, select Outlook Data File (.pst or .olm), and click the right arrow towards the right-bottom.
- Select Outlook for Mac Data File (.olm) and click the right arrow once again.
- Go to the OLM file location and select the file.
Following the steps for the appropriate Outlook for Mac software, you can open OLM file without any issues.
Outlook for Mac offers only OLM file format for exporting the mailbox data. If you want to export the data to other file formats, such as PST, you need to use third-party software, such as Stellar Converter for OLM.
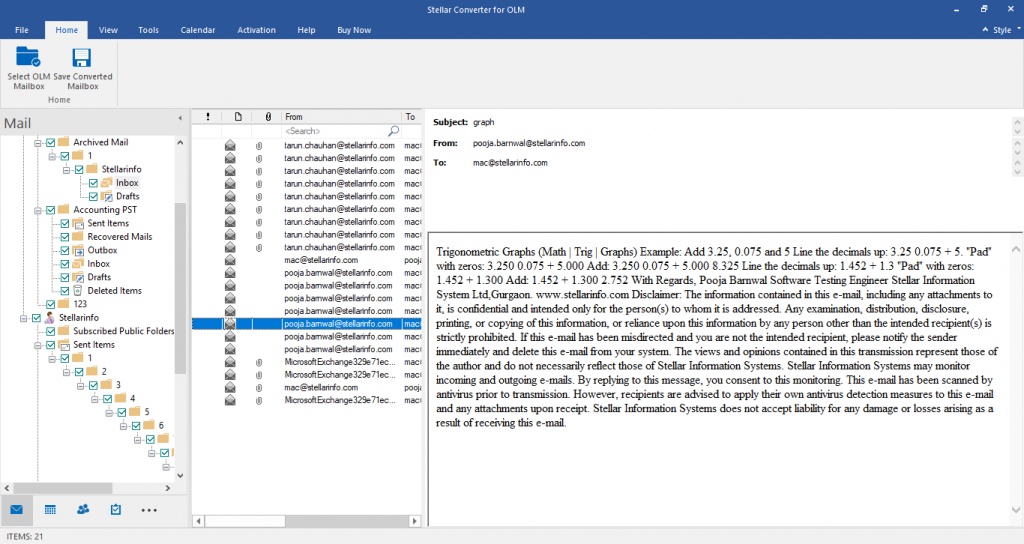 Screenshot of Stellar Converter for OLM
Why Use Stellar Converter for OLM?
Stellar Converter for OLM is an advanced OLM to PST converter utility that can convert OLM file into PST and other popular formats. It can convert all OLM items such as emails, calendars, tasks, and notes to the desired file format. It offers a preview of these items and also maintains folder hierarchy after conversion.
The following are some key features of OLM to PST converter:
- Easy and complete conversion of OLM to PST
- “Find” feature that automatically locates the OLM files in your system
- Preview of converted OLM items for selective conversion
- Multiple file formats for converting OLM- PST, EML, and MSG
- Regular software updates
Stellar Converter for OLM is a highly-recommended software for converting OLM to PST. It’s ideal for professionals who are migrating from Outlook for Mac to Outlook for Windows. You can also use the software to create a backup of Mac Outlook in PST, EML, or MSG. If you want to save OLM data in HTML, PDF, and RTF, you can use the software’s technician edition.
Conclusion
OLM file is commonly used as a backup or archive file in Outlook for Mac. You can use Outlook’s built-in Export function to save your mailbox data in an OLM file. You can also view OLM file on Mac Outlook by using the Import function. In case you want to open OLM file on Windows Outlook, you can use OLM to PST converter utility.
Was this article helpful?