Shared mailboxes are used for centralized mailboxes, which are shared with different people. Like any user mailbox, a shared mailbox also has rules, configuration, and in-place archive. Functionality-wise, there is no difference between a shared mailbox and a user mailbox except that there is no Active Directory user associated with a shared mailbox.
Additionally, a shared mailbox does not have its own username and password. Hence, users cannot log into it and must be granted Send As or Full Access permissions to be able to access it.
Since a shared mailbox stores important data, you as an administrator may need to export the data from the shared mailbox to PST for a variety of reasons.
Reasons to Export Shared Mailboxes to PST
You may need to export shared mailboxes in the Exchange server to PST files for several reasons including the following:
- To export shared mailboxes to PST and delete them from source database to free up space.
- To archive shared mailboxes that are no longer in use and store them as PST backup.
- To extract data in shared mailboxes from offline EDB files and access it with MS Outlook.
- To simplify migration while migrating mailbox, including shared mailbox, to another server or cloud (Office 365 or Microsoft 365).
You can use Outlook, PowerShell cmdlets in EMS or the Exchange Admin Center to export shared mailboxes to PST.
Let us learn about the prerequisites as well as methods to export shared mailboxes to PST.
Prerequisites to Export Shared Mailboxes to PST
Before you begin with the export process, ensure that you fulfil the below mentioned prerequisites:
- Assign the required permissions to the user account
To export shared mailboxes to PST using the Exchange Admin Center (EAC) or via PowerShell cmdlets in the EMS, your user account should have the Mailbox Import/Export role. By default, even the admin does not have this permission. Here are the steps to assign this role to your user account:
- Open and Log in to Exchange Admin Center (EAC).
- Click on Permissions > admin roles.
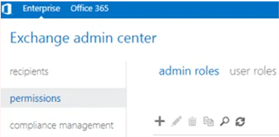
- Click on the add (+) button and create a new role.
- Assign the Mailbox Import/Export role to the new role and add the user account to whom you want to assign this permission.
Alternatively, you can assign the Mailbox Import Export Role to the user using the Exchange Management Shell (EMS). For this, open the PowerShell window and run the below cmdlet:
New-ManagementRoleAssignment –Role “Mailbox Import Export” –User “<Username>”

2. Set up UNC File Path to Save the Exported PST Files
You cannot directly save the exported PST file to a location. Before saving the PST file, you need to create a UNC path or a shared folder location. You need to share this folder with Exchange Trusted Subsystems and set the permissions to Read/Write. For this:
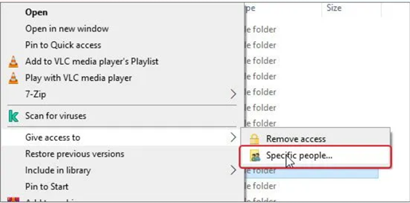
- Create a folder at any location on the Exchange Server.
- Then, right-click on the newly created folder and select Give access to > Specific People (refer image below).
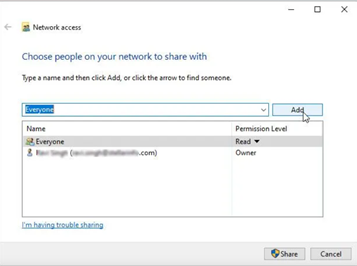
- You can select Everyone (not recommended) or your username (recommended) from the dropdown and click Add.
Please note – It is recommended to give access to a specific username since there could be sensitive personal data in the shared mailboxes and it is not advisable to grant unauthorized access to them.
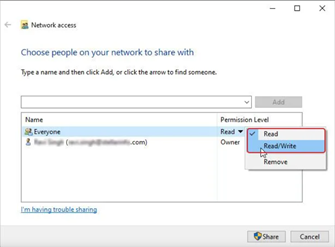
- Select Read/Write permission and click Share.
- Note down the shared network path. For example, \\exsrv2013\d$\pst.
Let us now look at the different methods to export shared mailboxes to PST:
Methods to Export Shared Mailboxes to PST
There are mainly three methods to export a shared mailbox to PST:
- Using Outlook
- Using Exchange Admin Center (EAC)
- Using Exchange Management Shell (EMS)
Method 1: Export Shared Mailboxes to PST using Outlook
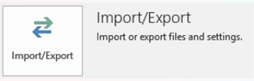
You can use the Import/Export option in Outlook to export shared mailbox to PST. Here are the steps:
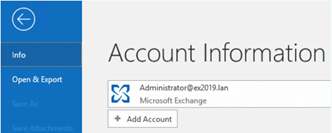
- Open Outlook.
- Click on File.
- Click on Open & Export.
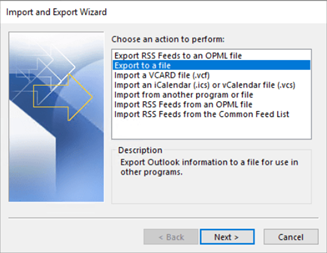
- Click on Export to a file and click Next.
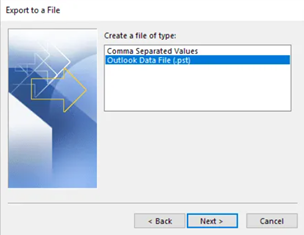
- Click on Outlook Data File (.PST) and click Next.
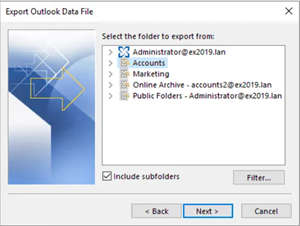
- Select the shared mailbox to export. Make sure to select Include subfolders checkbox (refer image below). This is essential so that all the emails that are even located in subfolders of the shared mailbox are exported to the PST file, thus preserving the complete structure and hierarchy of the folder.
If you wish to filter the export, click on the Filter and make the required modifications, as needed. Once ready, click Next.
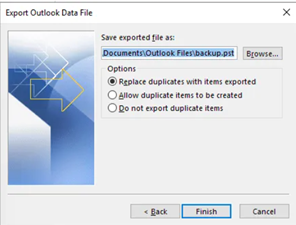
- Enter the filename or location and click Finish to start the export.
- Once done, your file will be available at the UNC path you created.
Method 2: Export Shared Mailboxes using Exchange Admin Center (EAC)
To export shared mailboxes using the EAC, follow the below steps :
- Log in to Exchange Admin Center, click on recipients and then click on shared.
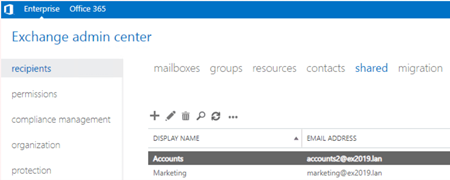
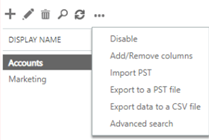
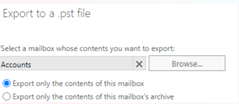
- Here, you will see a list of all the shared mailboxes. Click on the More button and click on the Export to a PST file.
- Now choose the main mailbox or the mailbox’s in-place archive for export. You cannot export both in one job. Click Next.
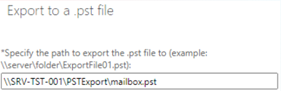
- Specify the path to export the file. You cannot use an absolute path for your PST destination. A UNC path is required, along with the filename. Once done, click Next.
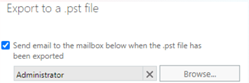
- If you want to receive a notification upon completion of the export process, you can select it here. Once selected, click on Finish. (refer image below)
Once the export is completed, the PST file will be saved in the specified location.
Method 3: Export shared mailboxes to PST using Exchange Management Shell (EMS)
To export shared mailboxes to PST using EMS, you can use the New-MailboxExportRequest PowerShell cmdlet as shown below:
New-MailboxExportRequest -mailbox <shared mailbox name> -filepath “<unc patch>”

To check the progress of the export, use the command Get-MailboxExportRequest.
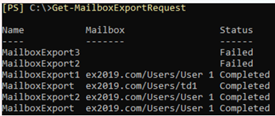
When the Status of the export request is Completed, the shared mailbox will be successfully exported to PST.
Pros and Cons of using the Manual Methods to Export Shared mailboxes to PST
The above mentioned methods will successfully export the shared mailboxes on the Exchange server in the PST format. However, each method has its set of pros and cons. The table given below highlights the limitations as well as the advantages of each method.
| Method | Pros | Cons |
| Outlook | Provides a graphical user interfaceDoes not require any additional permission | Not a recommended method as Outlook may crash if the mailbox is largeYou cannot see the progress of the export process |
| Exchange Admin Center | Provides a graphical user interface | Cannot export primary mailbox and archive mailbox togetherNo means of granular export |
| PowerShell cmdlets | Provides parameters for granular export | Does not display the progress of the export processRequires technical expertise. |
Apart from the points mentioned above, all the methods require the mailbox database to be online. In addition, there is no way to stop the export process once it has stared.
Export Shared Mailboxes to PST using Stellar Converter for EDB
To avoid the limitations of the manual methods, you can use the EDB to PST converter tool, Stellar Converter for EDB. Using it, you can scan and open offline EDB files and extract the shared mailboxes. These mailboxes are then listed on the screen along with other data form the EDB file.
You can select a single or multiple shared folder and export them to a PST file. The progress of the export process is visible on the screen and you can stop the process at any instance. Additionally, you do not require any roles or permissions to export the shared mailboxes to PST.
Conclusion
Shared mailboxes on the exchange server store important information that is shared between the users of an organization. Similar to a user mailbox, you may need to export the data in the shared mailbox to PST for backup or other purposes. This can be done by various manual methods elaborated above; however, it is recommended to use Stellar Converter for EDB. The software can open offline EDB files from any version of Exchange Server without having an Exchange Server installed. You can browse through the content and granularly export to PST and other file formats. It can also be used for migration purposes as it exports directly to a live mailbox database of any Exchange Server version and also to Microsoft 365.
Was this article helpful?