With the release of Exchange Server 2010 SP1, Microsoft has introduced in-place archiving for mailboxes. When the in-place archiving for mailboxes is enabled, it creates a separate archive mailbox for the user to store old emails and email items. This mailbox is stored in the Exchange database. Users can access the data stored in archive mailboxes through Microsoft Outlook and Outlook on the web.
Situations may arise when you need to export the archive mailboxes to PST. These include backing up the archive mailboxes, migrating the archive mailboxes to another platform or environment, and various others. Below, we will discuss how to export archive Exchange mailboxes to PST. But before that, let’s discuss the process to enable in-place archiving in Exchange Server.
How to Enable In-Place Archive in Exchange Server?
You can enable in-place archive for any user mailbox using the steps given below:
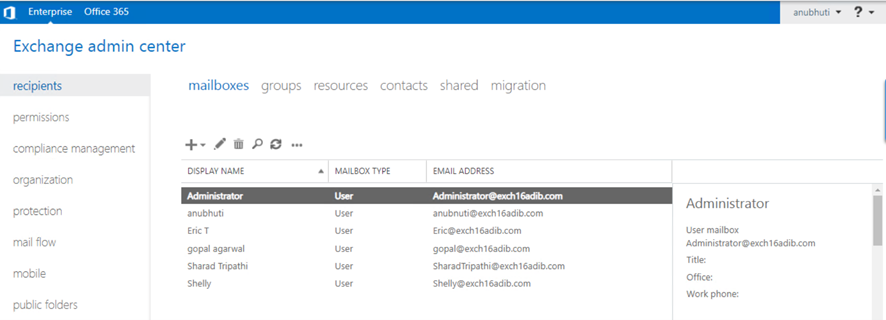
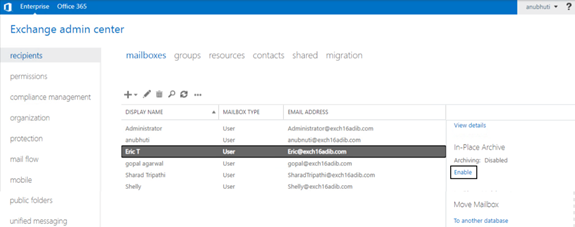
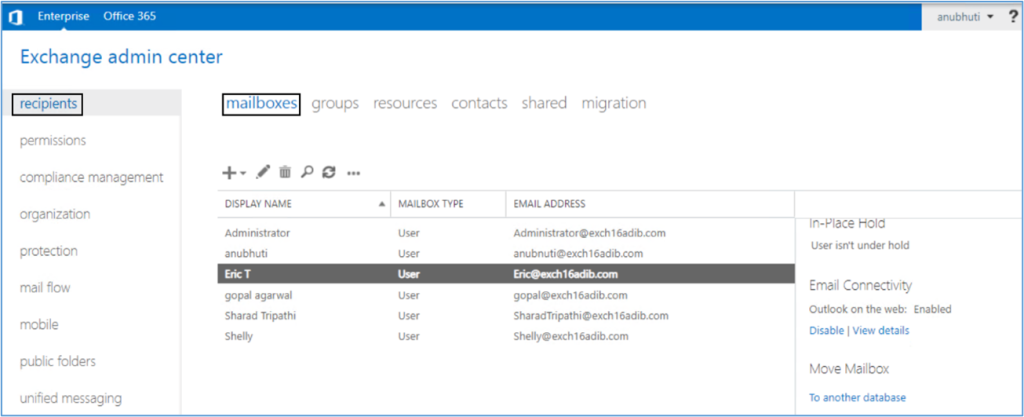
- Open Exchange Admin Center and navigate to Recipients > Mailboxes.
- Select a mailbox. In the details pane, under In-Place Archive, click Enable.
Alternatively, you can enable in-place archive for a mailbox using the PowerShell cmdlet as given below:
Enable-Mailbox “Eric T” -Archive

Common Reasons to Export Exchange Archive Mailboxes to PST
Creating backup is the primary reason to export archive mailboxes to PST. Here are some other reasons why you may need to export these mailboxes to PST:
- For compliance reasons, both the primary and archive mailboxes of a user are considered a part of the user’s mailbox. Therefore, if you export a primary mailbox, you also need to export the archive mailbox.
- Archive mailboxes are stored in the EDB file, along with the primary mailboxes. To free up space in the EDB file, you can export the archive mailboxes to PST and then remove them from the EDB file.
Methods to Export Archive Exchange Mailboxes to PST
We will now discuss the methods that you can use to export archive mailboxes to PST.
Method 1: Export Archive Mailbox to PST using Outlook
You can use the Import/Export feature in Outlook to export the archive mailbox to PST. Here are the steps:
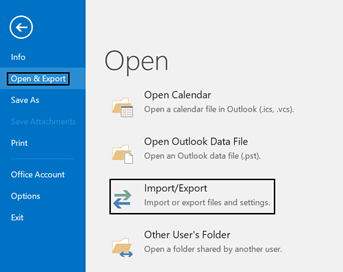
- Launch Outlook and click on File > Open & Export.
- Then, click on Import/Export.
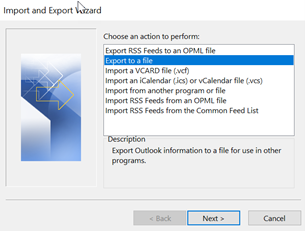
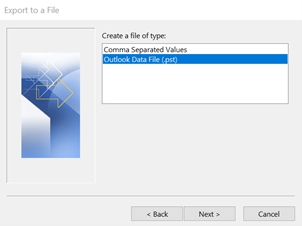
- Click on Export to a file and click Next.
- Click on Outlook Data File (.PST) and click Next.
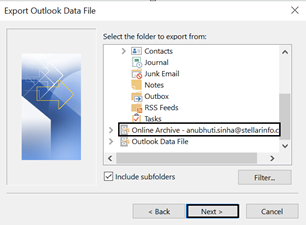
- Select the Archive Online mailbox and click Next.
- Select the location where you want to store the PST file. Then, click on Finish. The export process will start.
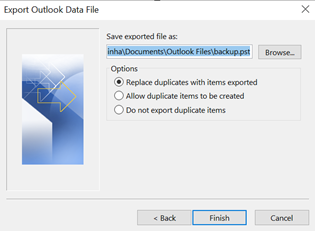
After the export process is complete, you will find the PST file at the selected location.
Method 2: Export Archive Mailboxes to PST using Exchange Admin Centre (EAC)
You can use the Exchange Admin Center (EAC) to export the archive mailboxes to PST.
However, you need to fulfil the following prerequisites before exporting the archive Exchange mailboxes to PST using the EAC.
Assign Permissions to the User Account
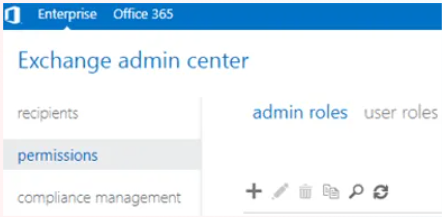
The user account (that you will be using) need to be assigned the Import/Export role. To assign this role, open the Exchange Admin Center (EAC) and click on Permissions and admin roles.
Then, click on the + button to create a new role and assign the import/export role. You can assign it to the user account that you will be using to export the mailboxes.
Alternatively, you can use the PowerShell commands to assign the roles and permissions to the user account. See the following example:
New-ManagementRoleAssignment –Role "Mailbox Import Export" –User "<Username>"

Set up UNC File Path to Save the Exported PST Files
You cannot export the PST file to a drive directly. You need to create a shared location and assign the Read/Write permissions to the user who will access the shared folder. You can use the UNC path of this shared folder as the location for storing the exported PST file. You can create a folder anywhere and get its UNC path (for example C:\PSTExports). Then, share the folder with Exchange Trusted Subsystem and assign the Read/Write permission.

After meeting the prerequisites, follow the below steps to export the archive mailboxes to PST using the EAC:
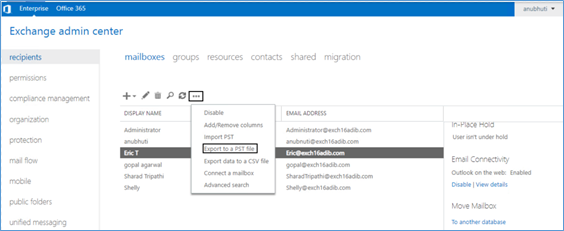
- Open the Exchange Admin Center (EAC) and navigate to recipients > mailboxes.
- Click on the mailbox to export and click on the more (…) options button. Click on Export to a PST file.
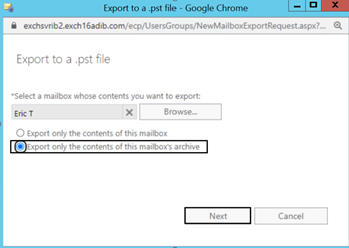
- Select the Export only the contents of this mailbox’s archive option and click Next.
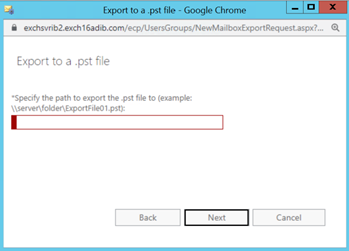
- Enter the location where the PST file will be saved (use the UNC path of the shared folder). Click Next.
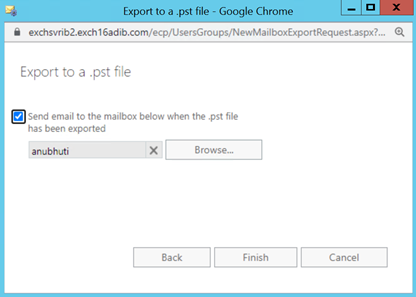
- On the next screen, specify the user account that will be notified once the export process is completed. This is optional. You can uncheck the checkbox if you do not want a notification. Click Finish and the export process will start.
You will be notified when the export is queued and completed or if there are any errors. If you have opted for the email notification, you will get an email at each stage.

Method 3: Export Archive Mailboxes to PST using PowerShell Cmdlets
You can also export archive mailboxes using the PowerShell cmdlets. Similar to the EAC, you need to assign the Import Export role to the user you’ll be using and create a UNC path or shared folder.
To export the archive mailbox, you can use the New-MailboxExportRequest PowerShell cmdlet with the –IsArchive parameter. See the example below:
New-MailboxExportRequest -Mailbox "Administrator" -FilePath "\\Exchange\PSTExport\Archive.pst" -IsArchive

To get the status of export process, you can use the Get-MailboxExportRequest cmdlet.
Once the status of the export request is displayed as Successful, navigate to the shared folder and check if the PST file is created successfully.

Limitations of using the Above Manual Methods
The methods mentioned above have the following drawbacks:
- The export process may stuck or fail if the archive mailbox is large.
- There is also no option to track progress of the export process.
- You will have to export archive mailbox and primary mailbox separately.
- The methods will work only when the database containing the archive mailbox is mounted on the server.
An Easy Way to Export Archive Exchange Mailbox to PST
To avoid the limitations of the manual methods, you can use an EDB to PST converter tool, like Stellar Converter for EDB to export archive mailboxes to PST. This tool can work with online as well as offline EDB files of any size. It scans the EDB file and lists all the mailboxes (including archive mailboxes) and other items on the screen. You can then select the archive mailboxes you want to export and the location where you want to store the exported PST. Additionally, you can use filter options in the tool to export selected mailbox items. You will also see the progress of export process on the tool’s screen. It can also directly migrate large archive mailboxes to Office 365.
Conclusion
Archive mailboxes are created when you enable in-place archiving for mailboxes in Exchange Server. If you want to export archive mailboxes to PST, you can use Outlook, Exchange Admin Center, or PowerShell cmdlets. However, for more detailed search criteria and granularity, consider using an EDB to PST converter tool, like Stellar Converter for EDB to export archived Exchange mailboxes to PST. The tool allows you to open any version of Exchange Server database, browse through the database, select archive mailbox, and export it to PST. You can also export this PST file directly to a live Exchange database or Office 365 tenant.